


(Click on the photo to enlarge it if you want to see more details.)
I'm still battling with Simplicity 3990. I was nearly ready to just toss it all and make a tee shirt or pillow or something else easy, but the OCD in me makes it very hard to just give up or give in.
Yesterday, I found myself with a couple of hours between errands and getting my sons ready for their big dance and I decided to try on my various muslins and take pics hoping either I or the camera would see something that I've been missing. My Aussie friend Belinda often advises me to put a frustrating garment into the "magic wardrobe" (wardrobe = closet in Aussie-speak). Again, this advice was spot-on except this time instead of magic wardrobe it was magic heap-on-the-floor as that's where all those muslins landed.
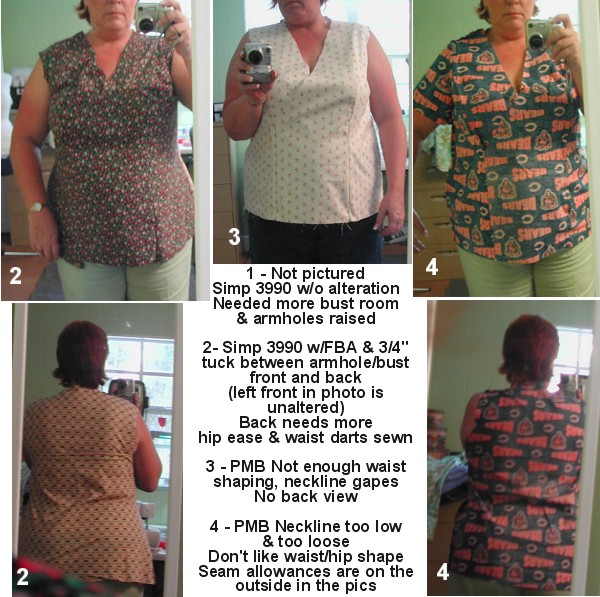
My first muslin isn't pictured as I had ripped it apart when my mom was here. As I mentioned in a previous entry it did show me that I needed more bust room than the D cup pattern piece provided. That led to Muslin 2, above.
My try-ons of Muslin 2 last week were also disappointing and being short on time, I thought I'd go the easy route (hah!) by recreating the style with my pattern software. Muslin 3, above, is the first version of that pattern. Still not happy with the front neckline gape and back neckline shape. Which led to tweaking some things, another print-out/taping session for the next pattern and Muslin 4, above. Meh. Muslin 4 is no real improvement, most likely because I was overthinking at that point and making changes about which I really knew better. Sometimes I'm "too smart" for my own good. Sigh.
Which brings me back to yesterday's photo session. Muslin 2 is clearly more flattering in the waist and generally overall, although I do need a scootch more room in the derriere area. I also need to fold out more from shoulder to bust for the front, and shoulder to waist for the back. In the photo, I've taken a fold across the entire back and on the front side just below the camera (my actual right side -- remember this is a mirror image). That fold at the front makes things close to perfect. The neckline isn't gaping as it is on the other side. The bust point is correct and where the princess seaming hits is good. Why didn't I see this last week??
Muslin 3 (from my software) is boxy and the neckline is gaping and too low. Muslin 4 (software) is better than 3 but I'm still not loving how the neckline hits on me or how low it seems. Muslin 4 is pictured with seam allowances outside so it looks bigger than it actually is.
On deck for today during football games: Start with Muslin 2, transfer the fold out from shoulder to bust/waist onto the pattern, add more width across the back hips, and cut out the flippin' final fabric. Oh, and make a note that the shoulder-to-waist tuck is something I probably need to do for most patterns, especially Women's (Plus) patterns.
This all illustrates one reason I still buy patterns even though I'm pretty good with my pattern software. There are often stylistic and shaping subtleties that can easily be lost in the translation (or impatience!) from pattern line drawing to pattern software. Commercial patterns, where a designer has already done all the hard work, really are a bargain at any price. And when they're on sale, they're priceless.
Pattern software is great, don't get me wrong. I use it a LOT! But if I had to choose between knowing my pattern software and knowing how to alter patterns to fit me, I'd choose the latter every time. Thankfully, I'm lucky and don't have to choose because many times they work hand in hand and almost every time I use one or the other, I learn something new. So while this multi-muslin meandering was frustrating, it was also educational. Once I put all this behind me and am wearing my new blouse, I'll appreciate the learning experience even more. For now, I just want to get this blasted thing done. ;-)
Thanks for sharing your muslins - I like seeing how others have to alter their patterns (it certainly helps me learn better fitting).
ReplyDeleteBy the way, your sons looked very handsome - hope they both had a great time last night.
I need to do what you and Belinda do; i.e., draft a similar pattern in PMB. Between the purchased pattern and PMB there will be the right fit. Thanks for sharing the process as always I find it very helpful!
ReplyDeleteDebbie, how do you print the patterns from PMB? Is it in multiple sheets that you then tape together?
ReplyDeleteKelly,
ReplyDeleteYes. You can print to whatever size paper your printer will handle and then tape those together. Sometimes I use letter-size paper, mostly I use roll paper with perfs between the sheets.