Showing posts with label Ottobre. Show all posts

Monday, October 9, 2023

Boring Basic

I know many sewists don't like sewing basics, but, truthfully, making basics is one reason I'm back in the sewing room. No, basics are not exciting blog content. But they sure are workhorses in my closet. I have a RTW plain(ish) black top that I've never loved even though I wear it a lot to the office because most of my office wardrobe is pretty much a take on basic and/or black these days due to a relaxed dress code and opting for comfort over "fashion." It's been way past time that I make a plain black top I actually like.

So, I present my 6 zillionth TNT Ottobre tee (view 4 with the gathered front). This pattern is now 16+ years old and still going strong, both on my cutting table and in my closet. I have more than a few I still wear from when I started making them 16 years ago. (Gotta love indestructible polyester haha!) And if I haven't sewn a knit top directly from one of the multiple views of this pattern, I've used it to fit most any other tee I've sewn.  
(In the pic above, the arrow is pointing to fabric I'm planning to use next for a skirt. It will be another boring project, but I imagine I'll get a lot of wear out of that too.)

This is what this particular 02/2007 Ottobre Woman issue looks like. It's actually still available, only in Dutch, on the Ottobre website here. I'm pretty sure I'd still wear most everything in this issue. I really should revisit it now that I've re-stocked my tracing paper.
I went "old school" with this top and used a neckline band instead of a binding.
And as usual, I coverstitched the bottom and sleeve hems. Which leads to …
… this little doo-dad. I've seen these hem guides a few places on the interwebs lately, and being the notions collector fiend that I am, it was soon in my Amazon cart and on its way to my sewing room. Yes, a stack of Post-Its still works just as well, but this looks cooler. :-) 
The package comes with two guides, which can interlock or not, and a little clear ruler grid if you want to set the guide up at a measured distance from your needle, which is probably more useful on a sewing machine and not a coverstitch machine. The guides have a removeable, and renewable, stickiness on the back to attach harmlessly to your machine bed. Here's the Amazon link so you can check it out (which is an affiliate link so I might make a fraction of a fraction of a penny if you happen to buy one from the link).
As you can also see in my hemming pic, I've finally found a good use for the sewing clips I bought a while back. I mostly press and coverstitch hems by eye but I usually use a few pins to hold things in place. Except some of the pins inevitably fall out as I'm going around the hem. These clips are a perfect replacement. Old habits die hard so I find the clips are still not as quick to use as pins in most of the rest of my sewing and they had pretty much been collecting dust. I'm glad to put them to use at last.

Wednesday, January 31, 2018

The New Dress


Above, my latest finished garment, and I L.O.V.E. it!

Backstory: I have a RTW dress almost exactly like it. I like the RTW dress a lot too and have been wanting to clone it. It's really just a simple knit shift dress with an "open" vee neck with ties. This is the RTW below. I meant to take a pic of it on either me or Zillie, but I forgot. If I think about it later, I'll add such a pic to this post.

I decided I could pretty easily re-create the RTW dress with my TNT Ottobre tee pattern. (I have been using that TNT for ELEVEN years now, it's originally from the 02/2007 issue!) The RTW has sewn bust darts. My TNT does not – it has extra length at the bust area which is eased into the side seam at bust level. I prefer the non-dart version.

Below, is my visual comparison between the RTW dress and my tee pattern, and how I started to assess what was going to be needed in a pattern.


This pic is when I got more serious and took measurements, noting similarities, differences, and necessary landmarks. I'm being "thrifty" (lazy) and using some pattern tissue from patterns I'll never sew as my tracing paper. The red arrows show my lines for the new dress.The rest of the lines are from whatever was originally on the tissue.


I drafted a facing for the front neckline. It's probably really hard to tell what's going on with the lines from the original pattern on the tissue. The pic below is the facing overlaid on the front pattern piece.


Here it is by itself where you can hopefully see the overall shape of the pattern piece, ignoring the printed lines. The only "line" that matters here is where it I drew in "FOLD." Right above FOLD is where the vee shaping is, which is not cut on the fold. Clear?


This is what the actual facing looks like using the pattern piece above. It's interfaced and the bottom edge is serged. The vee is sewn (right sides together) and then turned right side out. The shoulders and armholes are basted together and sewn as one when attaching the sleeves and back. The neck opening where you see the binding is also basted together before the binding is attached. The binding is applied to the raw edge(s) of the neck opening. Easier to do than describe.


The RTW dress has back waist darts, which produce some nice subtle shaping. I measured the end and middle points and the uptake of the existing darts. I transferred those landmarks as big dots to the pattern tissue. The janky looking dart outline is just to give me a visual clue for what those dots mean. In case I put this pattern away for 5 years. Or a week. :-)


Here are the sewn darts. As you can see, there's not a lot of uptake, but enough to lessen the "sack effect" while still camouflaging the back rolls. Hah.


The sleeve is nothing special. Ignore those lines all over from the original pattern. I already had a long sleeve created for my TNT Ottobre. I just traced it for this one so I could keep all the pieces together. Sometimes I'm actually not lazy. It's just a straight sleeve to be elasticated at the wrist, so it doesn't need much shaping.


The elastic cuff.


Below is the RTW neckline. The binding is all one piece, attached in one go, leaving lengths past the neck opening which become ties.


My copy.


I'm still kind of in shock at how perfectly the binding/tie went on my copy. I truly expected to need at least 2-3 tries. I luuuurrvvve my CS machine and binders! And Lady Luck.


Much of the success lies with the fabric used for the binding. It's a Telio doubleknit which has nice body and drape at the same time. I bought this to make a navy Jalie cardi, which is next up on the cutting table, but it turned out to be perfect for this binding/tie too.


Here's the neckline/tie open. I made the point of my vee a little higher than the RTW dress so it's not All Cleavage All The Time with it open.


This is the reverse side of the binding.


It's hard to tell because it blends in so well, but the coverstitch looper was threaded with navy woolly nylon. Since the underside was going to show on the tie sections of the binding, I was hoping the woolly nylon would look more substantial and intentional than plain thread. It does. Yay. The random dog hair, on the other hand, not so much.


And on Zillie. I finished the dress Sunday, hemmed it Monday night after work, and wore it Tuesday (yesterday). I am so happy with it. Most of its success is the fabric, but a lot is the effortlessness of a well-fitting knit sheath. I already bought more of this fabric. It's from Cali Fabrics but going quickly. As of today, there are only 6 yards left. Cali Fabrics is quickly becoming my new favorite fabric store. Great quality, lovely customer service and attention to detail, good prices, and fast shipping to Florida from California! I only wish they'd show more pics of their fabrics so I can get a better feel for drape and scale. (I have never been compensated in any way to say that. I'm just an actual customer spending my own actual money.)


One more pic, in front of Alex's shocking orange truck. Which kind of goes with the dress, no?


Parting shot: Snow, here in Tampa a couple of weeks ago. OK, actually frost. But I still had to scrape my car windshield before work. This is not how it's supposed to work here in Florida.


Thursday, July 6, 2017

Found!

I found both my sewjo and that big stack of missing patterns. Life is good.

Here's me today, back in the work bathroom for selfies, sporting the new 2-piece dress (aka skirt and top). And boy do I need a haircut!


But first, the missing patterns.


I have no explanation for not looking in this little chest/box which I walk past at least ten times a day, except that I must have just mentally ruled it out, thinking I already checked it. So glad I decided to double-check my assumption. It was like Christmas and my birthday all in one! And good to know that I haven't quite lost my mind. Yet.

Last post, I talked about mashing up my TNT Ottobre tee with the Love Notions Laundry Day Tee, the main reason being that I felt the overall upper bodice shape of the LDT was not the shape I knew I prefer for my tees. I did keep the LDT neckline and neckband piece, and swing shaping at the hemline, and I'm happy with those. The vee neckline shape is very nice and the band went on without a gape or pucker. I'll definitely use this neckline shape again. (Side note: Does anyone remember the Jalie 2005 tee and how that neckline stormed the online sewing world?)


I probably should've planned the seam on the band better relative to the print, but overall it's just not that noticeable from a regular distance, especially given the focus-pulling wild print. Or it's laziness. Or both. You be the judge.


Here's the top before any hems were sewn. Even after we all know the CF of the band isn't symmetrical, are you really noticing that? Yeah, I didn't think so. :-)


For the skirt, I used one of the long-lost-but-now-found patterns. I liked the flippy-ness/trumpet shape of all the lengths when I originally bought it, and still did once the pattern re-surfaced. The length I sewed is between Views D and E. I can see me using this pattern a LOT since it's only 2 pattern pieces and 3 seams and takes less than a yard of fabric for even my generous posterior.


So-so pattern matching at the sideseams. It's not an exact pattern to match so good enough is good enough, and about all that can be expected.


A quick hanger shot of the skirt. I decided to place the horizontal stripes section at the top of the skirt so they would be "hidden" under the top when worn. I thought it would be too much of a good thing to see one more row of those stripes. The eyes wouldn't know where to rest. I'm happy with that decision.


The whole outfit on Zillie.


I'll be back soon because I have another finished project to share, and I'm expecting a fun sewing blogger meet-up tomorrow. Stay tuned!


Monday, June 19, 2017

Laundry Day Tee. Or Not.

Yes, I'm actually posting twice in the same month. I'll wait while you get off the floor.

So apparently one of the best ways to kickstart a missing sewjo is to write a blog post about how little desire you have to sew. And in a similar vein, when in that same blogpost you lament about not liking any fabric choices you've seen lately … well, you know where that's going. Yep. A few yards may have jumped into my shopping cart during Fabricmart's latest Pyramid sale. And then possibly a few more a week later during the Knits sale.

That's all good news. But I am not without hiccups and speed bumps in this story.

Let's begin.

First, last year I had bought a crap-ton of patterns during one of the BMV all-brands sales. My order arrived. I ooohed. I ahhed. I made plans. I bought fabric. I dreamed. I put the patterns … well, that's just it. I have NO IDEA where I put those patterns (or a few others) and I've been looking for them on/off for MONTHS. My house is not big. I'm fairly organized. I cannot solve this mystery. I give up. I've decided I'll repurchase some of them during the next BMV all-brand sale. (And then I'll find the missing stack.)

So I moved on for the time being. While I may not have been sewing myself these past months, I still have been reading sewing blogs and websites and checking into Facebook sewing/pattern groups regularly. I've seen more than a few Love Notions Laundry Day Tees made up and modeled, with lots of raving about the pattern. Being the lemming that I am, or maybe because it was free when you join the LN Facebook group, I downloaded the PDF and printed it last week, with plans to use some of the newly acquired Fabricmart yardage.

Yesterday, I got the pattern out to tape the sheets together, which I did. I know it's free and all, but I wasn't extremely impressed, starting with the fact the PDF is supposed to be "trimless." This means you don't need to slice off unprinted page margins to accurately join the pages into one cohesive layout. I found I still needed to trim. Not a big deal. I'm used to it. I'm not ready to blame Love Notions on this yet because I haven't double-checked my printer settings (and I'm not sure I will spend time to do so), but do be warned in case it's a legit problem.

What really bugged me was the pattern itself. See below.


First, the front and back aren't separate pieces. If you're away from your printer when you realize this and can't print a quick duplicate, it means you have to trace or tape the jigsaw puzzle back together. It also means you're going to be ticked off. I absolutely do not see the point in this (the print layout, not the being ticked off). Well, OK, there is a slight point if you're printing to a commercial print house's large format printer and paying by the sheet, but even then, give us the option of more sheets with the other half of the damn pattern so we can decide for ourselves which pages to print.

Next, it should be obvious that if the front and back pieces are identical,  except for necklines, there's a good chance it won't fit a curvy body. Pretty sure my front and back aren't anywhere close to identical. I won't even talk about the sleeve being cut on the fold. Guess it's a good thing after all that I didn't do all that "extra" printing. ;-) I'm not truly knocking this pattern because (1) I haven't actually sewn it and (2) it does get lots of love and I have seen some very nice finished tees. But I did conclude it wasn't for me and the symmetrical drafting makes me hesitant to try a paid-for LN pattern.

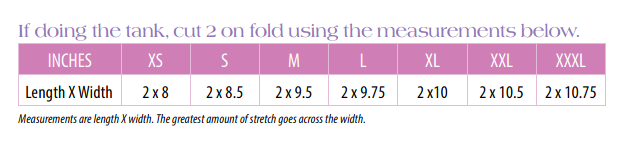
Side note on the LDT - Does anyone understand what the heck is meant by this? It totally does not make sense.
I decided what I was really after was the overall trapeze shape of the LDT and looked for my Cashmerette Concord pattern to just do that simple hack. Apparently my paper version of the Concord is with the other missing patterns mentioned above. Grrr, that MIA list just keeps getting longer. But I knew I also had a PDF version (from testing) that was already trimmed and ready to tape, and I was able to locate that one. Except … I was missing at least 6 of the pages. Six pages that would fall right across the bodice. I have no idea how that happened. Apparently, I'm getting old and senile. Missing patterns. Missing pattern pages. Missing brain.


Instead of giving up, I reached for my so very trusty TNT, the Ottobre Woman tee from the 02/2007 issue (cover below) and added the flare and length of the LDT.


And then I cut it out of this, with enough left for a matching skirt cuz I love me some 2-piece dresses. Yes, I know it's only a skirt and a top. I just like saying 2-piece dress. It sounds fancier. Humor me. :-)


And then I was done "sewing" for the day.

I've made a deal with myself to spend at least 15 minutes a weekday on this until it's done. I think I'll stick with it because I'm excited about the print placement for this one and want to see it finished. If I had started with the Ottobre, I'd be done by now. I hope I learned that lesson.

Saturday, November 9, 2013

Simplicity 2187 Finished: Verdict is Yes and No


The dress is finished and I like it, so that gets a Yes. I also cut and finished a black Ottobre tee with 3/4 sleeves and I like it too, so another Yes. The problem is, I don't think I really like them together. Hence the No in the blog title.

The dress really needs something underneath due to the low neckline and low-cut armholes. I'm just not sure yet if black is the right color here.I was originally thinking black tee underneath with black tights but now I'm second-guessing that. My first choice would be a tee the same shade of teal as in the dress print, but the odds of finding that in either fabric or RTW are about zero. So maybe white? But I really don't want to make a white tee right now since I have other things on my list. Maybe I've got something shoved in a drawer that I've forgotten about. I think I'll have a look after dinner. (Are you sufficiently bored with my internal monologue yet?)

So, let's move on to some close-ups ...

Murphy's Law is that the tee turned out perfectly without really trying. Some of my best binding in a while. I did interface the binding strip before feeding it through the binder on my CS machine since the black fabric is a thinnish rayon knit which I know from experience needs a little help with extra body for the binding.


The sash is great and holds its shape, since I did my fusible interfacing jigsaw puzzle shown last post. Love. LOVE the pockets. The pocket edges got some Design Plus fusible lightweight bias strips in the facing seam. (I was obviously on a fusible interfacing bender during this construction.)


The shoulder gathers. If there's a next time for this pattern (and there very well may be since it's a nice pattern and goes together quickly, and only uses 2 yds), I will move those more to the center, but as-is, they'll do for a first make.


Rear view. The back bodice blouses over the sash, which looks nice in real life but kinda skimpy here in this pic.


Inside view. Fold-over facings for the crossover. Which I fused in place with Steam-a-Seam Lite (see bender comment above) to discourage floppage.


No real need to serge/finish the edges since it's a knit, but I just think it looks better.


The back neckline is finished with purchased wide bias binding, per the pattern. The pattern also instructs to finish the sleeve/armhole openings the same way but (1) I was short on binding and (2) a simple turn under and coverstitch was more than adequate. And easier. ;-)


The tee. Black photographs so horribly, so forgive the pixelation. As you can see, I stuck on a trim I found while searching out the bias tape. It was the perfect length for the front neckline. I didn't trim the length at all. Hopefully, it will wash OK.


See what I mean about the binding? Perfection, and on the first pass with no testing. I should've known I wouldn't like the tee with the dress just from that.


In other sewing news ...

Two weekends ago, I made my friend her Halloween costume. Easy sewing, so I didn't mind. Plus she paid me. :-) She went as "Sexy Pebbles" ... with her Bam-Bam, of course. Fun!