Showing posts with label reviews. Show all posts

Sunday, October 1, 2023

Chalk and Notch Fringe Dress - Finished

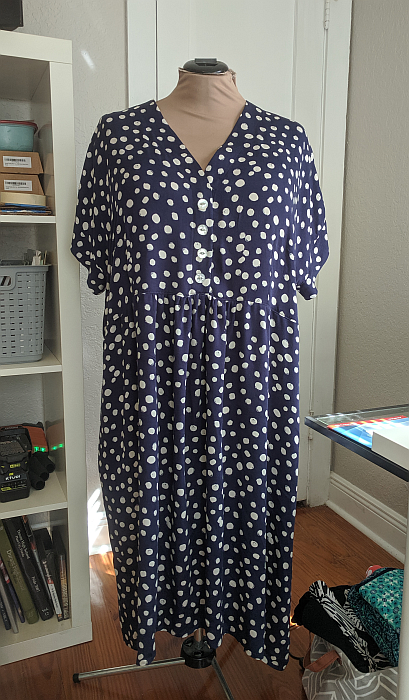
My Fringe Dress is done, and overall I like it. I'm still not loving the fabric though. The print/color is good. But the fabric quality is just OK. It's very drapey and comfortable, though I expect it to wear out quickly.
The dress sat in Time Out for a week because the bottom edge just seemed so uneven and I didn't want to deal with trying to even it out. (I had eliminated the curved up sides of the pattern and just squared off the hem but that wasn't a factor.)
Here's another view. It looks like the sides of the dress are hanging much lower than the front/back.
Well, today I had the brilliant idea to finally try on the darn dress. And, guess what? The bottom edge hangs MUCH straighter on my actual body and not Zillie's. The dolman sleeves without arms in them made the sides of the dress hang lower. It's obvious NOW, but when I was looking it on Zillie, all I could see was the floppy unevenness, hence the Time Out. 
I decided that any residual unevenness is not obvious when I'm wearing it, so I just hemmed it, added buttons, and called it Done. (Do you see my Cyrus—aka Velcro—behind me?)

Here's the back view. (I really need to fix Zillie's tilt.)
The inseam pockets.
And the sleeve "cuffs" that are the View B sleeves bands, which aren't really cuffed and there are no tabs. I didn't want to fiddle with those.
I also didn't want to fiddle with buttonholes. The dress fits over my head fine so I just sewed the buttons on, by machine, through all the layers. 
Before I get into my very few quibbles, I'll say the pattern goes together very well, I like it, and I'm sure I'll make it again. Now here we go on the quibbles …

The PDF prints in landscape orientation and I found that kind of awkward. It's not a deal breaker and I know I'm being nit-picky, but I do wish at least the instructions were portrait oriented. It's just what feels "normal" to me. I kept reading the left side of the page top to the bottom and then the right side, like columns and not rows, and the instructions are oriented in rows not columns, so I was reading out of numerical order and had to keep self-correcting.

I found it completely ridiculous that there are about 20 pages devoted to patterns for interfacing. (Outlined in yellow below.)
And even if you deselect those sizes in the layers tab of Acrobat, the interfacing pages still print with the page outlines and number watermarks. Yes, I could have checked and done a custom page selection before clicking Print but since I print at the office, I tend to just print everything because I blend between sizes and I want to be sure I don't miss something. Even with the "key" telling you what to print for certain sizes, it's difficult to know which pages are actual pattern pieces and which are interfacing pieces. If you're using your own printing supplies, you may want to check what pages you can eliminate from printing. Twenty extra is a lot.

After all that, I didn't even use the interfacing patterns, preferring instead to block fuse my interfacing to my fabric and cut out the facing pieces that way. The instructions have you fuse the interfacing to the garment wrong side instead of to the facings, although fusing to the facings is an "option" mentioned. Fusing to the garment side of things is way too fiddley for me, especially with this floppy rayon challis. (See here if I didn't explain well.) I'll also mention that the interfacing pattern pieces do not include seam allowances, which can be good in theory but extra fiddley to place accurately. Also, you shouldn't be using interfacing on this dress that is thick/firm enough to be a problem in the seam allowances so I think eliminating the seam allowances from the interfacing pieces is not really necessary here. Plus, I *like* the interfacing to go to the edge of my facings, especially on fabric that ravels when you just look at it sideways. And I don't turn under the edges of my facings - I just overlock/serge those suckers, at least for non-fancy stuff like this. So I guess what I'm saying is the instructions are fancier than I sew. Haha.

But the instructions overall are good. Not too verbose and well-illustrated with diagrams/drawings. If you prefer photo instructions or want more fitting help, there's also very good extra information on C&N's sew along pages, here.

Like I said above, I do want to make this again and I like the pattern. Any negatives I've detailed above are not show stoppers and are easily remedied or overlooked. I also hope to get a decent pic of me in this one, but who knows when that will happen. 

Question(s) of the Day: Do any of you watch sewing channels on You Tube? Who are your favorites? I have a few but I'm always looking for new ones. I miss the sewing shows from PBS. Sandra and Nancy and Shirley were gems, weren't they?

Wednesday, February 20, 2019

Thoughts on Blank Slate Rose Tee


I like knit top patterns that are more than a basic tee, such as Jalie 2806, HotPatterns Sunshine Top, my beloved Ottobre tees, etc., and which have a bit of design "fullness" in front to cover my own "fullness." Enter the Blank Slate Rose. I bought/downloaded this pattern about 8 months ago and it's been in my queue for a while. Finally, its turn came.


The pattern calls for a woven fabric to be used where you see a print in the pattern photo, and the designer and most others I've seen who've made it (#bsprosetshirt) have used solids for the rest. If you know anything about me, you know I'm a prints and knits girl. Give me All the Print Knits!


I had some Liverpool scraps left from my Slouchy Cardi which I used to "opposite" color block. I did interface, (with a non-stretch fusible) the pieces which called for woven to be used, mostly because the b/w print is a *very* drapey, silky knit and it definitely needed some stability when used around the neckline. There are front and back facings on the inside which I also interfaced, but with a knit fusible on those, for a bit more "oomph." I did not interface the solid black pieces at all.


I'm very happy with how the neckline turned out, even though I generally hate facings in knits. The shape, width, and depth are perfect for me. Next time, I will definitely just bind the back neckline or turn and coverstitch, but a facing on the front in this design is actually needed for stability, and to cover all the piecing so the insides are pretty too.


The pattern went together well but it's not for an abundance of accurate markings. Look at the notches above ... they aren't even close to being correct. Sigh. I suppose it's a good thing these notches weren't even mentioned in the instructions, right? :-) Speaking of which, the instructions are  illustrated with mostly photos, which is OK, but the instructions for attaching the facings are just plain a bad method and will give you a lump at the shoulder seams if you follow them. My advice is to sew the facing shoulder seams together/press and the bodice shoulder seams together/press, and then join the facing to bodice at the neckline, RS together, stitch, and turn. In other words, the usual way. :-)

As usual, I laid my TNT Ottobre tee over the pattern pieces and compared. Below is the back. Can you see how straight up/down this original pattern is below my TNT? I'm not that shape, so I reshaped the armholes and waist/hip curves. I did the same for the front, which was also straight up/down.


Below is the pattern sleeve behind my Ottobre sleeve. Yikes. Good thing I was already planning to use my Ottobre sleeve.


I've been wanting to add a flounce to a short-sleeve knit top for a while and finally I did. Watch out, because I love it and I'm going to add flounces to all of my short sleeves. Maybe kidding.


Seriously, how fun is this?


I dug out my 1/4" downturn feller for my coverstitch machine …


… ran the flounces through it before they were attached to anything …


… and Voila! Perfect hems on a curve. Now I'm really adding flounces everywhere. :-)


I'm very happy with my top and will definitely make it again because there are a lot of color/print blocking possibilities with the neckline, and all of those pieces were accurate and sewed together well. But if I'm being honest, I don't think this top would have fit me as I prefer below the neckline without sewing a muslin and tweaking if I hadn't substituted my TNT shaping. I'm just curvier than it is (was).

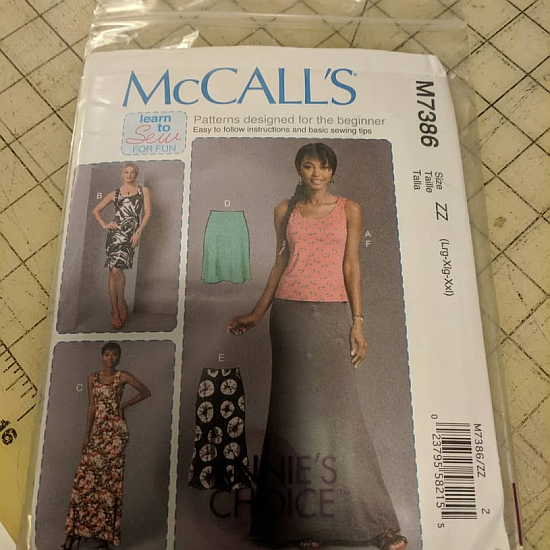
After finishing the top, I had some scraps of the print left. Too big to toss, but maybe too small to be anything. Well, with some creative cutting and thanking my stars that the fabric is 4-way stretch, I was able to eek out a McCall's 7386 skirt. I love this skirt. I must have at least 8 of them in my closet now. I love the slightly flippy, slightly pencil, slightly A-line shape all in one skirt. It's perfect for the office. I'm sure I'll keep making it for years.


The finished 2-piece dress on Zillie …


… and on me with those awesome work bathroom selfies.


Oh, and remember I said I had to creatively cut the skirt pieces? Well, I also had to piece a section, which turned out to be the CB hem area, which hardly shows now. I'll never point it out off this blog.


Friday, November 30, 2018

HP Nexus T-Shirt Dress


Happy End of November! And, yep, it's been a while. Again. I've sewn a number of things over the last few months and have at least one more blog post in the wings with photos loaded and waiting, so hopefully I'll get that published soon too.

Today, however, I'm going backwards and starting with what I made most recently. As in, last weekend. The photos are kind of meh and as usual include some from the work bathroom but … hey … that's me. So, let's get started. Spoiler alert — I'm not thrilled with this pattern.

The pattern is the HotPatterns Nexus T-Shirt Dress, pattern shown below. I bought the downloadable PDF version.

Pros for HP PDFs — no trimming. You just butt the edges and tape.

Cons - No layers, so in places you end up with a million indiscernible lines overlapping in place. And the pieces are not laid out with printer limitations in mind, so near the edges there is usually something missing. Mostly,  you can work around this. Sometimes, it's highly irritating. Also, for this particular dress, the front and back pieces are split into two sections that are to be taped together. Except, there is only one addition piece to be added to two base pieces. So you either have to print the addition pages again or trace the one you have. That itself isn't a huge problem but there's no mention of there being only one add-on piece instead of the two needed anywhere in the instructions so you could be caught out and feel a need to swear. Or is that just me? (That's the piece below.)


My photo above is after reworking the dress. This photo below is an in-progress shot before I reworked it. The main thing I want to point out is how twisted everything is. Is any of this twisting reflected in the line drawings above? Hint: No, it's not.


Below are what the pattern pieces look like. There is a center front seam and the ties are single-layer so the wrong side of them will show.


In the original design, the ties are supposed to overlap, kind of like a wrap dress, with one crossing your chest inside and being pulled tight and anchored into the side seam and then the "outside" tie connects to a "connector" tie sewn into the opposite side seam. But because the main ties originate from the center front, nothing lays nicely and it's a lumpy, droopy mess.


To salvage what was going to be a wadder, I removed the "connector" tie sewn from the side seam and then brought both real ties to the outside at the center front and tied them there. The whole dress lays so much better and the lower "skirt" isn't sticking between my legs.


The only thing I need to go back and fix is to sew the CF seam below the knot a little higher. You can see my black slip when I move the ties out of the way. The ties mostly cover the "hole," until the wind blows and they don't, so this is a fix I'll be making this weekend while I still have black thread in the machine.


Before I realized how much I hated the original design, I tried facing the tie, but it ended up way too thick so I removed it. (That's my Love Notions Forte hanging in the background below, which is the next blog post up.)


This is a really bad, small pic of the final tie with the facing removed and zigzagged 3/8" hem. I'm pretty sure you can't really see anything.


We had a cold snap here in Tampa this week, so this is how I really wore it, with a black RTW cardi and acid green tights.


While I like a lot of HotPatterns' designs and they were one of the pioneers in modern Indie patterns and deserve a high-five for still bringing it, I'm finding myself wishing they'd take on some of the features I've come to rely on from newer Indies. Such as photos of finished garments on a variety of bodies (heck, even ONE photo on a body instead of all drawings would be wonderful), great PDFs, and better instructions. I don't need hand-holding for assembly in the least, but I don't want to be scratching my head because something doesn't make sense or is wrong or is just plain missing. So by "better," I mean accurate. Speaking of missing, more notches and marks would also not be unwelcome. And finally, the elephant in the room is the completely bogus size chart and measurements. At first glance, it looks like there are a lot of useful measurements. Except if you use them to pick a size, you'll end up with a garment 4 sizes too big. And while I'm wishing, I'd also really like some finished garment measurements.I know if these things were offered, there'd be tons more customers for them, and I have a real interest in seeing HotPatterns stick around since I really do like nearly all of their designs.


Monday, April 25, 2016

Cashmerette Concord Tee - The Reveal and Review

I'm done. Tee shirts used to take me a 2-3 hours. Now, it seems, they take weeks. Hmmm. :-)

It's not the pattern that's the problem here. The Cashmerette Concord pattern is really great. I just started to dislike the fabric and had to force myself to keep at it. Now that it's done, I like it again. I just hated sewing with it. It's a thin rayon/lycra knit and it wanted to wiggle all over the place. At some point early on, once I declared this a "wearable muslin," I pretty much just gave up on stripe matching. If it happened, yay. If not, I wasn't going to care. I see a few spots in the pics that could be better but I still just don't care. This is a casual tee. No one in real life will even notice. It's fine. I just point out these things for other sewists, to keep it real. In actual life, nope.


So, as you can see, I used 3 different fabrics for the tee. Had I known how much I hated sewing with this fabric, it would be a b/w-only striped tee. :-) But I soldiered on, and here's a crappy cellphone-pointed-at-the-mirror pic.


And another cell pic from during the process when I was gauging the neckline width. (Did you notice the cool-geeky dinosaur necklace?) If you remember, I had some concerns last post about the open-ness of the neckline since I'm a bit narrow-shouldered. To compensate, I cut a 14 for the neck/shoulders. This is 2 sizes smaller than my size per the instructions (using my full bust measurement). It worked well. In the photo below, the neckband isn't attached and my bra straps are only just visible. Meaning, with the neckband, I'd have full coverage. Jenny (from Cashmerette) confirmed the neckline is "pretty open." My conclusion, it's a nice width but definitely go narrower if you have narrow shoulders. Or, cut a wider neckband. :-)


Close-up of neckband, sewn on with the sewing machine, and then coverstitched. I used the pattern piece for the neckband and I was a little concerned that it was going to take a ton of stretching to get it to fit the neck opening. It did but it also worked absolutely fine for this fabric. Still, I think I'm going to add a wee bit of length for poly knits such as ITYs. I have a really good feel for neckbands at this point in my sewing so it's one of those "I'll know it when I see feel it" kind of things. :-)


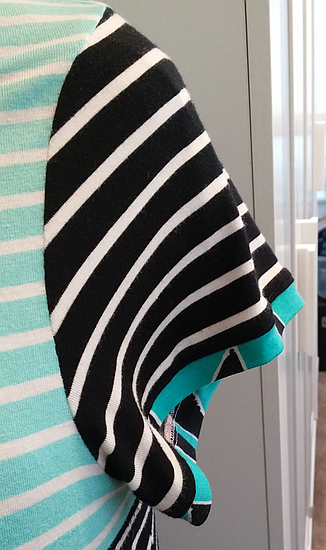
I also added the contrast band to the sleeve hems. (I like things in odd numbers, especially threes.) Although I cut the shortest sleeves in the pattern with a hem allowance (I didn't know I was going to use bands), I trimmed it off before attaching the bands. I like the finished length of the sleeves. The width is also good for me. I don't have skinny biceps but they aren't particularly meaty in proportion to the rest of me.


I color blocked the back as well as the front. I whacked at the pattern visually (meaning without measurements) so the back yoke length has no relation to the front. I was more interested in pleasing proportions viewing head on vs. how the two met around my armpit. The back yoke joining seam is one of those places where things could be more even. But it's my back. I just don't care.


I started with the shortest length and then proceeded to add 2 inches to it. And, yes, you guessed it …it's about 2 inches too long. I know it technically looks OK but 2 inches up is better on me. Since this is rayon, I'm going to see if a trip or two through the laundry takes care of things. This thin rayon does tend to like to keep shrinking a bit.


So, what I haven't specifically mentioned yet but I think is obvious from the photos is how well this tee fits me and the girls. The pattern is divided into C/D, E/F, and G/H cup sizes. I used the E/F as instructed because it was closer to my waist measurement. Yes, I said waist. It's an hourglass v. apple kind of thing, I'm guessing. I think the neckline options are nice. My only criticism on the necklines is the finish for the vee. It's more of a "scrubs" neckband, which I think is eh. I'm sure it's aimed at beginners, but I don't necessarily agree with "dumbing down" a tee pattern. But if I had been an actual tester as I initially agreed, maybe I could've changed some minds. We'll never know. :-) As for differing sleeve and hem lengths, these aren't really aimed at me since I can easily make those adjustments. For those who like to have it all in the package, it's good to have so no complaint there.

You may be thinking it's difficult to get excited about a tee pattern which costs $14/$18, but if you're a curvy lady who hasn't found tee nirvana in any other pattern, I say go for it. It will pay off in the long run. If you've been reading my blog for a while, you know that I love my Ottobre TNT. Well, that Ottobre magazine was probably in the $12-$15 range and I've made SO MANY variations on that tee that the cost of the magazine isn't even a factor anymore. (Yes, I know there are multiple patterns in the magazine but I didn't sew them.)

Don't tell my Ottobre bestie, but I think this Concord even fits me a little better. I like it enough that I'm subbing it into the bodice for the Kwik Sew dress pattern I showed last post.

Monday, December 8, 2014

Pattern Testing and Review: Muse Natalie


This is the pattern I mentioned I was testing, the latest offering from Muse, aka what is becoming my new favorite indie pattern company. Not because I received two patterns for "free" (quotes because testing isn't really free to me, or any tester, when you account for time, materials, etc. but I know that and volunteered with eyes wide open) but because I really like what I've seen and sewn from Muse so far. And I did buy the Jenna cardigan pattern with my own money so it's not all fluff and unicorns here. :-)

This dress is Natalie. Side note ... although I've heard/read grumblings around the interwebs about the practice among indies of naming patterns instead of or in addition to numbering them, I actually prefer the names. I can NEVER remember a pattern number (especially if they've been reissued), but I always remember the names. So names over numbers gets a thumbs-up from me and my forgetful brain every time. (You can also read about the inspiration for the Muse pattern names when you click over to the Muse site.)


This pattern testing cycle was pretty much like the last testing I did for Muse. I was given a preview of the pattern to see if I would be interested, along with a schedule of when to have my testing finished. No photos were required but I caught a nice day on a weekend after finishing the dress so I've had these waiting for this post. At first, I wasn't sure about this design for me and volunteered to only review the instructions, PDF print-out, cutting layout, and pattern pieces. But then, being the fickle sewist I am, I decided to just go for it, figuring nothing ventured, nothing gained. And I'm glad I did. I like the final dress a lot.


It's definitely a very feminine dress and my curves probably make it a little more so, but, hey, I've got curves. I have worn it to the office and while the vee is low, it's not work-inappropriate low. I also wore a black cardi over the dress in the office. Because office air conditioning.


The dress falls like an empire waist but wrong side out on Zillie below you can see that it's not really an empire at all. There's a triangle inset, gathering at bust and CF (optional at CF), and diagonal seaming down the front. The neckline is finished with a mitered attached band and was sized perfectly to fit the neck opening and lay flat on the body underneath. The back is cut on fold. Truthfully, I kind of wish there was some cool seaming at the back too and I contemplated adding at least a CB seam when sewing this, but laziness over pattern matching won over. And this print is cool/busy enough so any more seaming would've been lost anyway.


I cut a straight 44 with no adjustments except to square the shoulders (my usual) while cutting out the pattern.


It fits perfectly, no FBA needed due to the gathers and diagonal seams. For a next make of the dress, I will add 1-1/2" to the length because while the pattern is drafted for a 5'10" woman (yes!), it would have been shorter than my preference on my 5'5" self if I had hemmed it more than a smidge. So I cut a shaped hem facing instead. I could have just turned up a 3/8" hem but I prefer a deep hem on drapey knits so they have some weight. The sleeves, on the other hand, were much too long for me. I cut off about 2" and still hemmed them with a 1-1/2" turn-up. But that's to be expected if the fit model is 5'10", no? Better too long than too short anyway. The dress was cut out and sewn in one day. It's a fast project.

While testing, I noted some corrections and slight improvements to the pattern markings and cutting layout and I think every one of them was incorporated into the final. I thought the pre-release instructions were fine as-is, with no corrections needed, although other testers must have had suggestions since the release notes mention those changes being included too. This tells me that again Kat, the designer behind Muse, listened to her testers and adjusted her pattern and release schedule to make necessary changes. As a tester, it's gratifying to know that the testing does matter and we're not here for just a happy shiny blog tour to sell patterns.

I'll state it again, I was NOT asked to post this review or any photos. What I'm writing and showing here is by my own choice. I like the pattern and my final dress. If you like it too and want to buy it, that's your choice. I get nothing if you do, or if you don't.

Now if you do decide you're interested, the full sale price, less transaction fees, of all Natalie patterns sold during the first week of launch (December 8-14, 2014) will be donated to the Wellington branch of the Cats Protection League and you can get 15% off the Natalie pattern during launch week with the code NATALIE. A win for the kitties and a win for you.

I have a few projects running through my mind that I want to tackle soon so this will be it for me and pattern testing for a while. Stay tuned for my overly ambitious to-do list. ;-) I hope the sewjo holds up.