Showing posts with label pattern software. Show all posts

Friday, May 23, 2008

Another "Vintage" Blouse


When I was cutting out the brown Butterick skirt, I also cut out another Ottobre-based "vintage" blouse, this time with short, non-gathered sleeves. I sewed it first because the serger was already threaded with ivory thread. But once again, I'm stalled at the buttons and need to make a trip to Joann's for those before I can finish it.

The fabric is really soft rayon with a woven-in micro stripe. It wrinkles as soon as you breathe on it, so I'm not sure how practical this will be for schlepping to/from work. I'll try some spray starch on it when I'm done and see if that helps.

For this one, I detoured from the Ottobre instructions and sewed the collar down at the back neckline "in the ditch" instead of …


…covering it with a bias strip per the instructions, which I did for the first blouse below. Oh, and these colors are actually pretty accurate for once.


I've started sewing the brown skirt and will finish that up by tomorrow since it should go together pretty quickly. A quick look at the instructions has told me I'll be winging this one since Butterick's order and methods leave a lot to be desired.

That's all I have for now. My days have been filled with sending out resumes and fielding telephone calls, around the sewing. No plans for the holiday weekend, except sleeping in and maybe a trip to the dog beach on Sunday.

Saturday, May 17, 2008

Blouse Progress

I love the collar of this blouse so I'm glad I decided to morph the Ottobre pieces with my PMB pieces and not just toss the whole Ottobre pattern. Of course since the blouse isn't done yet, it still needs a good pressing and the collar will look better than it does in this photo, but the shape is very nice on me. If I do say so myself. ;-) Collars give me fits in PMB. I never know what settings to use to get what I want without experimenting.


The fabric has been in my stash for a loooooong time. I really thought it was polyester. My first clue that it wasn't was that this fabric holds a crease like no one's business. Polyester doesn't do that. A burn test confirmed that it's not synthetic at all (no hard, melted, plastic-y remains). I believe it's rayon or mostly rayon, which could mean trouble in the future because I didn't pre-wash it thinking it was poly. But I have steamed and pressed the heck out of it along the way and everything is still lining up without any obvious shrinkage, so I'll keep my fingers crossed and the blouse out of the dryer.

Anyway … the fabric is very drapey. And the sleeves have gathered caps. Um, not by design, but I didn't test the Ottobre sleeve very well with my PMB armscye and it ended up with more cap length than I could gracefully ease. And hey, gathered sleeves are in so why not?

But then I tried it on and the sleeve caps immediately drooped. Rats! So I put on my Mother of Invention cap and fashioned (read: completely made up) a sleeve head out of some horsehair canvas I have in the interfacing stash. It does the trick perfectly, providing soft support so it doesn't look like I've got a Working Girl leftover or linebacker shoulders. Hopefully it will launder OK. (Note to self: test this before throwing blouse in washer.)


The blouse is done except for the bottom hem and buttons, but at least this time I already have buttons. They do really match the blouse but were uncooperative for photo/color matching today.


Here's a shot of the blouse with the skirt. Again, colors are off. The lighter color in the paisleys matches the skirt perfectly, although the skirt color isn't really this color either.


It's a very fitted blouse and does evoke the feminine look I was hoping for when I picked the original Ottobre pattern to begin with. I think it will be a great classic shape so I'll be keeping this morphed pattern. And one of these days I'll re-pad Zillie to match my curves, so my clothes don't hang like sacks on her in my photos.

Friday, May 16, 2008

Wadder


I worked on fitting this Ottobre blouse yesterday and finally threw in the towel. Usually Ottobre patterns are drafted beautifully, but something is seriously wrong with this pattern. I wrote up a review for it on PR, here, as warning to others, and the details are in that review. But in a nutshell the problems are (1) darts are in the wrong place for larger sizes and (2) the division between front and back pieces is completely unbalanced.

Now that I'm looking again at the line drawing for the pattern pieces, I can see the problem with the front/back division, but the bust and front waist darts as printed on the pattern sheet are in reality positioned nothing like shown here. Instead, they are essentially in the armpit and do not even come close to the bust.


I tried to fix the Ottobre pattern. Three times. The Ottobre blouse is a very simple design and it should not take a lot of work to make it fit. Once I stepped away, it was obvious that it would be faster to just print a pattern from PMB and morph the collar and sleeve details I liked from the Ottobre design. So, that's what I did. And it was faster. A lot faster. And a much better fit.

Here's the progress so far. I've sewn the bust and shoulder darts and shoulder seams, and then I basted the sideseams to try it on. What a difference between this and my Ottobre muslin. What a lot of wasted time yesterday.

Sunday, July 15, 2007

One More Lavender Tee


This is #3 from the Diana Mode inspired tee pattern I created with my pattern software. It's also the second solid lavender top I've made this week. I don't know why I was stuck on lavendar. It's not even one of my usual colors. But it was calling to me from the stash so I listened.

I wanted to experiment with this one and so I made up a frilly neckband to add some interest up near my face (and away from the fluff!). The front and back neckbands are usually made from two layers each. For the front neckband on this one, I channel-stitched 4 concentric rows (more or less) on the two layers and then I added a third unstitched layer for the back. If you've ever done the chenille technique, it's just like that. I also satin-stitched a vertical line down the middle just because. ;-)


I slashed through the center of the rows, through the first layer only. When I was done, it looked like this:


Then I continued with the rest of the construction as usual and tossed it into the washer and dryer when I was done. I got the effect I was hoping for — curly frills.


I left the back neckband with no frills.


Here's a close-up of the sleeve, for which I again used the original Diana Mode pattern pieces.


So now I'm done with all the patterns I cut out last weekend. I still have one more skirt to make to go with this latest tee but I'm still working on the pattern alterations since I'm short on fabric for my first choice of pattern. I have to say that I've really liked having multiple garments cut out at once so that I get a mini-marathon of just sewing.

Tuesday, June 19, 2007

Tee Time


I finished this tee tonight. As you can see, I went with plain sleeves. That was mostly because of laziness. ;-) These are just faster to sew.

I'm on a roll because every tee I've made in the last couple of weeks has become my new favorite. It's so nice to have a choice of new tees/outfits to wear for summer. It also means that it's time to start weeding old stuff out of the closet and drawers.

I tried a little raw edge "embellishment" for this one. I rough cut 3 of the brown outline flower motifs from the fabric scraps and then zigzagged around the outline, stretching a little for a curly effect, and then trimmed the excess. I attached them together with a circle satin stitch pictogram on my machine. For now, the flower is just safety-pinned to the top to see (a) how much I really like it and (b) how it will do through the laundry. If I decide to keep it, I'll attach it more permanently with a few handstitches.


I also reshaped the neckband just a little. I made it a little wider so it would be more open on my upper chest. The new pattern piece is on top in the pic below.


Speaking of new outfits (which I was earlier if you scroll up), I've decided once and for all that I'll never be able to do a SWAP. I buy fabric for and sew outfits, not wardrobes. I love seeing the SWAPs and storyboards everyone else puts together during contests and just good planning, but I'm much too fickle to be tied to one color scheme with everything coordinating. The brown I've been sewing lately is about as close as I get. I do tend to pick the same color families but I still don't really have a true mix and match wardrobe. Just lots of outfits in greens, turquoises, and now corals and browns.

Tomorrow (or is that later today?), I'll work on altering the pattern and cutting out the fabric for the capris that are next up … so I can finish this new outfit. ;-)

Monday, June 11, 2007

Tomorrow's Dog Walking Outfit


Well, I don't have anywhere else to go so why not? ;-) And, yes, I was being goofy in the middle pose. As Angie pointed out yesterday, it's a bit weird taking photos of oneself in the mirror while juggling camera, dodging dogs playing tug-o-war with fabric scraps they steal from my trashcan, and trying to stay in the shot (OK, those are my distractions not Angie's) and yet still come up with something I'm willing to park on the internet for the entire world to see. Not that I think the entire world is reading this, but you know what I mean.

Here's a close-up of the sleeve. The top of the sleeve is gathered a lot more than the bottom. It makes a nice shape, I think. I like the narrow hem band too. I'll definitely be using this sleeve again.


I'm still really digging these skirts. Our summer heat and humidity are finally here for the duration and a Florida girl needs all the updrafts she can get. ;-)

Oh, and to Claire … Yes, I agree about the turquoise but I didn't have anything this exact shade. That was part of my analysis paralysis, and I finally decided to just go with the brown.

Still Needing To Be Hemmed


It's mostly done and I think it's going to be a keeper. But I need to get over the "maternity" feeling. It's not the top so much as the belly underneath the top. ;-) I still need to hem it (the top, not the belly). When I've got the hem done (after dinner?), I'll take a pic of me in it.

I got sidetracked from hemming by fussing with Zillie. I've never been happy with the tummy and hip padding on her so in a fit of frustration on a whim, I took it all off. But the result of that was even worse since my hips haven't been that skinny since I was 8. Or maybe 11. So then I added some padding back. And then I had to adjust the waist/bust depth, which is another thing that's not been quite right for a while. But that still wasn't right. More fiddling. Zillie turned upside down. Loosening, tightening, pulling, pushing. Chasing Dani the Thief as she raced off dragging a mouthful of batting/padding behind her. All of that and Zillie isn't really any better than when I started, just different now. Sigh. I'd really like a true body double but (a) I don't know if I really want to see it and (b) I'd have to grin and bear DH doing the wrapping. But boy, if I had a true body double, I know I'd be a Draping Queen.

Back to the top. There's some things that could be better in a second version that most likely will never get made. I think I'd like the band under the bust to be a little higher. It's higher on me than on Zillie, but not where I thought it would land. The neckline probably could be a little lower. Although at least where it is now it doesn't gape or reveal too much. I like the sleeves though. They are loose enough that they aren't squeezing the flubby arms and shorter than my usual short sleeves so maybe I can get some new tan lines during the daily dog walks. ;-)

In Progress


This is just loosely pinned on the dressform and so the fit proportions are a little off — especially the underbust band which is sitting at waist level here on Zillie. I'm ambivalent about it at this point because I've had to fiddle with things more than I like, but I think I'm going to end up with a wearable top.

I hope to get into the sewing room tomorrow to finish it. I still have to sew the lower back, the sleeves, and the sideseams. Then I'll decide on the final length.

Sunday, June 10, 2007

Ready To Sew


It seems like I'm having another lazy Sunday. I have all these plans for projects I want to do and then I just can't get my butt into the sewing room. Some initial analysis paralysis set in after taping the pattern together, but I did finally manage to make some decisions on the top and it's cut out and ready to sew. I'm going to work on it for the next few hours.

I decided to forego the muslin stage and the good fabric is cut. It's not like I don't have a plethora (I love that word) of replacements waiting in the stash closet if this one doesn't turn out as I'm imagining. I'll be disappointed, but I'll get over it. I also stole a sleeve from Simplicity 3837 (View B, puffy sleeve).

While I'm sewing, DH will be doing some dog training. Dani really needs to have "Come" more firmly embedded into her cute puppy head. She likes to wander and is easily distracted by squirrels (and Chili). A fenced-in area is looming in our future.

Now, off to the sewing room before I get distracted!

Friday, June 8, 2007

The Pattern

I fiddled around with my software today and came up with this pattern. It's printing as I type.


Speaking of printing …

This is the print screen from Pattern Editor (which is the same screen as all of the Wild Ginger programs). Each grid section represents one letter-sized page. The yellow sections are those I have marked to actually print. Those that aren't yellow will not be printed. I won't waste paper that way. But if you prefer to print the entire grid (in order to assemble all columns/rows and not piece them together as I'll be doing), you can do that too.


OK, back to my pattern. I decided to go with the crossover. I'm still undecided on the final length which is why you see 3 different hem marks. I'll cut long and then decide. I'm also undecided about testing it first. My gut is telling me to test instead of cutting the good fabric, so I think I'm now leaning that way. Maybe instead of an unwearable muslin test, I'll look in the stash for something that I'd wear if it turns out but won't cry over if it doesn't.

PD&SD

The skirt is done and here it is on Zillie's lumpy hips. (My hips are lumpy too, just not in this particular way.)


The "PD&SD" in today's title refers to a Personal Drafting & Sewing Day. I don't have any outings planned, except for the usual dog walk around midday. So today I've declared that I will draft and start sewing a top to wear with this newest skirt.

I was fooling around with the fabric and some skirt scraps last night, like this:


In my mind, I was going for something Duro-esque. I want the contrast neck and underbust bands. I do not want a kimono sleeve, but I do want a short sleeve of some sort. I looked through my pattern collection to see what I could come up with, but of course, out of 3,784 (estimate) patterns, I didn't find The One. After looking at the online catalogs, I came up with this one, New Look 6677, Views D and E.


But then I started thinking that maybe something more like, New Look 6515, Views A and B (this one I do own) or Butterick 5031 with a crossover would be more flattering than doubled band right down the center of the mountains.


Instead of fiddling with a tissue pattern, I'm going to morph one of my TNT computer patterns into these basic shapes. Most of the work I've already done when creating other patterns.

What you see below are the pieces I'll be working with. Those in red are from a previous TNT top. The others are from the stenciled brown tee I made the other day.


I'll rotate the bust dart to underbust gathers and then I'll need to decide if I'm keeping the crossover or going full Duro. Either way, I'll morph the stencilled tee neck band onto the front of the bodice and I'll create an underbust band that goes around to the back too. I don't think I'll do a muslin of this pattern since most of the elements will already be TNT. I may kick myself later for that. Oh, and I'll need to figure out what I want for a sleeve. But first, I really should get into the shower and out of my PJs. ;-)

Sunday, June 3, 2007

Done With Diana 23-31


I see now that it's hanging crooked on Zillie but the top is done, and I like it. I hemmed it on the long-ish side because the fabric is a rayon knit that will likely shrink some more in the laundry. If not, I'll have to re-hem it later. Like that will happen.

Here's the back neckline:


I'll take pics with me wearing it and write a review soon. I just looked and I haven't "officially" reviewed a pattern since March. I didn't realize it had been that long.

Next I'm going to give Jalie 2681 a try.

Late Night Ramblings

We got back from our trip to the dog park and I was all set to hide away in the sewing room for a couple of hours to work on my top. Until I realized I was completely out of brown thread. How did that happen? So no sewing until a trip to Joann's to restock.

I figured I might as well take a quick thread inventory before leaving to make the gas expenditure worth the trip. (That's my excuse and I'm stickin' with it!) I restocked a few shades of brown thread and some other colors, and even found some mini cones of Gutermann upholstery thread for future topstitching. (Using this thread is Belinda's great hint, BTW.)

Then, because the store was relatively quiet and I didn't have a time limit, I decided to wander around to look at the sections I usually never even go near. At the back of my mind was looking through the stencils and paint to see what I could come up with without spending another $30. Stenciling some fabric has been at the back of my mind ever since Belinda showed me this tee shirt she stenciled a couple of Aussie summers ago. And then Beth brought the stenciling bug to the front of my brain with her recent hat and dress projects.

Is it only me, or does anyone else remember when stenciling was more popular and those little bottles of acrylic paint were front and center? At "my" Joann's, the stencils and paints are now at the very far, far, far corner of the store. I really had to hunt to find them. The collection of stencils is pitiful and it looks like they're about to be cleared out completely as nearly every one was marked way down with a clearance sticker. Good for me today, though, as I was able to find a few stencils that would work, a couple of cheapie stenciling sponge brushes/daubers, and paint — all for under $8. (I'm also wondering what I ever did with the stencils/brushes I used to have. Did I toss them, or are they still hidden in an unpacked box somewhere? Hmmm.)

Here's some of what I bought:


And here's the top in progress:


I've stenciled the front and back neckbands in a haphazard, random "pattern." I don't think I'll do the sleeve bands because I really don't need extra attention at my flabby biceps. But I reserve the right to change my mind tomorrow. The paint is metallic brown with fabric medium mixed in. It's not nearly so shiny as shows in this photo, but the flash reflected and made the paint stand out really bright.

Because I had to first play, test the stencil on scraps and then wait for the final stenciling to dry, I haven't made a whole lot of progress. 
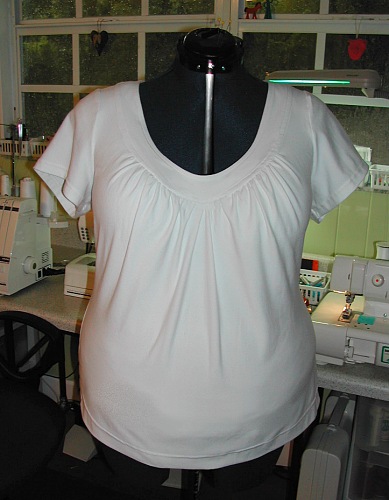
(Yeah, tell us something new Debbie!) This is just the front piece pinned to Zillie. I have to thread up the serger in brown thread to neaten up the inside before I move on but I was too lazy to do that tonight so I stopped and headed for the computer. But so far I'm loving the top with a vee instead of scoop neck. I like how the gathers are radiating in a flattering-to-me shape and they really add some nice bust shaping. Too bad you can't see this top in 3D. It looks like it has boobs with no boobs yet inside. ;-) I'm also half-wishing I wore sleeveless tops because I think this would also look great as is.

Speaking of the gathers, this photo is for you Bev. ;-)


After I pulled threads for the gathering, I fused a narrow self-cut strip of black interfacing onto the seam allowance to keep the gathers tight until I could attach the neckband. I tried the Design Plus fusible stay tape first, but it isn't meant to fuse permanently and didn't hold the gathers in place as I started fiddling to pin the neckband into place. Most of the interfacing will be cut off when I serge the edges tomorrow so no worries about extra bulk. Tonight the inside is messy and the gathering threads are hanging out all over the place.

Before I go, one more comment about a comment. Someone asked, "I am wondering if that neckline curve should be concave instead of convex, just a bit, following the natural line of the body." After the gathering is pulled tight and attached to the neckband, the shape does turn into what you'd expect for the neckband (concave, so to speak). I'm sure there's a great technical explanation for curving out the seam allowance where it is to be gathered and maybe I'll even be able to think of it when it's not 4 a.m., but the main reason I do it is simply because that's just how I've seen it done in patterns and patternmaking books and it made sense to me.

Now I'm off to bed. Zzzzzzzzzzzzzzzzzzzzzzz

Saturday, June 2, 2007

Morphing Along

The Tropical Storm (Barry) in the Gulf has been dumping rain on us since yesterday morning, and it's turned me into a slug. I seem to be moving at half pace. Unlike Carolyn, who is on vacation from work and has been churning out the outfits at 10 times my normal speed.

I did manage to tape my pattern together, cut it out and then cut out my fabric so that's some progress. While taping the pattern sheets together, I decided I didn't like the scale of my sleeve inset as well as the original, and then I compared the armhole seamline lengths between the two. Very, very close. So I made the executive decision to toss mine and use the original pieces. This sleeve detail is the reason I liked the pattern after all, so this makes perfect sense, right?

The muslin sleeve felt a little tight so I added about 5/8" more width to the pattern and I've decided to leave out the interfacing in the band, which at the time I wasn't sure was called for or not in the instructions since they're in German and all I had to go by was the sketch ... which could've been indicating wrong side or interfacing. I did recognize "Vilieseline" as interfacing in the instructions so I decided to interface the shaded areas of the layout since I had no real idea what was being instructed. It was Guess Your Best and I guessed wrong. ;-)

Since then, Katharine very kindly translated her French version of the instructions into English for me. I see a few discrepancies between what I did and the instructions, but nothing extremely glaring. And I also see the sizes Katharine lists are different than the German version. Katherine's copy lists the sizes as 40/42, 44/46, 48/50 and my German copy lists them as 38/40, 42/44, 46/48. Interesting. Katherine also confirmed the dart for me. Apparently it is added to just the largest size for additional shaping, which tells me that I was correct when I decided the larger sizes are drafted for a larger bra cup size too. That's a Good Thing for me. And she confirmed the back facing piece. I still haven't gone back to figure out whether I traced it wrong or the pieces just don't match. The pattern sheet is folded back up and my table isn't clear enough yet to get it back out.

Here's a comparison of the Diana pattern laid over my TNT software pattern. The Diana pattern is wider at the shoulders and upper chest, which I knew from my muslin. As I was expecting, the Diana is also narrower at the hips and waist. The Diana armhole is a lower than my pattern, especially at the back. I like high armholes, which is one reason I always seem to crawl back to my TNT pattern. It just plain fits the way I like and it's just not that hard to morph elements from other patterns onto or into it. The overall lengths between the two patterns are about equal, but since I always cut with lots of extra just-in-case length, my pattern looks a lot longer. In reality, I cut most of that off when cutting my fabric.


This is the original Diana sleeve and band after I added width, and my new neckband pieces.


The sun is starting to peek out so we're off to the dog park for a while to burn off some of the energy of 3 dogs mostly cooped up inside for a couple of days. I'm hoping to get back into the sewing room later this afternoon to start sewing this new tee.

BTW, I made lasagne for dinner last night and found out that leftover uncooked pieces of the lasagne pasta make really great crunchy dog treats. They LOVE that stuff!

Sunday, November 5, 2006

Living Dangerously


I'm a bit burned out from doing muslins and fittings so a forgiving knit was on the cutting table today. That's it above. I like how it picks up on the undertones in this skirt, (which you would think is a regular denim blue ... until you put it next to anything other than white).

The chosen pattern for this top is from Burda WOF 06/2005 (#111). It's a pattern for a woven but since when does that ever stop me? ;-)

I traced the Burda pattern last night and a quick pin fit told me it was going to be more alteration work than I wanted to do. (See above re being burned out.) So I opened up my pattern software and started doodling.

This is the line drawing for the Burda pattern pieces.


This is what I came up with after some dart rotation on my standard empire bodice pattern (the program creates that for me) and a couple of manual changes to the hemline and cuff. I printed it out and taped it together.
This morning, I tried on the upper bodice pattern before committing it to the fabric and decided that I needed to dart out some of the spread at the neckline or else it would probably fall off my shoulders. So I reverted to low-tech. I squooshed a dart in the paper, cut it apart and taped it into a 3D cone/dart. Then I cut a slash roughly where you see that line in the upper bodice piece above and spread the paper until the pattern laid flat again. I reshaped the front gathering area and called it done.

I'm not making a muslin. If the top works, I'll be thrilled. If it doesn't, I'll be sad to see this Textiles Studios fabric wasted … but I'll get over it. Today is going to be a relaxing sewing day.

Sunday, October 22, 2006

Muslins everywhere and not a thing to wear (yet)


(Click on the photo to enlarge it if you want to see more details.)

I'm still battling with Simplicity 3990. I was nearly ready to just toss it all and make a tee shirt or pillow or something else easy, but the OCD in me makes it very hard to just give up or give in.

Yesterday, I found myself with a couple of hours between errands and getting my sons ready for their big dance and I decided to try on my various muslins and take pics hoping either I or the camera would see something that I've been missing. My Aussie friend Belinda often advises me to put a frustrating garment into the "magic wardrobe" (wardrobe = closet in Aussie-speak). Again, this advice was spot-on except this time instead of magic wardrobe it was magic heap-on-the-floor as that's where all those muslins landed.

My first muslin isn't pictured as I had ripped it apart when my mom was here. As I mentioned in a previous entry it did show me that I needed more bust room than the D cup pattern piece provided. That led to Muslin 2, above.

My try-ons of Muslin 2 last week were also disappointing and being short on time, I thought I'd go the easy route (hah!) by recreating the style with my pattern software. Muslin 3, above, is the first version of that pattern. Still not happy with the front neckline gape and back neckline shape. Which led to tweaking some things, another print-out/taping session for the next pattern and Muslin 4, above. Meh. Muslin 4 is no real improvement, most likely because I was overthinking at that point and making changes about which I really knew better. Sometimes I'm "too smart" for my own good. Sigh.

Which brings me back to yesterday's photo session. Muslin 2 is clearly more flattering in the waist and generally overall, although I do need a scootch more room in the derriere area. I also need to fold out more from shoulder to bust for the front, and shoulder to waist for the back. In the photo, I've taken a fold across the entire back and on the front side just below the camera (my actual right side -- remember this is a mirror image). That fold at the front makes things close to perfect. The neckline isn't gaping as it is on the other side. The bust point is correct and where the princess seaming hits is good. Why didn't I see this last week??

Muslin 3 (from my software) is boxy and the neckline is gaping and too low. Muslin 4 (software) is better than 3 but I'm still not loving how the neckline hits on me or how low it seems. Muslin 4 is pictured with seam allowances outside so it looks bigger than it actually is.

On deck for today during football games: Start with Muslin 2, transfer the fold out from shoulder to bust/waist onto the pattern, add more width across the back hips, and cut out the flippin' final fabric. Oh, and make a note that the shoulder-to-waist tuck is something I probably need to do for most patterns, especially Women's (Plus) patterns.

This all illustrates one reason I still buy patterns even though I'm pretty good with my pattern software. There are often stylistic and shaping subtleties that can easily be lost in the translation (or impatience!) from pattern line drawing to pattern software. Commercial patterns, where a designer has already done all the hard work, really are a bargain at any price. And when they're on sale, they're priceless.

Pattern software is great, don't get me wrong. I use it a LOT! But if I had to choose between knowing my pattern software and knowing how to alter patterns to fit me, I'd choose the latter every time. Thankfully, I'm lucky and don't have to choose because many times they work hand in hand and almost every time I use one or the other, I learn something new. So while this multi-muslin meandering was frustrating, it was also educational. Once I put all this behind me and am wearing my new blouse, I'll appreciate the learning experience even more. For now, I just want to get this blasted thing done. ;-)

Wednesday, October 18, 2006

3 Steps Forward, 2 Steps Back


Those are my muslins for Simplicity 3990. I had high hopes for this pattern, with its separate bust cup sizing, but those hopes are long since out the window.

My first try-on of my STP (Swedish tracing paper) tracing seemed to fit. But upon closer inspection, I realized I actually didn't have enough bust room, even using the D cup pattern piece. Not really surprising since I am a DD, not a D. So I made a FBA (full bust alteration) and cut a muslin. The bust fit was great ... if I yanked the bust area up about an inch and a half. In other words, there was too much length between shoulder and bust. So I pinned that out, transferred it to my pattern pieces and cut another muslin. That was better but still not the "great" I was after. Little things were off, like where the princess seams hit, the back neckline and how low the armholes were. I started watching the Top Chef marathon on Bravo and ignored the sewing room.

After watching the last half of Season 1 (I'm now hooked, thankyouverymuchBravo, and boy does this show make you hungry!), I decided to stop trying to reinvent the wheel. I copied the style lines using my pattern software (PMB) and printed out a pattern I knew would fit. I should've done this from the start as the style is really quite simple and very easy to copy ... and I would've had a finished blouse by now.

Apparently mom knows best because when she was here and watching me alter after the first tissue-fitting, she asked why I wasn't using a TNT pattern since surely I must have a similar pattern that already fits. Grrrr. I hate it when she's right.

So today I will try to decide which good fabric I'll use for my PMB version of this blouse and hopefully move along on this project. Tonight, I'll be watching the season finale of Project Runway and then I'll have to stay tuned for the premiere of the next season of Top Chef.

* * * * *
BTW, I do have a separate web host (a few actually) where I could put photos and link to them (but thank you anyway Amber), it's just that it ticks me off when Blogger doesn't work like it should. I like to keep things in their places and putting some Blog pics here and some in other places just feels messy to me. I do get over that when I give up on waiting for Blogger, but I still don't like it. ;-)

Sunday, September 10, 2006

Knocking Off Sunshine


This is my finished "muslin." I've been wanting to make a top like this after seeing similar tees in the stores, on the street, and patterns such as the Hot Patterns Sunshine Top, and Kwik Sew 3418 (not sleeveless on me though!). Then Gigi starting hers really motivated me to start mine. Thanks Gigi! :-) I'm looking forward to seeing how yours turns out.

I wasn't sure how all the gathering would look on my full bust, but since this tee is more fitted at the waist than a flowy peasant blouse or tunic-y tee, I think it's actually OK and doesn't invoke the is-she-or-isn't-she maternity question.

Because I have a great base pattern using my pattern software (Pattern Master Boutique), I knew it would be easier (and lots cheaper!) to start there and morph this style than to start with a purchased pattern and alter. So, that's what I did. I used the editing module of PMB which makes the editing fast and easy. If you have a similar TNT (tried and true) pattern, you can make this top too by copying the steps below with a pencil, scissors, a curve, and a ruler.

I started with my darted tee pattern (1). I reshaped the neckline to a low scoop and then added a 1.75" band (2).

Next, I cut the band from the bodice (3) and extended the dart to the bust point (4) in order to rotate the dart (below).

I rotated the side bust dart to the neckline (5) and then spread/slash the neckline an additional 3 inches to create more gathering (6).

The final step for the front was to true the neckline where I had spread it. (7).

Now onto the back. I aligned the shoulders of the front and back pieces (8). I used my original front pattern from (2) above so I could transfer the neckband shape/size onto the back.

Since I have a very narrow back shoulder dart, I just eliminated it when I drew the back neckband (9). I cut the neckband from the back pattern (10).

After reshaping the hems to a slight curve, the final step was to add seam allowances to all pattern pieces, as shown below.


Edited to Add: A (blurry) photo of me wearing the top.

Wearing the top