How does so much time go by between posts?? I really always intend to post more often but then either my sewjo disappears or my blogjo
(is that a thing?) does, or both. And then I make excuses to myself or figure no one wants to just read about my day-to-day, especially with no pics! But anyway ... here I am. And I sewed!
(I thought this pic was both creepy and hilarious, in a 'The Shining' sort of way.)
This past Memorial Day Weekend was the most productive I've been in a short time in months! I made two tops and three skirts. Yay!
Today, I'm going to talk about the Nottingham top from Itch to Stitch. Link to pattern
here (not an affiliate link).
This is the first Itch to Stitch pattern I've actually sewn. I've bought a few and downloaded the freebies and they are in my queue but see comment about sewjo above. Plus Magpie Syndrome. I know ... preaching to the choir! :-) But I love me a twisty top and so this one jumped into first position.
Overall, the pattern is good. The drafting is accurate, the price is very reasonable
(especially if bought during the first week of release) compared to other Indies and non-sale Big 4, the PDF pages go together quickly
(even quicker if you use the Itch to Stitch tutorial here), and the construction instructions are fine. But I do have some opinions I'll share below. Whoa Deb, you have an opinion? What a surprise! Hah. I crack myself up.
If like me, you really wanted to see what the pattern pieces for the twist look like, voila. The top section is just a basic tee, with all the twisty stuff going on near the bottom. The pattern is PDF only but available for large format and created with layers so you can print what you need. There are 33 pages for the whole thing and it took me about 20-30 minutes to assemble. I'm one that very much prefers PDFs over tracing.
I was hoping that I'd be able to quickly morph my TNT tee to this pattern, and that worked out very well. Truthfully, there aren't a huge number of differences between my TNT and this pattern, but there are enough, so why reinvent the wheel when I can just cut and sew, you know?
So my first "opinion"
concerns the neckline. Kennis
(the pattern designer) calls it a scoop neck. It is not a scoop. A look at the "tester"
round-up pics will confirm that. It's a jewel neck. I do not like jewel necks on me. Which leads me to my next "opinion." It's pretty easy to offer additional neckline styles for simple knit tops
(which this one is in the upper torso). A true scoop neck and vee neck would've been great inclusions. Not that I can't do this myself, but it just seems nicer to have the choices already in the pattern. I mean, it comes with three sleeve variations so why not a choice of necklines? For mine, I lowered the pattern neckline at least two inches. And as you can see by photos of me wearing it, it's nowhere near a low neckline even with those two inches removed. I also increased the width to open up the neckline even more.
I added a band, whereas the pattern is a "facing" turned outward to look like a band.
My next "opinion" is about the sleeve and armhole and sewing them together. Since I was using my TNT upper bodice, I also used my TNT armhole and sleeve. I like the armholes in my knit tops to be high and narrow
(curving more inward at the upper chest than not). I do not want extra fabric across my chest nor below my armpit. The Nottingham armhole is lower than I like and it's also set wider under a wider shoulder seam. Many of the
"tester" photos bear this out. I won't point out which ones specifically since maybe the wearer actually prefers hers that way. But I do see a trend that makes me wonder. Plus, I've seen the pattern. Hah.
What I will complain
(and not just opine) about is that the instructions have you set in this sleeve like for a woven blouse. Why? And why is there so much asymmetry and height in the sleeve cap for a knit sleeve? My pink mark shows the sleeve pattern for the size I was sewing. In reality, I had traced my TNT sleeve and used that. You can see the difference. Yes, technically I'm sure the pattern sleeve works. But it's
too much work when it doesn't need to be.
The sizing is generous. There is a lot of upper body ease to create the pretty draping toward the twist. Pay attention to the finished measurements and your fabric's characteristics. The measurement chart would have me in a 20. My TNT is closer to this pattern's 14-16 in the upper chest and I morphed to the 18 toward the hip and still have plenty of room and drape. The pattern's elbow-length sleeve is narrow. My TNT sleeve equates to roughly a size 20 sleeve for this pattern.
If you have a larger bust, you probably won't need an FBA but I would advise to add length to the front piece, tapering to nothing by the side seam. There are lengthen/shorten lines provided, which is a nice touch on such a weirdly shaped pattern piece.
(You could also do a traditional FBA but you'd have to do it twice since the pattern piece is a full piece, not a cut-on-fold piece.) In fact, unless you're very petite with a smaller bust, I would suggest adding length all around. I'm 5'5" and the overall length of this top out of the "envelope"
(off the printer?) is fine on me with a skirt, but would definitely be too short with pants
(which I wear a little below my skirt waist). There are a lot of inspirational "tester" pics on the pattern's release blog page but I wish there was more info about their height and about the whys of their size choices. I saw a number of length variances but no explanation. Next time, I'll likely add an inch.
One little addition I made, which you can see in the above and below pics, was to add a 'faux" tie. It's just a simple tube of fabric, about twelve inches long, pulled through the hole created by the twist. I think this balances and finishes the bottom edge. The tie will be more apparent when I wear this top with the solid navy skirt that also came out of the sewing room this weekend. The twist gives me a spot to hang my work pass, which you can see in the bathroom selfies below.
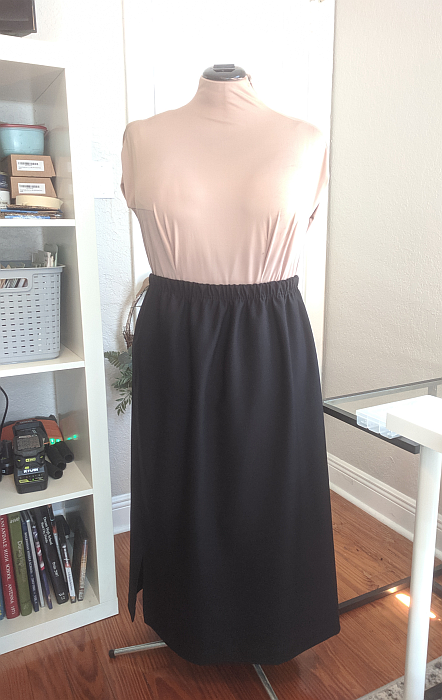
If you've read my blog for any time, you probably know my love for 2-piece dresses
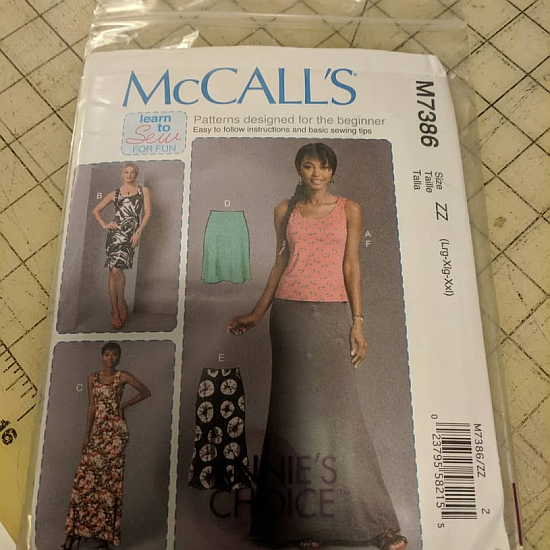
(aka top and matching skirt). I'm really happy with how this set turned out. The skirt is my trusty McCall's 7386, which is a cross between an A-line and trumpet skirt and is SO FAST to cut and sew. The separates will mix/match nicely with other pieces in my wardrobe.
Overall, I like this pattern a lot. I'll definitely be making it again soon. It's distinct enough to not want too many in my wardrobe, but a solid white will mimic a blouse nicely and another print will be a great weekend top. And maybe one with a vee neck, one with long sleeves for winter ..........