Thursday, January 31, 2008

Best Jeans Ever


That's all I'm saying.

(Until I write my review.)

Oh, and one more thing … Fabric.com has their stretch (and other) denim at 30% off their already discounted prices. Click here. But only through midnight tonight. I got my order in so am now telling all of you. There's not much of the 10 oz. and 12 oz. so hurry! I'm mentioning this because part of the reason these are the Best Jeans Ever is the darkness, weight and only slight stretch of the denim. Look at the Dark Navy (#BF-738) and Dark Indigo (#BF-735). I ordered Dark Navy and Indigo Blue (#BF-721) because I want to see piece-to-piece the difference between 10 oz. and 12 oz. These denims are all only 2% Lycra, which is enough to be comfortable but not so much as to be baggy by the end of the day. OK, you've been enabled.

Tuesday, January 29, 2008

Just Say No!

My body is not really made for nor flattered by true jeans. But yet I live in jeans. Unfortunate paradox, eh?

Well, not really, because I can make "jeans" that are a cross between true jeans and slacks. I can incorporate the extra leg room where I need it and how it looks best on me but I can still keep the snug (tummy-holding-in) jeans abdomen area and overall general styling.

But I really need to be thumped over the head because I keep finding myself attracted to real jeans patterns only to be reminded that they don't actually do much for me.

So, here's the pattern again (from the E799 issue of Burda Plus). Remove the mid-leg seam and it's a pretty basic bootleg jeans style, with shaped sideseams that skim the legs. That's the place where I need to remind myself to keep turning the pages. Those lovely shaped sideseams. Except, um, well, if I wear them I look like a stuffed sausage.


Here's my muslin from the front. Not completely horrific, although my thighs are filling out every square millimeter of those shaped sideseams. But with these same basic thighs since puberty, I'm used to that. ;-)


But the back? Hahahahaha! No.


Still not quite enough a of a reminder, I suppose, because I took off muslin #1 and dutifully made the Minott alterations and a couple of tucks/spreads for leg and crotch length. I also straightened that lovely sideseam shaping to hang straight and camouflage instead of squeeze and unflatteringly accentuate. And guess what?

I ended up with a pattern that was nearly identical, yes IDENTICAL!, to my TNT Simplicity 4068 pattern. I literally cracked myself up when I got out that TNT pattern and laid it over the altered Burda for comparison.

Since I had already wasted spent the time making the alterations, I decided to go ahead and just cut my fabric using this pattern. Here they are so far, sans waistband, back pockets, and hemming. The legs and crotch are only basted but after this fitting check, I'll rip that out and go finish them.


Until the new body fairy comes along, I'll just have to keep my jeans basically the same and only make changes to the pockets and hem width. And stop reinventing the wheel! Speaking of pockets, here's one of the single-welt pockets I made for these jeans, borrowed from another WOF pattern I made a few years ago.

Monday, January 28, 2008

Thanks Marjie!


Marjie left a comment on my blog when she tried the Sweet Potato Bread. Of course I had to go check out her blog, and when I did, I found some great recipes to try. Today was her Pane Toscana, (Tuscan Bread).

Marjie's Recipe:

Starter:

1-3/4 cups water
2-1/2 tsp. yeast
1/2 cup whole wheat flour
1 cup white flour

Put these ingredients in your machine and set it for the dough cycle. Let it mix for 10 minutes, then turn it off and leave the starter sitting in the closed bread machine for one hour.

After one hour, add:

2-1/2 cups white flour
1 tsp sugar
1 tsp salt

Restart the bread machine to mix these with the starter. After about 15 minutes, when the dough is completely mixed, remove from the machine and form into 2 round, country style loaves. Let them rise for an hour or more, until doubled in size, then bake 35 to 40 minutes at 375.

And my changes:

Instead of forming into two loaves, I used my deep dish baking stone from Pampered Chef for one big, round loaf. I also lightly punched the dough down after the first rise and let it rise again for about 45 minutes. After baking for about 10 minutes, I brushed egg white over the top of the loaf and sprinkled on flax, toasted sesame, black caraway, midget sunflower, poppy, & anise seeds which is a mix purchased from King Arthur Flour and then let the loaf finish baking. It's out of stock—I almost typed OOP!— right now, but don't they look delicious!


The bread turned out nice, with a wonderful crusty-crust. The seeds add a nice country flavor (I sampled it!). I can't wait for the rest of dinner to be ready.

* * * * *

I'm plugging away on the Burda jeans and I'll update about those later.

Friday, January 25, 2008

It Might Work


Anyone that knows me, knows that I am like a starving dog with a bone … I just don't easily let go. So, of course I ripped out the arms of the latest Burda tee to get to work on trying to salvage it. I hadn't yet hemmed the bottom so if I end up taking in the sideseams all the way down, at least I won't have to rip that too.

I tried it on sleeveless and noticed two things right away. First, the shoulder seams are set just a smidge too forward for me. And, second, the shirring is what is causing the weird curvature at the front armhole. I didn't think the pattern looked particularly curvy at the armhole and this confirms that thought. But it is still right on the verge of being too narrow-shouldered and I don't have any seam allowance left after serging the sleeves on to fudge that.

What to do? Well, there's not a whole lot to do about the shoulder seam on this one. Not unless I want to remove the binding and since I don't want to fight with it yet again, I'm probably not going to. I'm saying probably because I reserve the right to change my mind after I see how the other fixes I have in mind work out.

For the armhole problem, I'm thinking that ending the shirring where I have the pins circled in the photo above should give me the extra width I need across the high bust. It will be a pain to unstitch the zigzags from this fabric, but I'll just suck it up.

I also need to take it in at the sideseams from the underarm down to below the waist. I have about an inch pinned out in the left side of the above pic. Definitely a big difference for batwing reduction.

On the other hand, I have enough fabric to cut an entirely new front. Hmmmm.

I'm going to let this sit today, though, and start on the jeans. I need jeans more than another tee. Especially with the temps dropping this week. It will down to a frigid 66F. ;-)

Oh, by the way, I wore my latest brown Burda pants yesterday and I'm not disliking them so much anymore. They are extremely comfortable, both in fabric and fit. Although every once in a while the seams down my backside feel like my undies have slid up when they haven't. Nothing majorly irritating, just a new feeling. LOL! They'll definitely be staying in my wardrobe.

Thursday, January 24, 2008

Meh

I finished the Burda WOF Plus shirred top this morning. It's now my muslin. Yeah. Sigh. It's still wearable and fits better than most RTW tees but it doesn't fit nearly as well as I'm used to which means it won't ever be a favorite. I've had the fabric for a long time so I'm not upset about that, and chose it specificially because it could be expendable.

I should've listened to myself and morphed my TNT Ottobre 02/2007 tee into this one because there are some definite fit problems. It may not be immediately apparent in this pic, but look at the close-ups below.


The front of the armholes are wonky on me. Too inwardly curved and right on the line of being too narrow, and I didn't even narrow the shoulders as I usually have to do. I traced a straight 46 at the shoulder, neck, and underam (with a square shoulder adjustment) and morphed out to the 50 at the bottom of the underarm and down to the hem. I measured the resulting armhole and traced a "51" for the sleeve. This is very similar to how I morphed between sizes with the Ottobre tee. Except that one turned out perfect and this one, not so much. Part of the problem, for me, is that the cap for this sleeve is much too high for a tee. A lower cap fits my square shoulders better. You can see the cap sorta poking up in the first pic above.


There's also much too much fabric under my arms. Batwings anyone? Clearly morphing out to the 50 at underarm level was not necessary.


To fix this pattern, I would need to start with a "47" at the shoulder, reshape the sleevecap and front armhole and then not morph to the 50 until waist level. It wouldn't be hard to do, but I think it would still be easier to just spread the Ottobre tee neckline to incorporate the Burda shirring.

To improve (I can't fix it completely) the sewn shirt means I'll have to frogstitch the sleeves. I don't know yet if I'm willing to do it so this might become a Goodwill donation.

On the bright side … The shirring went rather well. I did one practice run and decided that was quite enough to be ready to go for real.

This is the neckline of the pattern. The black ink is the marking for the shirring placement. The blue marks are the measured intervals. There are 5 rows of shirring but you'll see 6 blue dots below. That's because I decided that the instructed placement was just too high to be able to bind on my CS machine, so I marked one more row down and skipped the top mark.


I folded the pattern piece so my marks were on an edge and then walked it around the neckline using the dots to mark my fabric about every inch or so.


Here's the neckline marked. Those two lines in the upper left corner are just the fabric folded back on itself after I laid it on the table for this pic.


I used my 7-hole cording foot and threaded the elastic thread through the middle hole. This foot held the elastic perfectly in place as I zigzagged over it. I just moved from dot to dot, eyeballing the placement. It came out pretty even this way. Love those specialty presser feet!


Here are the 5 finished rows of shirring from the wrong side (and before pulling them into the gathers):


And from the right side:


This is where the instructions lost me. I think I figured out that they wanted me to straight stitch a strip of narrow satin ribbon over each end of the rows to anchor and stabilize the shirring stitches and elastic So, that's what I did. With pink ribbon because it was handy. I imagine this will fray like crazy in the laundry. We'll see.


Here's the finished neckline. The shirring gets lost in the print in this photo but it does actually show up in real life one me.


This fabric was a BEAR to run through the binder and you can see that it most decidedly did not turn out perfectly. The fabric is polyester Lurex. Those metallic stripes run throughout the fabric and they acted like Velcro on top of each other … the binding strip wanted to catch on the bodice edge and stay put. Oh well. It looks a lot worse in this close-up than it does when worn so if this top stays in my wardrobe, I won't fret the binding too much.


Overall, I like the style. I just am not thrilled with the fit of the pattern yet.

And my cooktop? Still not fixed! The guy came (5 minutes before the appointment window ended) and without even looking at it, said that he needed to order two boards. They should be here by next Tuesday, at which time he'll also return. Looks like the crockpot will be getting a workout until then. At least I'm not paying for the repair. Extended warranties for major appliances are the *only* extended warranties I ever buy. And they've always been worth it. ;-)

Wednesday, January 23, 2008

Again With Jeans, and Maybe a Top

LOVE that Burda Plus is now archived on the Burdamode.com website! Thanks again Mia and Rose.

The queue has changed. It always does. I'm still thinking about that jacket I mentioned a couple of weeks ago, but what I really need is a pair of plain ol' blue jeans. I have one pair of regular-length blue jeans which are starting to show some fading. It's time to replace them with jeans that aren't brown.

I thought about just sewing the same TNT pattern again (Simp 4068, which is not only OOP but now it seems to have been completely removed from the Simp website too so I'm guessing it's sold out) but where's the challenge in that? OK, so I may have to eat those words but I do like trying out "new" patterns. I put quotes around "new" because the pattern I've chosen is actually from the Winter 2004 Burda Plus issue.


In the magazine they are shown made in suede. Um, no. Although they are beautiful in the photo, suede jeans are not exactly my lifestyle. Picture me walking through the woods with the dogs and picking up poop in suede jeans. See what I mean? Maybe in my next life I'll be more glamorous. So boring ol' blue denim it is.

I'll be leaving out the mid-leg seam since I'm not trying to fit the pattern pieces onto hides and because it's not the most flattering look to be visually chopping my chunky legs in half. I will be morphing the contoured waistband from Simp 4068 onto this pattern if I decide these are a go, since it fits me much better than a straight one. (I won't be making the jacket, but it's part of the line drawing I grabbed from the Burda site and I was too lazy to edit it out.)

Also on the table to be traced is this tee from the latest issue of Burda Plus. I'm going to compare it to my TNT Ottobre tees to see if it will be more efficient to trace the Burda version or morph the Ottobre. I'm guessing the latter, but you never know. Whatever is quicker, you can be assured that's what I'll be doing. I know I'll have to do some practice runs of that shirring though which may cancel out the "quick" part of the equation.


While I waiting for the cooktop repairman to show up I did manage to do a bit more painting on the french doors this morning. Gah. All those panes are a PAIN! Then I got a call that he had called in sick and wasn't coming. They tried to reschedule me for Monday. Monday?? I think not. The cooktop lost all power this past Monday night and there's no way I can go a week without it. DH brought out his propane camping burner but I laughed and then turned him down. It hasn't gotten that bad yet. Anyway, I called Customer Service and they did whatever they do, called me back and assured me that someone will be here tomorrow. I decided to give up continuing with painting and head to the sewing room. I didn't have to twist my arm. ;-)

We'll be having steaks on the grill, baked potatoes and nuked veggies for dinner tonight. I don't think the guys will even notice the stove isn't fixed.

Monday, January 21, 2008

Monday, Monday

The mending is still sitting on my cutting table because I didn't do much in the sewing room this weekend except pass through. I did manage to sew the button back onto to DS' coat last night before bed because I remembered it was going to be cold this morning and he would need it. Other than that, my weekend was spent doing odd jobs around the house.

I knocked out a lot of painting and I can now say my dining room is officially finished. It was mostly finished, but there was one area of painting to do. If you look at the photo below, you can see the still-brown inner edge of that half of the double doors. (There's 2 sets of these double doors but the others were done months ago when we painted the dining room.) These edges and the sides of the doors facing the wall were still at wood or primer stage. I also painted the inside and outer trim of that doorframe and happily installed new knobs last night after it was all dry. All those "little" things that kept getting put off because I hate painting doors. Whose idea was it to paint all of the doors in house white anyway? (Yeah, mine.)


The closet doors and doorframe in the foyer were also still at primer stage and I'm glad to say they are now done too and a new knob installed so we don't have to keep fumbling to open the darn door. I also touched up the door in the laundry room that the dogs scratch on to go outside, the door to my sewing room that took a hit when DH was trying to squeeze my new cutting table through it, and various other spots throughout the house that were sporting nicks.

But these doors …


… still don't look much different. Sigh. But I did start them last night and so far have painted about half of them today. It's such a tedious task. Each row of 3 windows takes me almost half an hour. You do the math, and keep in mind there's one whole panel you can't really see in the pic. ;-)

Holding the paint bowl as I go makes my arm ache after a while too so it ends up being paint, paint, break. Paint, paint, break. And it's really going to need two coats on top of the primer you see here. But at least the second coat will go faster since I don't have to be quite as detailed with it. I'm looking forward to a day hopefully this week when I can get out the razor blade, scrape the paint off the window panes and finally call it done! We've been living with the primer on the frames and panes for 2 years. Ahem.

We'll still need to paint the outside of the doors but I've already decided we'll tape and otherwise block off the house portion and then get out the power spray painter and have at it. But it might be another 2 years before I am motivated to do that.

Sunday, January 20, 2008

Answering Comments

No sewing yet this weekend. I've been doing some painting. Trim that needed a second coat, some touch-ups, some trim that hadn't been touched yet. I may even get to the french doors in the family room that I've been avoiding for almost 2 years! And there's a few items in the mending pile in the sewing room that will need attention before I start another project. This afternoon is football playoffs so I'm pretty sure I won't be sewing today, but I can probably paint those doors while the games are on. But it's a long weekend so there's still tomorrow for sewing.

In the meantime, I thought I'd answer some comments before they stack up too much. And I'll plead again that if you are posting as "Anonymous," please sign a name just so I know who you are in order to distinguish your notes from others.

From Kris O:
I love your bags. My mom loves VB bags. What are your favorite sources for the pre-quilted fabric?

Thank you! I don't really have "favorite" sources since I don't make too many of these anymore. This particular fabric came from Fabric.com. They have a prequilted section on the website and with a little bit of looking through the other quilting cottons, you can find unquilted coordinates for the prequilted selections.

From Mia & Rose:
Yes, BurdaPlus does have archives. They are in the German pages, under "Archiv Sonderhefte" (extra/special issues archive).

Thank you, thank you!! I will be using this a LOT!

From Arielle:
I'm just discovering your post (was away on vacation) and I wonder if you could tell me the brands and sizes of your rulers? Especially the French Curve one.

The French curve is the Styling Design Ruler and I bought it from Nancy's Notions. I just recently bought another since I've really put some wear and tear on my original. I also have a Dritz clear, flexible plastic ruler (from Joann's), and the others are mainly clear quilting Olfa quilting rulers.

From Anonymous:
Is it possible to reduce the leg width by taking it out at the seams which run down the center back of each leg?

Yes. And in a perfect world, that's what I'd do. But since I had already cut the fabric and sewn/topstitched the center seams, I opted for the less painful sideseams.

From Marji:
Is this pair of pants the candidate to go with your most recent top?

Well, while they do match in color, I don't think they match in style. So, no. Still no pants (or hem) for the recent top.

From Izzie:
So, you achieved this fit with just the cut and slide at the knee and the tuck at the knee? No FED?

Correct, no FED. I haven't been using the FED for a while. Before this latest round with Minott, I was using wedges (slash/overlap or spread), like this.

From Designdreamer:
Now I'm not sure if they're full in the "inner part", (but my guess is yes,) but I KNOW they're full in the FRONT. Is there a different alteration for this?

There is. And it should be found in most good pants fitting books. But, truthfully, I don't know all the methods off the top of my head since I don't use them so I don't have any specific advice.

From Anonymous:
Do you plan on doing a review of the Minott books you bought? I have been looking to buy some good reference books but looking at some of the reviews on PR, It kind of puts me off.... I wondered if the books she is selling are just copies of earlier books or are different than earlier publications.

No, I don't plan to review any of the Minott books because I haven't really read them cover to cover. Well, without my eyes glazing over because the information is very disjointed and badly organized. Mostly, they are drafting books, although one is a convoluted (to me) method for altering commercial patterns. I think most of the information in these books can be found in better form in other sources. But there are the "wrinkle charts" which are good references for alterations and a few of the problems/solutions are not easily found elsewhere. So, I keep them around for that. But, really, that's only about 20 pages out of hundreds so unless you're shaped like me or want to draft patterns from scratch using her methods, then it's probably not a worthwhile purchase. And, yes, I think the books available on that website are indeed (legal) photocopies of previous publications.

From Anonymous:
I will also definitely get rid of both my Palmer Pletsch books. They do nothing for me. I purchased them because people raved. Maybe they raved because of the colourful illustrations, I don't know but I have never found them helpful or informative.

Hmmm. I'm sorry but I have to disagree here. I love the P/P books! Slash/spread is the method I use the most and these books cover all of that in great detail. They also have a lot of valuable fitting information, especially diagnosing the wrinkles. I don't think there is a more comprehensive or easy-to-understand fitting series, especially as a jumping-off point. While I may not now agree with every single solution, I do with the majority of them.

But different strokes and all that, and if you still want to get rid of them, I'm sure you'll have no trouble reselling the books.

And my favorite comment about my latest pants:
From Meg:
I think EVERYBODY feels that way about their bodies in January!
How true!! Thank you for the reality check! And yes, Meg, feel free to use "elastification". LOL!

Thursday, January 17, 2008

Pants Done, Ho Hum


Here they are. They're done. But I'm not completely enthused about them. The fit is good but the cut is, well, not my most flattering pair of pants. I thought the seaming would show up more, but it doesn't … not even in real life. Maybe in denim with contrast thread it would be better, but I don't think I like them enough to try again. Especially not when there's still 1,472,968 pants patterns yet to try. ;-) But they are comfortable so I'll wear them. I just won't love them.


Truthfully, I think what I'm feeling most ho-hum about is the body inside the pants. I'm never going to be rail thin, but during football season and the holidays I added enough additional fluff that I'm ready to do something drastic … you know, like eating healthier! And increased walking. Even a 10-lb. loss would do wonders for how my clothes hang on me and how I feel in them.

But enough of my whining. Here's a photo of the pocket and topstitching. Even artificially lightening the pic doesn't help make the stitching stand out.


And here's a view of the waistband elastification (new word!) and the inside. The instructions are sorta sparse for the waistband but I'm pretty sure they didn't instruct to turn under the inside edge of the waistband, which is just fine with me since I usually don't anyway. As per usual with straight WOF waistbands, there's no actual pattern piece and I didn't pay close enough attention so I ended up cutting it without a seam allowance. And not enough fabric left to cut it again. Oops. But I had cut the rest of the pieces with a 5/8" seam allowance so I just used 1/4" to sew the waistband to the top of the pants, making it off only by about 3/8". Not really noticeable when being worn.


I'm glad I tried out the Minott alteration. I think it's going to be a winner for me.

Tuesday, January 15, 2008

So Far, So Good

A quick update while I'm waiting for DH to get home from work. Although after seeing these pics, we really shouldn't be going OUT to dinner. Sheesh ... those Christmas cookies tell no lies and it's time for another 2008 resolution.

This is the muslin from the current pants. The leg on the left side of the pic has the tuck in it between crotch and knee. It's an even tuck, around the whole leg. Big difference, no? BTW, the seaming over the derriere is supposed to be curved as you see. It looks weird to me in muslin, especially with the dark undies, but much nicer in the final fabric. And the seam does provide a nice fit over the tush.


Next are the real pants, with the Minott alterations incorporated into the pattern. I haven't yet attached the waistband so an elastic "belt" is holding them up. The vertical seams are still basted. Hopefully the pic is clear enough that you can see there are no X wrinkles. There are vertical wrinkles because they're still too long and I'm standing on the bottoms. The fabric is a milk chocolate brown woven RPL (rayon, polyester, Lycra) with both horizontal and vertical stretch. I will definitely be stabilizing the crotch and waist seams.

I was also experimenting with the leg width and the sideseam on your right has been taken in an additional .75" (total 1.5"). It would look better if I wasn't standing on the hem area ;-) but I think I prefer the narrower leg.


Here's a front view, although I forgot to turn off the flash. My hand is at the top of the pocket opening. (And I swear I recently cleaned this mirror.)


Full Inner Thigh Alterations

Let's see … where was I? Oh yes. I had just finished tucking up a good amount of length between crotch and knee on the Burda WOF pants muslin.

I've now made that alteration to my pattern pieces and have cut the good fabric. As I mentioned on Sunday, I knew that my extended calves were playing a part in this fitting conundrum. As I was slicing and dicing my pattern pieces, this was confirmed. What that crotch-to-knee tuck actually did was to bring up a wider section of the pants leg to calf level. So, it's not really the length that was the culprit; it was a matter of putting the required width at the proper level. Well, in theory at the moment, because I'm still sewing the pants.

Sunday night, I went to bed with some of my fitting books to re-read any info on alterations for full inner thighs and/or knock knees (FiT/KK). (Both body types display the same rear X wrinkles.) In my pile were:

Fitting Finesse (Zieman)
Fantastic Fit for Every Body (Grigg Hazen)
Fast Fit (Betzina)
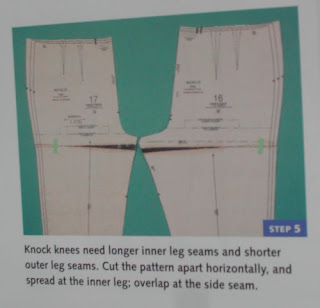
Sewing Pants That Fit (Singer Reference Library)
The Perfect Fit (Singer Reference Library)
Pants and Skirts Fit for Your Shape (Minott)

Fitting Finesse had nothing. Zero. There is some basic info for full thighs, but nothing specific for full *inner* thighs or KK (or bowed legs, which is the direct fitting opposite of KK).

Fantastic Fit for Every Body was another miss. It usually is. I really don't know why I hang on to this book. I've never once used anything from it and some of the advice is just plain wrong, IMO. But I digress.

Fast Fit does address the FiT/KK issue:

(Click on all the photos for bigger, clear versions.)

With the Fast Fit method for KK, I would still have to add width between crotch and knee because my issue is actually FiT, not KK. FiTs still need more width than what you get with this alteration alone. There is another section in this book which illustrates how to achieve that extra width by adding to the inseams, with the length of the addition dependent on how full the thighs are. After that, I would still have to re-establish a vertical grainline, because as you should be able to see, the alteration below angles the original grain outward.


I know the Fast Fit method works, as it's the basis for my previous X-wrinkles alteration, here. But I'm fickle, and curious, so I wanted to try something different. ;-)

An Anonymous commenter mentioned that I should buy the Singer books instead of the "expensive" Minott books because the Minott info is also in the Singer books. Well, first, I already have both Singer and Minott so acquisition/price isn't an issue. But, the main point of my response to this comment is that while the FiT/KK Singer alteration starts like Minott, the end result is different.

Both methods start out by slashing the pattern at the knee and sliding the knee-to-ankle section toward the inseam, as in this section from Minott:


In Sewing Pants That Fit, you are never instructed how to true the seamlines after the slash/slide (oops). In The Perfect Fit, this is the illustration and instructional text for truing the seamlines to finish the adjustment:


It's an at-first-glance subtle difference between Singer and Minott, but upon further inspection the difference is really quite significant. With the Minott method, the entire leg is shifted toward the center of the body, with the overall width of the pant leg remaining virtually unchanged. This is what I want, pants that have the same cut as the original pattern but which have been adjusted to follow the shape/slant of my leg.

The Singer method starts out OK, but the way you are instructed to true up the outseam gaps left after sliding the lower section toward the middle gives you pants that are still centered on the "perfect" leg exactly as before but now they're also wider.

Minott trues the outseam from the bottom up. Singer trues from the top down. It makes a difference.

So now I'm going to go back to the sewing room and work on finishing those pants to see if my thinking works in practice as well as theory.

Sunday, January 13, 2008

Sunday Pants Trials, Part 2

As mentioned earlier, I've been fooling around with that WOF pants pattern. I finished the X adjustment as per Minott, which is to cut the pattern at the knee and slide it over toward the inseam (front and back). That part was easy and went fairly quickly. I marked the knee line on my pattern by first marking the crotch line and then folding the pattern from hem line to crotch line, using the resulting middle fold as the knee line. Standard stuff, right?

Then I cut out my pattern in muslin and methodically marked all the vertical and horizontal lines (grain, crotch, knee) and sewed it together. My X wrinkles were better, but still not completely gone. I stared in the mirror while pulling, pushing, … you know the drill. ;-) And then I noticed that the line I marked for my knee was a good 3+ inches below my actual knee. While still wearing the muslin I sorta tucked it up at the knee and it looked like it improved things at that back X area. So, I took off the muslin pants and machine basted a 4" tuck between crotch and knee so that the knee line actually hit ON my knee.

I then tried the pants on again and I swear that back leg/crotch is now nearly perfect.

Could it really be that simple? Could the lower part of those X wrinkles have been fooling me all along, making me think they were something else instead of simply too much length in that area of the pattern?

I never thought I had short legs, and I don't as far as RTW pants. But I suppose mine *are* shorter than the 8-foot model legs the patterns are drafted for. And maybe they're shorter between crotch and knee than "normal." I know I do have extended calves, which has got to play a part in this. But maybe I just have short legs overall and am in denial. I have no idea.

So, hmmm. I'm going to think on this for a while. And maybe make another muslin while playoff game #2 is on to test this again.

Sheesh. The more you learn about this stuff, the more you realize you don't know.

Sunday Pants Trials

First, thank you everyone for weighing in on the length of the last top. So far in the comments, longer is winning with "medium" coming in second. I'm going to let it sit for a while before I decide what to do. And, as Belinda pointed out, I really need to decide what pants and shoes I want to wear with it. It's not as casual a top as I usually wear, so that will have some bearing on the rest of the outfit.

(Oh and to address your comments Carolyn ... thank you for your opinion. I like hearing different takes, different ideas. But … (you knew there was a but!) … I'm not going to add any more dark brown because I want the focus to remain UP, near my face. If I add brown at the sleeves or bottom, it will just draw more attention to my hips.)

In the meantime, I'm going totally off track from the ideas that have been floating around. Which isn't unusual for me. I should learn to never say what I'm planning to sew next because it usually doesn't happen that way.

I've traced these pants from the January 2008 issue of Burda WOF.


I'm really loving the close-up detail photos Burda is now including on the website. This new feature is so helpful since you usually can't see those details in the modelled magazine photos. I love the pockets and extra seaming on these. The front and back seaming, by the way, incorporates waist darts so I shouldn't end up with a bunch of extra fabric at the waist, which is good for my basically hourglass shape.


I'm about halfway through initial alterations before I cut a muslin. I'm doing this at the commercial breaks during the NFL playoff games today so it will be slow going. Instead of doing my previous "X-wrinkle" alteration shown here, I'm trying an alteration shown in one of Jan Minott's books (I have 3 of them and the exact title is upstairs in the sewing room so I'll update that info later). It's an easy alteration to try so I thought I'd give it a go just to see the results.

I'll also have to add to the back crotch length so I'll do this at the top of this pattern. It's a partial-elasticized, pull-on pant and adding on to the top is the easiest and most efficient way for this pattern.

Saturday, January 12, 2008

Hemming and Hawing


It's done. Well, almost. I'll get to that later.

I added the topstitching on the pleat seams. It gets a little lost in the print but I think it's better than no stitching at all because it does show, even if it tends to blend in. I also used the 1" binder for my coverstitch machine to create a thicker neckline band/binding. And, of course, it's brown. Were you really expecting anything else? ;-)


The sleeve ruffles are Much. Too. Full. I think I'm going to have to do something about that if I want to wear this top and actually be able to do anything in it without dragging my sleeves through the soup. I like the way they look. But when my arms are in them, they feel too floppy (the sleeves, not my arms). I'm thinking of running elastic through the hem so they stay in place. One of the views of the original McCall's pattern shows something like this.


Here's a semi-profile view to show that by enlongating the pleat stitching, the open pleats don't poof out until below the girls. When worn, it has the look of an empire waistline.


Now here is where I'm stalled. Final length. What should it be? Long? Short? In between? To my eye, the longer length looks better. But I'm just not used to the tunic length so it feels like I'm wearing a dress. So maybe a little long, longer than the pic on the right, but shorter than the pic on the left? Opinions??


Beth asked what I was planning to wear with this. The answer is, I don't know. Most likely long pants similar in silhouette to what I'm wearing in the pic. But these pants are actually purple so it won't be them with this top when I leave the house. (And my hair is soaking wet from the shower so I felt compelled to chop off my head.)

Friday, January 11, 2008

Morphing to McCall's 5469

No, it hasn't taken me all week to morph my Ottobre Woman tee pattern, but it has taken me from Monday until last night to again become productive in the sewing room. I have all these ideas and projects running around in my head and it's just been overwhelming. I keep talking myself in and then out of starting. Analysis paralysis. I finally decided yesterday that I would go ahead and let the other projects bubble around some more and just do this morph since it would be easy and fast and should bring the sewing mojo back.

Since this is a very easy morph, I'm glad again that I caught myself before ordering the pattern. I never would've sewn the actual pattern and would've only been paying for a picture I've already printed off.

I started with the plain front Ottobre Woman tee from the 02/2007 issue, pattern no. 2 with the 3/4 sleeves.

Then I decided how much I needed to add to the front for the 4 pleats. I settled on 1.5" pleats (.75" deep), spaced 1" apart. That meant adding an additional 3" to the Center Front of the pattern (2 x 1.5"). In the pic below, the yellow line is the original CF, the green line is the new CF, or cut-on-fold line, and the red shows the placement of the pleats.


I traced the Ottobre tee as-is and then added the 3" to the CF. I widened the neckline .5" at the shoulder for an inch total and also lengthened the top and back about 5" at the hem area, figuring I can always cut off what I don't want later.


Last was the sleeve. I'm trying out View B, which to me looks like a regular elbow-length sleeve with a long ruffle sewn on the bottom. I cut a straight section that is 8" wide and 2.5 times the width of the bottom of the sleeve. I used my original tracing of the 3/4 Ottobre sleeve and then just folded it up to where I thought it should be. Nothing scientific here (and no sleeve pics yet).

Here's what the front looks like so far:


I'm using a poly knit from Fabric Mart for two reasons. One, it's very drapey and, two, I have enough to make another top if this ones turns out to be a wadder. I didn't really want to start with a true (unwearable) muslin because this top is so simple to draft and sew that it's either going to work on me or it's not. Fitting shouldn't be an issue. But if I hated it, I didn't want to waste muslin time or lose a nice fabric. Since I had plenty of this, it won't bother me to toss some if I do end up hating it on me.

I sewed my pleats further down the front than the McCall's version because my bust is bigger than the model's. I figured the pleats shouldn't be poofing out right at apex level. I'm thinking of topstitching the pleat stitching with my coverstitch machine so they are more defined. I'll definitely be using the CS machine to bind the neckline.


So far, I'm liking what I see. It's full but because the fabric is drapey it looks tunic-y to me and not maternity. Do you agree?

Monday, January 7, 2008

Free To Move On


ETA: I forgot to mention the pattern (thanks Donna!). It's my ol' stand-by for Alex — Burda 2713. I've made it a few times for him. Last time he was smaller and I thought I'd go down a size, but time and teenage hormones kicked in and the same exact size as before is a perfect fit now. Well, almost. I also added elastic to the waistband to snug it in a bit at his back waist right above the full booty, using this technique. When worn, you can't see that there's any elastic. It's just enough to ripple the waistband when off the body but it stretches to flat when worn. You can see the rippling in the last pic below.

We now return you to your regularly scheduled blog entry …

Darn black fabric ... you can't see anything! You'll just have to take my word for it that these jeans are fabulous!! ;-)

Seriously, I'm just glad they're done. The sewing part was fine but the topstitching thread gave me fits. I let DS pick from the thread stash and he happened to see some multi-colored pearl crown rayon. I agreed, without realizing what I was getting myself into. But it's done and it looks great against the black denim so the pain is fading.


I didn't topstitch as much as I would've with more cooperative and less bright thread. The back pockets are only colorfully-stitched across the upper edge. The waistband is topstitched with regular black thread because by that time I was at my wit's end and no one is going to see it anyway. The beltloops are done with the colorful thread and that's enough eye interest at the waist. I also topstitched in the usual fly and yoke places, and down the outseams.


I added a No Fear tag from old RTW to one of the back pockets. I also split the legs in the front and the back (in two different places) and topstitched the joining seams for more interest. And, I added a front patch pocket for the cellphone/ipod.


I used a red zipper and B/W striped cotton for the fly shield and pocket bags. You can see a bit of "faux piping" at the edge of the pockets where I let the pocket lining peek out at the edge as DS' urging. DS loves all the colors together. Me, I think I'd go cross-eyed staring at all of this too long. But then again, I'm not 15 anymore. If he's happy, I'm happy. He really does like to have a hand in "designing" what I make for him.