Showing posts with label pants. Show all posts

Wednesday, July 26, 2023

Clown Pants (or why one should make a muslin)

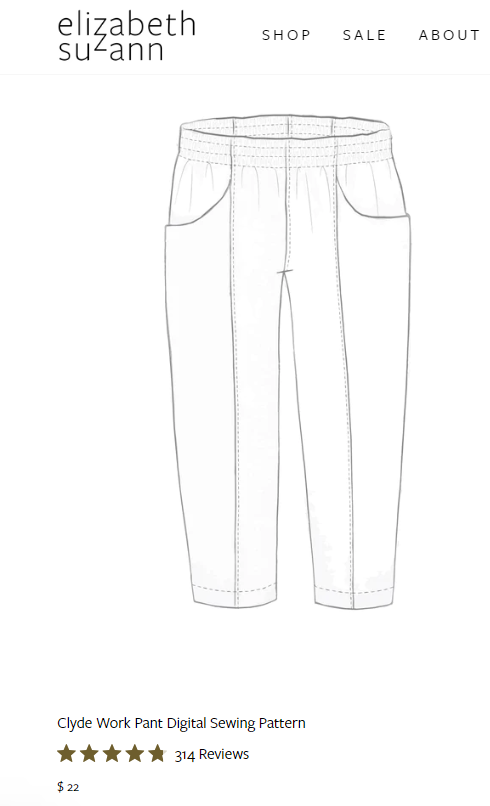
This is either the beginning or the end of my saga with the Elizabeth Suzann Clyde Work Pants. Which of those outcomes will be determined by my desire to spend hours with my seam ripper and ability to find something to stream on the ol' tube to keep me occupied while I do so. I note this pattern is now $22. When I bought it, it was free/pay-what-you-can. According to my account on the website, I paid $15. I also think I probably would NOT pay $22. Especially when the very similar Muna and Broad Sculthorpe Pants are available for $16.

I bought and assembled this pattern right before my sewjo went on hiatus a couple of years ago. Since it was pretty much begging to be next, I decided to go ahead and give it a whirl. I can definitely use a pair of dog walking pants. They were never slated to become more than very casual, wear mostly at home pants. But I also optimistically thought "Who knows? Maybe they'll be great." And the pattern gods laughed.
Did I try them on as I went? No. In hindsight, since I wasn't making a muslin, I definitely should have basted everything together before committing to all the serging and topstitching. Yeah, even crusty old sewists make rookie mistakes. Hubris, thy name is Debbie. 

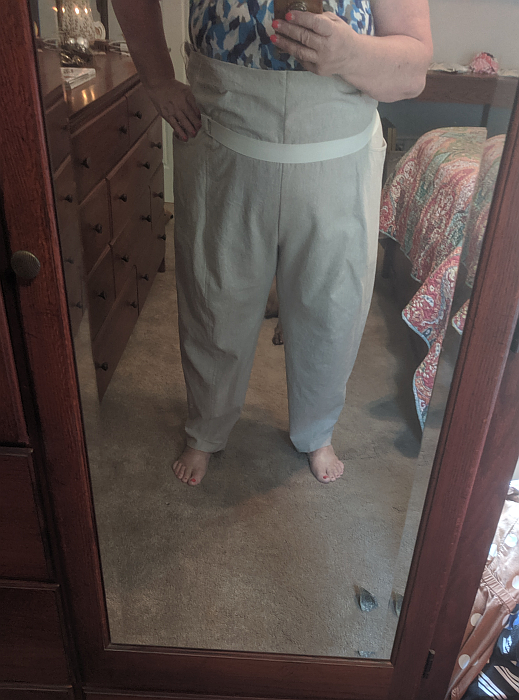
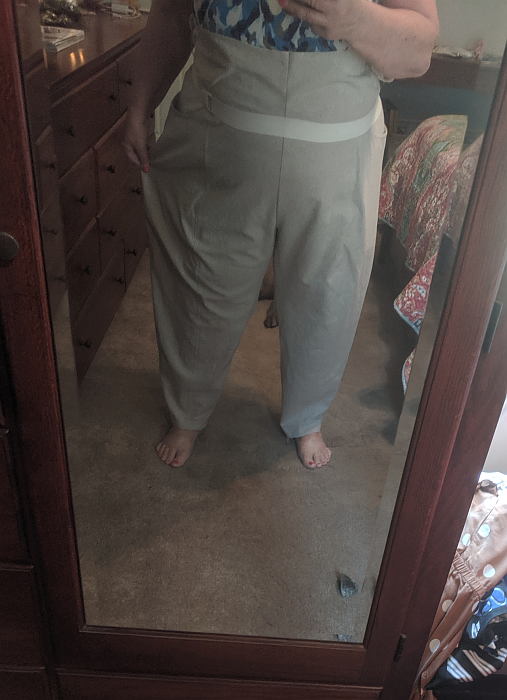
The photos below REALLY do not do justice to just how BIG these are on me. I have a large tummy. I have large thighs. And I have enough room in the pants legs for a small animal. Or even a medium-size one.
I picked my size from the body and finished garment measurement charts and from notes on the retail side of the ES website noting model measurements vs. the size they were wearing. Someone is fibbing. On the bright side, if you thought you were sized out of this pattern by a couple of sizes, you probably aren't. 

I think they're salvageable. It's just going to be a question of how much patience I have in me for ripping out every serged and topstiched seam. Right now, I feel up to it. Stay tuned.

Other thoughts on this pattern: Assembly of the PDF was easy enough. The instructions are so-so. I mean, they will definitely get the job done and are nicely illustrated, but I don't like the order of assembly. For one example, instead of sewing the crotch seam last from front to back with the legs one inside the other, you sew the crotch seams separately and then the inseams as one long stretch. Pretty sure this is to make topstitching the CF and CB seams easier, but I'd rather do it all in one go. So, it's really just a preference thing on my part and not a slam of the instructions. I also don't think I'm going to be a fan of the method for attaching the waist elastic, but I haven't gotten there yet. 

But what I really do not like and will slam a bit for is that notches are severely lacking for aligning the pocket pieces and all the leg panels. For the legs, there's one notch at the waist and one notch at the waist. And all the notches are just one single line/snip, so it would be very easy to mix up front and back panels since the panels are all very similar shapes. It would also be very easy to mix up front and back crotch seams for the same reasons. It's not that I need the notches for lining up the pieces, but more for identifying which piece is which. 

TL;DR: If you do make this pattern, be sure to keep track of and/or label your pattern pieces.  

Parting shot: My sewing buddy Cyrus who follows me room to room wherever I go. (Ignore the pile of crap to the right of the cutting table which still needs to be relocated.)
 

Monday, December 18, 2017

Late to the Party … Again — True Bias Hudson Pants Review


So, this pattern has been out since mid-2014 and currently has at least 30 reviews on Pattern Review, (plus more if you count the men's and kid's versions and reviews not on PR). I bought it about 2 years ago. Good intentions blah, blah, blah. Finally, its time had come.

Here I am wearing my adjusted second pair with the goofiest of goofy expressions. But you come here for the sewing and chit chat, not my (non)modeling/posing skills. The short verdict is: I love them! My wordier thoughts follow below.


The temps in Tampa dropped quite a bit a couple of weeks ago and I really needed casual long pants for after work, walking the dogs, running to the grocery store, etc. (We're back up to the 80s today, and I'm kind of missing the chillier weather.) Making Hudson Pants had been on my to-do list forEVER but kept getting pushed. And every time I'd want to wear those casual long pants and NOT find them in my wardrobe, I scolded myself for not taking a weekend to Just Sew Them.

Finally, my Hudson sewjo and weekend coincided and I got started. Better two years later than never. My first pair is below. They are the better pair to look at since they have a lot more visual interest than my next solid black pair. The fabrics are deep stash/leftovers from at least 10 years ago. And it holds up like iron. The bomber jacket I made from both the "print" and the solid is still going strong and I wear it on dog walks All. The. Time. This means I now have a dog walking suit. Hahaha. The "print" is a ponte with some, but not a lot, of stretch. It must be poly the way it's not changed at all over the years, but it feels like cotton. I'm pretty sure it's from Fabric.com back in the days that Stephen was still at the helm. The solid is also ponte, a rayon blend I believe.

I don't have a photo of me wearing them. Life is not fair.


The size chart appears less generous than it is in the actual wearing. I had read some reviews from other sewists on the higher end of the measurements reporting plenty of room in their finished Hudsons even though they themselves were quite outside the given numbers. In other words, these are very casual pants with a lot of ease. Basically, if you can pull 34-36" of elastic up and over your butt, you're good with the size 18. (That elastic measurement is about what you'd use in the waistband for the size 18 waist.)


I did make adjustments, though. One, because said other sewists/reviewers have proportionately thin legs. I do not. Two, my "muslin" fabric isn't the stretchiest kid on the block. Or something like that.

While these are not particularly low-rise, my muffin-top waist and cake-eating butt will be better served with a higher cut. (More on this below.) I added one inch to the front and back rise. In the front pattern right below, you can see that said inch was added below the pocket so messing with the pocket pieces would not be required. Yay!


I also added inner thigh space, pointed to by the red arrows, tapering to nothing around knee level.


The pattern calls for 2-inch wide elastic. Of course I did not have any on hand. I "made" my own. It was a little trickier to feed through the casing, but not terrible, and now that it's in and stitched over, I can't even tell it's really two pieces. I will probably never buy 2-inch wide elastic now. Heh.


I also cheated and didn't thread a tie all the way around. I made the buttonholes in the waistband as instructed and then just threaded a short "faux" waist tie through the buttonholes without going around the waist in between. I won't tell if you won't.


This is as close to modeled as we're doing today. (This was actually a week ago.)


Trying on and wearing the brown, first, pair told me I definitely needed more room over the caboose. I could be a plumber in these pants if you catch my drift. I added a wedge to the CB, tapering to nothing at the waist. I also thought I wanted a bit more length in the rise all around. Ultimately, I was wrong about that last part and will go back to adding just 1 inch to the rise, not the 1.5 inches I added for the second, black, pair.


Here's where the second, black, pair hits me ... right over the belly button. I don't mind too much because I'm never going to tuck into these, but if I'm aiming for best fit, they'd be better with 1/2" less height in the rise.


For the black waistband, I cheated even more and completely omitted a tie and the buttonholes. As mentioned, I'm never going to tuck into these pants and the bulge from a tie looks weird under untucked shirts.


The last thing I did differently on both pairs and which step I think is glaringly missing from the instructions and sew-along, is to edgestitch the pocket just past the band. It's a nicer finish and holds everything in place better. Speaking of the pockets ... I feel that they are right on the very edge of being too shallow. They're fine as is. My hands fit. I just want them a little bigger/deeper. I'll alter this for a next pair.

This fabric is from Cali Fabrics, my new favorite online fabric store. Cali calls it "techno knit," which feels very much like a thin scuba. It's nicely stretchy with 100% recovery, comfortable to wear, and doesn't pill. Cali is sold out of black. I hope this is a fabric they will carry again. I know these Hudsons are boring with no contrast and hard to see details but they are definitely a basic I sorely needed in my wardrobe and I'm so happy to have them.


Overall, I think the Hudson Pants is a good pattern. It sews up quickly, the PDF is easy to assemble accurately, not too many pages to tape together, and nothing was out of whack in the pattern pieces or instructions. It was the first True Bias pattern I've tried so I've had a good first impression. I've had my eye on Jalie's similar Vanessa pant and may give into buying that one too, if only to compare. Because I'm weird like that.

This is the realistic shot of how they'll be worn most of the time.

Monday, September 30, 2013

Sunday Wrap Up

So I made these shorts (S3768) a few weeks ago and have been living in them every weekend. Love. Them. Still can't believe they needed no alterations. The last you saw, I was contemplating back pockets. I tried to get a modeled shot, but no flash, and aiming into the mirror while facing backwards results in much blur. Here's one of the better ones. I use that term loosely.


So I just stepped out of them and laid them on the floor for a photo, weekend wrinkles, dog hair, and all.


The first "tester" pair was from a much-loved repurposed linen but I totally spaced when sewing the waistband on by not stabilizing it and I could only wear them for about an hour before the linen stretched, which meant I was constantly tugging my shorts up like a teenaged boy. I fixed that yesterday. It ain't pretty, but it works. I added some twill tape to the inside of the waistband (right after they were pulled from the dryer) by stitching in the ditch from the top and praying I hit the twill tape underneath. I did, but it's not straight by any means. Lazy sewing at it's laziest. :-) The important thing is, it works. But ... the TOP of the waistband still gets a little loose even if the shorts now stay in place so if I get really motivated to fix this properly, I'll need to also rip out the stitching holding the slapdash twill tape in place. But for now, I'll also be living in these shorts on the weekends and chances are good that I won't fix them properly, because who's gonna know anyway?


My next project is this dress. It took me a while to settle on it because I'm having a real hate with my fabric stash and matching patterns to fabric I want to use is becoming harder and harder.


The main problem is I don't really want most of my fabrics anymore. Many are solid non-Lycra knits, bought when I was sewing more for my sons and other family. But I can't just toss or donate because ... what if I NEED something there? Right? The bottom line is it really means that out of a very full closet, only a few stacks are anything I will actually sew and even some of those are yawners to me. So now I'm contemplating sticking most of it in bins and storing it in the garage. Basically starting over, but with a lot more thought, less quantity, and a lot more sewing fabric before it becomes unloved. 

Here's where the dress progress has stopped for now. The fabric is drapey sueded moleskin, both the print and the contrast solid. I do like *this* fabric but I wasn't really wanting to sew such a fall/winter look yet. Still, if it works out, it will be a nice addition. My office is freezing most days anyway.


I haven't done a muslin for this. Just a quick tissue evaluation (not even really a tissue fit) and a few usual minor alterations as I cut the tissue so this may end up being a pretty wadder. Hah. But I don't think so ... there are many princess seams for adjusting as I go, but that means I have to baste instead of really sew. The back is together too, although I'm also trying to find out if the back zip is really necessary so I haven't done that seam as final yet either. Hopefully, I'll have some energy and mojo for sewing after work this week.

Because if I don't, my sewing table is going to look like this all week.


Tuesday, September 10, 2013

Shorts for the weekend

Still with the newly TNT pattern ... I started another pair of shorts this past weekend and continued on them for about an hour tonight. I have about one more hour left and they'll be done in time for the coming weekend when I'm meeting up with my friend from that job which shall only be mentioned slightly. We're going to go out to a sports bar somewhere and watch football games. And drink. (By the way, she's no longer at that place either! Interesting, right?)


Here's the front. The button/buttonhole and hems will be done tomorrow. I haven't been sewing during the week at all lately so I didn't want to push it.


Inside shot. The last of some red/blue paisley cotton for the waist facing, fly shield, and ...


... inside the pockets.


Speaking of pockets ... I think the back needs some. If only to break up the wide expanse of my backside. ;-)


Parting Shots:

The building where I work:


A Tampa "landmark" from one of my lunchtime walks:

Monday, September 2, 2013

No Labor Day

Happy Labor Day from here at Chez Debbie ... where absolutely NO labor is happening at all. We're hanging out on the back porch (lanai), dipping toes into the pool, surfing the 'net, and waiting for when it's time to fire up the grill.


Linen Bermudas ... it doesn't get much more comfortable than this. And a rayon knit top only helps. (Speaking of which, the front of this top is double-layer, so be warned if you have your own personal heater moments! ) I will probably be living in these shorts for the rest of the summer, on weekends and after work. Or at least until they're too big, because I was serious yesterday about the gym. I know my weight gain is due to the emotional rollercoaster of the last few months and hopefully I'm now off that ride, but I am more than ready to drop those lbs.that creeped back onto my butt. And, arrghh the reappearance of back fat makes me mad. Thankfully, this is one thing that IS in my power to control.


So, a few fabric and construction details. First, hopefully this shot below helps you understand how the border print was used. I really like how the border forms the cowl and looks almost separate from the rest of the tee but still matching the other print area. Kind of a necklace without wearing jewelry.


Here's the tuck in the shoulder that I mentioned as my solution to fix the too-wide front shoulder. I've revisited the pattern tissue and conclude that I just didnt' fold the cowl facing far enough inward. It helps to look at pattern markings from time to time. Oops.


Hard to see in this low-contrast pic, but here are the pockets on the front of the shorts. I love me some pockets so I'm happy with these and they don't gape at all. But instead of using a bias binding facing on the open edge and turning under the outside edge, I just cut two pocket pieces for each, sewed them RS together, flipped them RS out, and pressed before topstitching/attaching. SO MUCH easier to get a smooth curve that way and the linen isn't too bulky that the extra layer is even noticeable. If anything, since linen "gives," it's probably better to have a bit more stability.


This is the back of the shorts. No pockets here, but you can (hopefully?) see where I used the sideseams from the old Marrakesh pants as a design feature seam for these shorts. I wish I could say this was the plan from the beginning, but I soon learned that I didn't have much choice about where my shorts pattern pieces would fit on the old pants.


More Labor Day Weekend Miscellaneous ... here's Alex mixing up his custom marinade for the steaks we'll be grilling in a couple of hours. I don't know what it is about men and steaks and grills, but I'm all for anything that gets me out of the dinner chore. Go Alex!


I haven't been the only one "creating" this weekend. These are Alex's shorts. Shorts that I JUST BOUGHT a week ago. He wore them once and then managed to dribble liquid pool chlorine on them (the really white spots). We were both a little more than irritated. Me, since I just spent the money. Him, since he really liked the shorts. Yesterday, while at the grocery store, I bought some gel bleach with a pointy tip. I handed it over to Alex and told him to have at it. The pic here doesn't do the shorts/bleach design justice. They look really cool and he'll definitely be wearing them. I would too if they fit me. ;-) I know the fabric will be weakened now but at least the shorts won't go directly into the trash bin yet.


Alex had so much fun with the bleach on his shorts that he went looking for more clothing to transform. He came up with this plain red tee. It looks like he tie-dyed it, but it's really just the gel bleach squirted randomly all over. Good job!


Loving Simplicity 3768 So Far

It's looking like this will be one of those patterns that sat untouched in the drawer for too long. Two cut-and-sew successes.

Here's the top, nearly finished. I still have to hem it and will do that tomorrow after I try it on again to mark the length.


And the shorts, also nearly finished. They still need to be hemmed, which will also happen tomorrow. It's late and as much as I want to get these done so I can wear them tomorrow, I know I'm tired enough that stupid mistakes are likely.


I haven't sewn anything in the pants category in YEARS. Yes, me, who used to sew pants and pants and more pants. I've been making do with some RTW jeans and capris because I really wasn't looking forward to re-fitting pants. But another one of my wild hairs struck and I decided to just go for these without stressing.

No muslin. No pattern alterations. No fitting as I sewed. No good fabric. Well, actually, this used to be good fabric but it was already made into a pair of pants ... HP Marrakesh to be exact (review here if you want to see them from then). Yep, I unstitched them while watching TV last night and today cut the shorts from the pieces. I loved this fabric (oatmeal colored linen) and held on to the too-big pants with the thought I could reuse the fabric somehow.

I sewed everything together today, adding the sewn-on pockets, and even topstitching quite bit. All the while kind of dreading finishing because that would mean trying them on and likely tossing them into a wadder pile. I mean, who did I think I was NOT doing any fitting on PANTS??

Well, a pig is flying around somewhere because these shorts fit pretty close to perfectly. How often does THAT happen? Answer: NEVER! ;-)

Hopefully, I'll get some better pics tomorrow when everything is hemmed, pressed, etc. I want to be wearing both of these while we hang out around the BBQ.

And now that my sciatica troubles are finally receding after TWO MONTHS (OMG getting old sucks!), I will be signing up for the gym in my office building. That butt view above is definitely not pleasing me even if the pants do fit.

Saturday, November 5, 2011

Next Week's Sewing

Since I've made NO progress on the cammie purses since last weekend due to severe lack of energy in the evenings (busy week), this weekend's sewing time will be devoted to finishing those. But NEXT week, I'm sewing jeans for me.

I really wanted to buy some jeans for my Thanksgiving trip, but I've tried on about 20 pairs now in the last week and none are it. I'm losing hope. And time. Most of the RTWs fit everywhere except at the back waist, where they gape. I don't have a small waist in relation to my butt/hips, so who on earth DO these jeans fit?

I decided that if I had to rip out a waistband and topstitching down the center back and then re-do it to take in RTW jeans, I might as well make my own from the start and be reasonably assured they will fit when I'm done. It's also hard to find jeans without the un-strategic (in my case) fading and whiskers and I've got solid blue denim waiting in the stash closet.

I'm using the pattern I traced off from RTW and tweaked 7 years ago to make these:


I'm going to go with the bootcut leg like the burgundy pair, which was a change I made to the original "pattern" after making the green jeans. Those green jeans, if you remember, are the jeans I tried on at the start of my weight loss journey, which I couldn't even zip up. Now they are getting too big. Yay! Both of these jeans are straight out of the dryer so they haven't seen a full day of stretching yet. I can really only get one day of wear from either (but I'll probably still take them both on the trip).

I already dug through my pattern drawer to see if I could find the pattern and was relieved to know that I kept it. There's lots of notes on the pieces and in my reviews so I think I'm ready to just cut and sew. But for now, it's back to the purses and just dreaming of new jeans.

On a little bit of a sad note, I called to make a dentist appointment and found out that my wonderful dentist (and the person who really inspired me to change my eating habits) moved out of the area. Selfishly, I'm sad because I really wanted him to see how far I've come. Hopefully his former partners will be as good as he is. If not, I may be driving to Ocala (an hour north) for my next dental needs. 

Parting Shot: Tyler's new medals. On the left, National Defense. On the right, War on Terrorism Service. They will make nice additions to his dress blues, which he'll be donning next Friday night for the Marine Corps Ball.Right now, he's on a plane flying back to Cherry Point NC from Yuma AZ. After 6+ weeks away from "home," he's ready to be back in his own barracks.

Thursday, October 6, 2011

If Friday Is Jeans Day …

 … Then Thursday Must Be Jeans Try-On Night


But first, here's what I wore today, now a little frumpled after work all day and dinner out with Alex and his best friend. I forgot about this twinset until I was digging in my closet last night and am so glad I found it. I love me some lime green. ;-)  I also love this necklace and even had a compliment on it today, but by the end of the day, it is OMG-HEAVY. I couldn't wait to take it off after this photo session.


(My photography skills are even more lacking tonight as I managed to cut off my feet/shoes in every pic because I set the tripod a hair too close. Grrr.)

Let the jeans try-on session begin …

Self-made burgundy bootcuts from 2004. I tried them on with platform sandals and boy did my legs look long. Unfortunately, with my crap camera skills you'll have to trust me on that.


These are the beltloop-less self-made jeans I mentioned last week, and the outfit I thought I was wearing tomorrow until I saw this pic. They are just too big and add 10+ lbs to me. No, thank you, I just lost that 10 and don't want it back again.


These RTW jeans look better so I may be wearing them tomorrow instead. Or chickening out on jeans again and wearing a dress.


Another for the clown pants pile. These were too tight 6 months ago. Amazing.


These are the green "progress" jeans. The ones I tried on and photographed being way too tight in the next pic below, which was back in June. This pic is tonight. They fit, and are even getting too loose. And, no, they are not favorites anymore. They are too skinny in the calves and not flattering.


It's really hard to believe these are the same jeans as above but they are.


Parting Rant: My BMV order arrived yesterday. I broke my promise to myself and ordered yet another Butterick/Crawford pattern (Butterick 5574) because I want to try this skirt. (Carolyn — recognize anything sticking out in the upper right corner??)


And again, I'm really PO'd at this pattern line, especially the instruction sheet.


As usual with this line, there are no illustrations of the pattern pieces. Uh, hello, Butterick? I *NEED* those drawings. It's what I look at first to see how it all goes together. I don't want to have to read ALL of the construction steps just to see what I'm dealing with. That may or may not come later, depending on what the pattern pieces tell me. I like the puzzle of figuring it out for myself.

But what also ticks me off are the lumpy-slouchy-woman-with-a-serious-wedgie drawings. It's irrelevant if my body really does look like that. I don't want to be reminded of it. Do you? I sew and wear clothes to camouflage and conceal my lumps. And, to me these drawings speak VOLUMES about what CC *really* thinks about plus-sized bodies. I've seen many drawings and paintings of larger and curvy woman who looked beautiful, as we all are. Not slouchy and depressed like these pattern drawings. But what's almost just as bad is that I bought the size range for this pattern that is NOT plus-sized. The sizes start at 2 in this range. And yet all of the fitting "advice" is aimed at the other envelope and assumes much bigger bodies. WTF? What size 2 has arms like the drawing on the left? If I had never been or sewn plus-sized, I wouldn't understand any of that at all.

I swear, with all of you as my witnesses, if this skirt doesn't work without major alterations, I WILL NEVER BUY ANOTHER BUTTERICK/CONNIE CRAWFORD PATTERN AGAIN. And this time, I really, really, really mean it. Really.

To leave you on a happier note, these will be arriving tomorrow. I so love having paychecks again, and a reason to dress up. And brown shoes.