
Showing posts with label HotPatterns. Show all posts

Friday, December 1, 2023

Seamwork Meg Dress (and Beatnik wadder)

Yep, you read that correctly. Seamwork. 

I've been eying the Seamwork Meg dress for a while. There's just something about it that called to me. 

So I decided to test out a Seamwork membership because with a 15-day trial membership you get a free pattern download plus access to all the other membership stuff (message board, member projects, tips, project sheets, videos, etc.). If I decided to cancel, I'd still be able to keep the pattern at no charge and I wouldn't be charged for the membership — your credit card is not charged during the trial period. Good deal, right? 

So, I downloaded the pattern to have a look at the drafting, sizing, and instructions. I printed out everything and taped the pattern together. It all seemed in order. (I have some opinions — shocker! — about some of the instructions which I'll share later but overall, they're fine.) 

And here is my dress (still to be hemmed). And I love it!
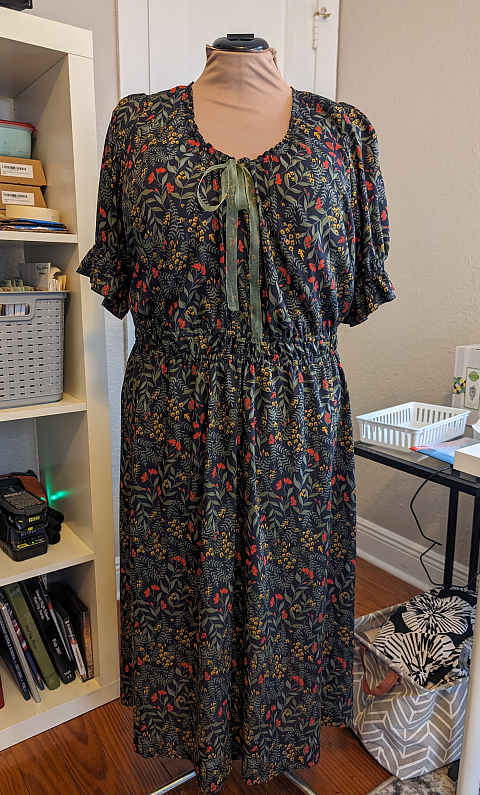
My measurements put me in a size 20 bodice, but this pattern has a lot of ease and after reading through some of the Seamwork "Community" (message board) and seeing some YouTube videos on this and other Seamwork patterns, I think Seamwork patterns run large. I cut an 18 bodice and blended to a 22 at the waist/hip. My measurements would put me in a much larger hip size but there's plenty of design ease in this dress so I stayed at the 22. My sizing decisions worked fine. I also added length to the bodice. Instead of cutting the bottom edge at the 18 lines, I extended to the 22. Kind of a cheater FBA. Seamwork is supposed to draft for a DD in the larger size range, but, again, after my research, I thought I would need more bust length. I was right. The width is fine, but again, lots of design ease.

The fabric is rayon voile from Fabricmart. It was supposed to be challis, but it's not. I'm not lucking out with Fabricmart rayons lately. But I do love the actual print. Also, I see that I still need to more evenly distribute the elastic in the channels so the waist is looking a bit wonky. (If only I could distribute my own waist so quickly.)
The tie is organza ribbon from deep stash. I'm still "auditioning" it and I may end up making a tie from the leftover fabric, of which there is a lot. But I do like the bit of contrast so the ribbon may stay.
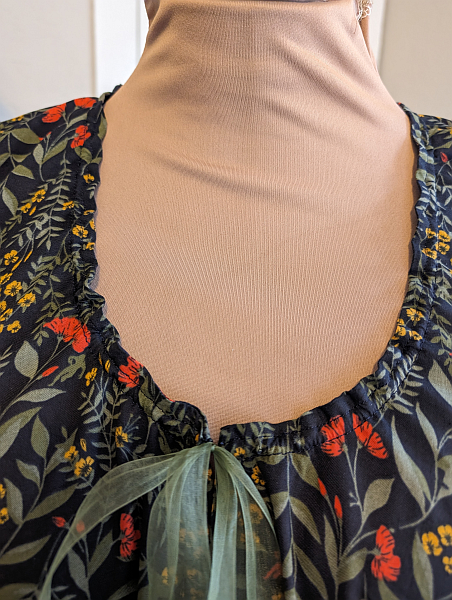
These are the "bonus" sleeves, which are "puffed" and have an elastic channel to create the gathered hem flounce. Members get "free" bonus views of patterns that you don't get if you just buy the pattern without a membership. I think that's how it works, anyway. The non-bonus sleeves are flutter style.
Line drawing of the bonus view.
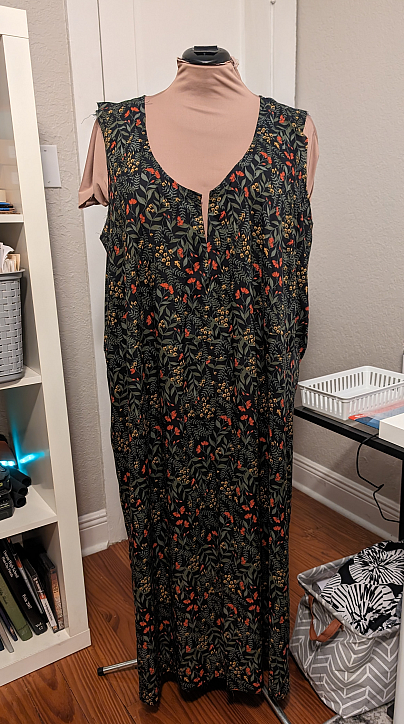
Here's the dress in progress to show how low the neckline is before gathering shortens it. I also added about 6 inches to the skirt length, much of which is now taken up by the waist elastic. I haven't done a final hem yet, but I'm thinking I'll keep most of the extra length.
Side note:  Cyrus decided the pattern tasted good and I found this after walking into the sewing room one day. My fault for strewing pattern pieces all over the place. It taped together fine, but it turns out that the bonus view also comes with its own bodice pieces so I didn't need the chewed piece in the end.
Now on to my opinions about the instructions. Overall, they are fine and will get the job done, especially if you have some experience. But some of the methods are not necessarily "Best Practices." For example, almost everywhere, you are instructed to finish (zz or serge) seam allowances separately. Technically, that's fine. But it's not necessary to construct the pattern and on my lightweight fabric, serging one layer was horrible. I quickly ditched that after being sure no seams actually had to be flat. If there's no construction need for the seam to be flat/open, then I think the instructions should offer a choice. 

Ironically, there is no instruction to finish the seams of the CF bodice and facing, which means they end up raw edges which can be fiddly inside the neckline channel if your ribbon insertion doesn't go smoothly. The facing should be interfaced and it's not. This would eliminate one of those raw edges in addition to just giving the facing a bit more something-something IYKWIM. 

Another "bad practice" is you are instructed to sew the bodice sideseams before attaching the facing and doing the topstitching to it. Much, much easier to do all that in the flat and THEN sew the sideseams.

Lastly, the pattern uses 5/8" seam allowances everywhere. I know this is technically OK and standard for Big 4, but I personally hate a 5/8" seam allowance on a sleevecap. Since this one is gathered, it wasn't a big deal, but if it wasn't, I would have trimmed it down.

Out and out mistakes include some typos, a missing instruction to remove basting stitches from outside a seam allowance (the puffed sleevecap), and no instruction to understitch the facing join seam. These are things a sewist with experience would just do so they didn't slow me down, but a beginner would have no idea.

So, did I cancel my trial membership? Actually, I did not. I'm enjoying the behind the scenes features and other members and there are a number of other patterns I want to download/try, plus I might actually go through their Design Your Wardrobe class at my own pace since my closet needs a huge overall. I think I'm actually seeing marked improvement from Seamwork patterns and practices since their early days and I'm willing to give them another chance. We'll see how I feel next year at renewal time.

* * * * *

Now for The Wadder (HotPatterns Beatnik). Ugh. This fabric (French terry) is so nice that I hate to waste it so I'll probably just literally wad this up and put it in a pile for a while until I can repurpose it. But the actual garment is a Big No. It just looks horrible on me. It's just too much fabric in the wrong places and not enough where it's needed, and the neckline sits funny on me. I've wanted to try this pattern for a while and I'm glad I did finally get to it. It's now out of my system. I'll be trying a Cashmerette Stanton next, I think. 
The topstitching looks so wonky in these pics. That's about the only thing that actually turned out OK, but it doesn't look like it. Hah.
Parting Shot:  If you've made it this far, here's Alex prepping the bird for our Thanksgiving last week. He's an excellent Cook (haha, get it?). Seriously, though, he's done the turkey for a couple of years and it's always been SO GOOD. That's one of his 3 dogs, Oreo, standing behind him. Anytime anyone is in the kitchen, so is Oreo. It was a low-key but enjoyable day with my sons and all the dogs. I finished up the last of the leftovers last night. I'm ready for more turkey! 

Thursday, December 20, 2018

Love Notions Forte and Other Stuff


I'm back today with more of what I've been making recently (and more work bathroom selfies than should be in one post). Speaking of work—I'm off from tomorrow through January 1, which is TWELVE days (woot!) and I'm really hoping to get a few things done in the sewing room. December has sucked (see below) and I'm so ready for the New Year.

In the meantime, let's get back to the sewing stuff. Above is my Love Notions Forte Dress, sewn in October. I like the finished dress, but I took a few detours from the pattern to get there.


This is my second Love Notions pattern made up. My first was the free Laundry Day Tee (previously blogged here and here). LN has a "trimless" print-out, which I found worked better on the Forte than it did for me on the Laundry Day Tee. Me or the printer or the pattern? I have no idea. What *was* my fault was not checking which pages I needed for the View B dress I was making and instead, I printed all 104 pages. Yes, ONE HUNDRED AND FOUR pages. Good for me that I print at work. Bad if you're paying for supplies.

Another backhanded compliment (complaint) I have is that the pages are laid out such that you're only assembling one pattern piece at a time and don't need a huge tabletop to do so BUT … the "map" for the assembly is too light and low-resolution for my old eyes to see it clearly. The assembly diagrams are the pink boxes below. If you're looking at the PDF on a computer, you can theoretically zoom in to see the diagrams better (still low-res though). But if you're staring at the printed pages, it's a blurry mess. I did let the designer know and she responded, so hopefully this will be improved at some point.


There are a number of hints and links to tutorials, etc. that are clickable within the PDF when viewing on-screen. Again, useless if you're looking at just paper. So, I have very mixed feelings on these features because once I'm ready to sew, I'm not next to a computer in my present set-up.

The pattern is touted to have a "full bust" version included. I looked at the tester photos and saw too many on which what is supposed to be an underbust seam bisected the bust instead. I don't know if those testers used the regular or full bust pieces. I don't know if they made any adjustments. I only know that after holding the pattern piece up to my own bust, I needed to do something. My quick fix was to just add more length, as shown by pink-lined addition below. I lost most of the inverted vee shape of the seam with this quick fix but at least it's under my bust. On a future version, I'll probably adjust my adjustment to get back some of that inverted vee shape.


I'll also lower and widen the neckline on future versions. This one is technically fine but higher/narrower than I prefer. Part of this finished shape/height is because I actually added a half inch to the height because some tester photos looked very low. Again, no info on what the testers may or may not have done so I was just guessing. The other part of the finished shape is because I used my coverstitch to bind the neckline instead of turning and topstitching. (Binding also meant I had to change up the order of construction so I could start/stop the binding at the center front.)


The binding looks great. The pattern matching across the CF seam, not so much. I stitched/ripped literally three times and it didn't improve. I decided to employ the 3-foot galloping horse rule. (That's the rule that if something can't be seen from 3 feet away while riding a galloping horse as you pass by, then it's good.) Seriously, not one person has come up to me to complain that for 2-1/2 inches down the center front seam, the pattern doesn't quite line up.


See … far less noticeable at this distance. Even less so on a live body.


Another problem I had with this dress was the sideseams didn't match. I'm confident I matched the correct seams and I'm also confident that pattern itself matches as it should. I think the fabric just stretched out from hanging on Zillie for a week or so. I tried to force it by easing the seams and ended up with this:


So I pressed, steamed, and clappered the heck out of the seams.


Better, but still wonky. Plus, I really wasn't happy with how the dress hung over my backside. I have erect posture and there was just too much length in the back bodice area before it hit my butt so it just hung badly instead of skimming. I thought I took a pic but I didn't find it, so you'll have to take my word on that.


So I took a hard left (figure of speech) and unstitched those wonky sideseams and then cut off the lower back …


… so I could add an adjusted back waist seam to get rid of the excess. Again, not scoring perfect 10s in the pattern matching but I was now limited by remaining fabric so I didn't even try.


And it looks fine. The sideseams aren't rippled anymore either.


My phone makes little animations when I take a lot of similar photos in a row. It cracks me up, and this one was actually pretty good. I really like the front drape of the skirt section. It's fun to wear because it has a lot of movement.


Now for some other October/November sewing. Up first, HotPatterns Garden Party T.


The pattern is great. My fabric and trim are crap. I'll be trying this again in another fabric. One that doesn't hold static, doesn't flip up, and doesn't feel like wearing plastic. And this from a polyester-print-lovin' girl.


One more pair of black Hudsons for cooler weather. Love these. Wear them all the time. All. The. Time. This is the best black ponte ever. From Cali Fabrics. I'm not affiliated at all, I just love this fabric. Go buy some here.


Lastly, another Itch to Stitch Nottingham top and McCall's 7386 skirt.


I used my lowered neckline from last time.


I love my clapper when pressing neckbands, so they stay curved and flat.


I also added about an inch to this version of the top (first version here) on the lengthen/shorten lines and I like the length of this one.


Also did the "faux tie" thing again.


One last work bathroom selfie.


* * * * *
And now on a more somber note about why this December sucks. Many of you know that my marriage ended about 6-1/2 years ago. Very long story short, I was finally divorced two weeks ago, on December 5, here in Tampa. (My ex had been living in Virginia all these years but had flown down to Tampa for this.) After court, he drove to St. Augustine, where Tyler and Michael (my step) live. The three of them went to dinner that same night and while walking in the tourist areas of St. Augustine, my ex had a sudden and massive heart attack and passed away just minutes later. All of this is to say that it was huge shock and we're all pretty sad. (Luckily Alex did have dinner with him in Tampa the night before.) I couldn't decide whether it was appropriate to put this on the blog but all of my family has been on the blog at some point and so many of you have been there from the beginning so it feels like a kind of closure.


Friday, November 30, 2018

HP Nexus T-Shirt Dress


Happy End of November! And, yep, it's been a while. Again. I've sewn a number of things over the last few months and have at least one more blog post in the wings with photos loaded and waiting, so hopefully I'll get that published soon too.

Today, however, I'm going backwards and starting with what I made most recently. As in, last weekend. The photos are kind of meh and as usual include some from the work bathroom but … hey … that's me. So, let's get started. Spoiler alert — I'm not thrilled with this pattern.

The pattern is the HotPatterns Nexus T-Shirt Dress, pattern shown below. I bought the downloadable PDF version.

Pros for HP PDFs — no trimming. You just butt the edges and tape.

Cons - No layers, so in places you end up with a million indiscernible lines overlapping in place. And the pieces are not laid out with printer limitations in mind, so near the edges there is usually something missing. Mostly,  you can work around this. Sometimes, it's highly irritating. Also, for this particular dress, the front and back pieces are split into two sections that are to be taped together. Except, there is only one addition piece to be added to two base pieces. So you either have to print the addition pages again or trace the one you have. That itself isn't a huge problem but there's no mention of there being only one add-on piece instead of the two needed anywhere in the instructions so you could be caught out and feel a need to swear. Or is that just me? (That's the piece below.)


My photo above is after reworking the dress. This photo below is an in-progress shot before I reworked it. The main thing I want to point out is how twisted everything is. Is any of this twisting reflected in the line drawings above? Hint: No, it's not.


Below are what the pattern pieces look like. There is a center front seam and the ties are single-layer so the wrong side of them will show.


In the original design, the ties are supposed to overlap, kind of like a wrap dress, with one crossing your chest inside and being pulled tight and anchored into the side seam and then the "outside" tie connects to a "connector" tie sewn into the opposite side seam. But because the main ties originate from the center front, nothing lays nicely and it's a lumpy, droopy mess.


To salvage what was going to be a wadder, I removed the "connector" tie sewn from the side seam and then brought both real ties to the outside at the center front and tied them there. The whole dress lays so much better and the lower "skirt" isn't sticking between my legs.


The only thing I need to go back and fix is to sew the CF seam below the knot a little higher. You can see my black slip when I move the ties out of the way. The ties mostly cover the "hole," until the wind blows and they don't, so this is a fix I'll be making this weekend while I still have black thread in the machine.


Before I realized how much I hated the original design, I tried facing the tie, but it ended up way too thick so I removed it. (That's my Love Notions Forte hanging in the background below, which is the next blog post up.)


This is a really bad, small pic of the final tie with the facing removed and zigzagged 3/8" hem. I'm pretty sure you can't really see anything.


We had a cold snap here in Tampa this week, so this is how I really wore it, with a black RTW cardi and acid green tights.


While I like a lot of HotPatterns' designs and they were one of the pioneers in modern Indie patterns and deserve a high-five for still bringing it, I'm finding myself wishing they'd take on some of the features I've come to rely on from newer Indies. Such as photos of finished garments on a variety of bodies (heck, even ONE photo on a body instead of all drawings would be wonderful), great PDFs, and better instructions. I don't need hand-holding for assembly in the least, but I don't want to be scratching my head because something doesn't make sense or is wrong or is just plain missing. So by "better," I mean accurate. Speaking of missing, more notches and marks would also not be unwelcome. And finally, the elephant in the room is the completely bogus size chart and measurements. At first glance, it looks like there are a lot of useful measurements. Except if you use them to pick a size, you'll end up with a garment 4 sizes too big. And while I'm wishing, I'd also really like some finished garment measurements.I know if these things were offered, there'd be tons more customers for them, and I have a real interest in seeing HotPatterns stick around since I really do like nearly all of their designs.


Friday, July 27, 2018

One More Hot Patterns Classix Nouveau Primavera Dress

I last made this dress just about 1 year ago. I've worn it a LOT since. It's the perfect combination of great fabric, easy wear, easy care. Every time I wear it, I always tell myself to make another. I finally listened.


Another classy work bathroom selfie.


The pattern:


Bodice, in progress. Like last time, I fully lined the bodice to eliminate the facings. I also raised the neckline another 3/4". The last version is passable, but it still teeters on low-cut. Teeters. Hah. That's the only alteration I made to this version, having incorporated the incremental fixes from last time into my actual pattern pieces. It was nice to pretty much just cut and sew.


Lots 'o gathering at the front waist.


CB stripe matching like a BOSS! If you look close, you can see there's actually a seam in there.


Almost BOSSy matching at the side, but not quite.


I had a brain fart and forgot to match the pocket facing. The eagle-eyed among you will also notice that I didn't even attempt to match at the bodice side seams. Well, I did, but I cut either the front or the back in the opposite direction so what I thought was matching, really wasn't. Not a big deal since my hands are always either in the pocket or hanging next to it blocking the opening and my arms block the sides. And it's done and quite wearable, so there's that.


The 2-inch hem facing. I love wide facings. I don't always like slowing down and cutting out the extra pieces, but I'm always happy when I do.


More bathroom "glamour shots."


I'm glad to have this one in the wardrobe now too. I'm putting this pattern away for a little while, but I'm sure it will make another appearance at some point. Mindless dressing at 7 a.m. for hot Florida summer weather is what I'm all about these days.