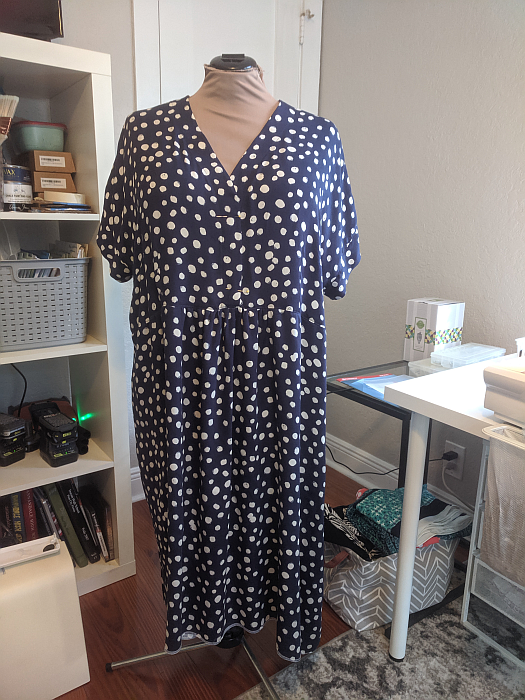
My Fringe Dress is done, and overall I like it. I'm still not loving the fabric though. The print/color is good. But the fabric quality is just OK. It's very drapey and comfortable, though I expect it to wear out quickly.
The dress sat in Time Out for a week because the bottom edge just seemed so uneven and I didn't want to deal with trying to even it out. (
I had eliminated the curved up sides of the pattern and just squared off the hem but that wasn't a factor.)
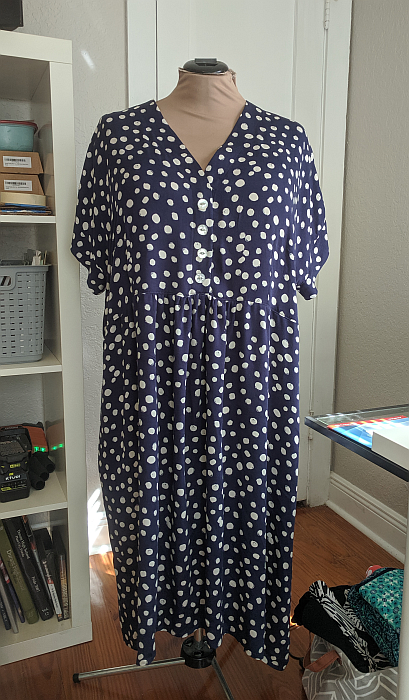
Here's another view. It looks like the sides of the dress are hanging much lower than the front/back.
Well, today I had the brilliant idea to finally try on the darn dress. And, guess what? The bottom edge hangs MUCH straighter on my actual body and not Zillie's. The dolman sleeves without arms in them made the sides of the dress hang lower. It's obvious NOW, but when I was looking it on Zillie, all I could see was the floppy unevenness, hence the Time Out.
I decided that any residual unevenness is not obvious when I'm wearing it, so I just hemmed it, added buttons, and called it Done. (
Do you see my Cyrus—aka Velcro—behind me?)
Here's the back view. (
I really need to fix Zillie's tilt.)
The inseam pockets.
And the sleeve "cuffs" that are the View B sleeves bands, which aren't really cuffed and there are no tabs. I didn't want to fiddle with those.
I also didn't want to fiddle with buttonholes. The dress fits over my head fine so I just sewed the buttons on, by machine, through all the layers.
Before I get into my very few quibbles, I'll say the pattern goes together very well, I like it, and I'm sure I'll make it again. Now here we go on the quibbles …
The PDF prints in landscape orientation and I found that kind of awkward. It's not a deal breaker and I know I'm being nit-picky, but I do wish at least the instructions were portrait oriented. It's just what feels "normal" to me. I kept reading the left side of the page top to the bottom and then the right side, like columns and not rows, and the instructions are oriented in rows not columns, so I was reading out of numerical order and had to keep self-correcting.
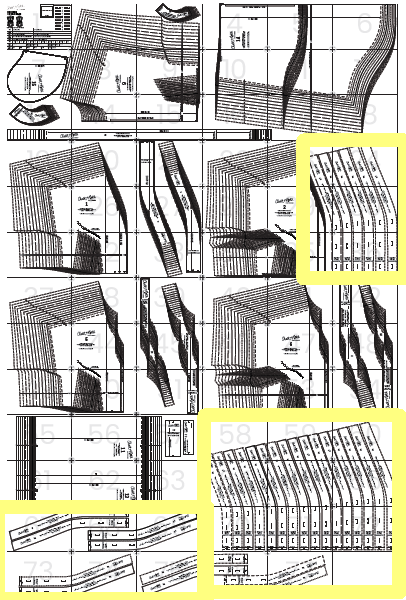
I found it completely ridiculous that there are about 20 pages devoted to patterns for interfacing. (
Outlined in yellow below.)
And even if you deselect those sizes in the layers tab of Acrobat, the interfacing pages still print with the page outlines and number watermarks. Yes, I could have checked and done a custom page selection before clicking Print but since I print at the office, I tend to just print everything because I blend between sizes and I want to be sure I don't miss something. Even with the "key" telling you what to print for certain sizes, it's difficult to know which pages are actual pattern pieces and which are interfacing pieces. If you're using your own printing supplies, you may want to check what pages you can eliminate from printing. Twenty extra is a lot.
After all that, I didn't even use the interfacing patterns, preferring instead to block fuse my interfacing to my fabric and cut out the facing pieces that way. The instructions have you fuse the interfacing to the garment wrong side instead of to the facings, although fusing to the facings is an "option" mentioned. Fusing to the garment side of things is way too fiddley for me, especially with this floppy rayon challis. (
See here if I didn't explain well.) I'll also mention that the interfacing pattern pieces do not include seam allowances, which can be good in theory but extra fiddley to place accurately. Also, you shouldn't be using interfacing on this dress that is thick/firm enough to be a problem in the seam allowances so I think eliminating the seam allowances from the interfacing pieces is not really necessary here. Plus, I *like* the interfacing to go to the edge of my facings, especially on fabric that ravels when you just look at it sideways. And I don't turn under the edges of my facings - I just overlock/serge those suckers, at least for non-fancy stuff like this. So I guess what I'm saying is the instructions are fancier than I sew. Haha.
But the instructions overall are good. Not too verbose and well-illustrated with diagrams/drawings. If you prefer photo instructions or want more fitting help, there's also very good extra information on C&N's sew along pages,
here.
Like I said above, I do want to make this again and I like the pattern. Any negatives I've detailed above are not show stoppers and are easily remedied or overlooked. I also hope to get a decent pic of me in this one, but who knows when that will happen.
Question(s) of the Day: Do any of you watch sewing channels on You Tube? Who are your favorites? I have a few but I'm always looking for new ones. I miss the sewing shows from PBS. Sandra and Nancy and Shirley were gems, weren't they?


 (In the pic above, the arrow is pointing to fabric I'm planning to use next for a skirt. It will be another boring project, but I imagine I'll get a lot of wear out of that too.)
 I went "old school" with this top and used a neckline band instead of a binding.
 And as usual, I coverstitched the bottom and sleeve hems. Which leads to …
 … this little doo-dad. I've seen these hem guides a few places on the interwebs lately, and being the notions
  The package comes with two guides, which can interlock or not, and a little clear ruler grid if you want to set the guide up at a measured distance from your needle, which is probably more useful on a sewing machine and not a coverstitch machine. The guides have a removeable, and renewable, stickiness on the back to attach harmlessly to your machine bed. Here's the Amazon link so you can check it out (which is an affiliate link so I might make a fraction of a fraction of a penny if you happen to buy one from the link).
 As you can also see in my hemming pic, I've finally found a good use for the sewing clips I bought a while back. I mostly press and coverstitch hems by eye but I usually use a few pins to hold things in place. Except some of the pins inevitably fall out as I'm going around the hem. These clips are a perfect replacement. Old habits die hard so I find the clips are still not as quick to use as pins in most of the rest of my sewing and they had pretty much been collecting dust. I'm glad to put them to use at last.