
Showing posts with label notions. Show all posts

Monday, October 9, 2023

Boring Basic

I know many sewists don't like sewing basics, but, truthfully, making basics is one reason I'm back in the sewing room. No, basics are not exciting blog content. But they sure are workhorses in my closet. I have a RTW plain(ish) black top that I've never loved even though I wear it a lot to the office because most of my office wardrobe is pretty much a take on basic and/or black these days due to a relaxed dress code and opting for comfort over "fashion." It's been way past time that I make a plain black top I actually like.

So, I present my 6 zillionth TNT Ottobre tee (view 4 with the gathered front). This pattern is now 16+ years old and still going strong, both on my cutting table and in my closet. I have more than a few I still wear from when I started making them 16 years ago. (Gotta love indestructible polyester haha!) And if I haven't sewn a knit top directly from one of the multiple views of this pattern, I've used it to fit most any other tee I've sewn.  
(In the pic above, the arrow is pointing to fabric I'm planning to use next for a skirt. It will be another boring project, but I imagine I'll get a lot of wear out of that too.)

This is what this particular 02/2007 Ottobre Woman issue looks like. It's actually still available, only in Dutch, on the Ottobre website here. I'm pretty sure I'd still wear most everything in this issue. I really should revisit it now that I've re-stocked my tracing paper.
I went "old school" with this top and used a neckline band instead of a binding.
And as usual, I coverstitched the bottom and sleeve hems. Which leads to …
… this little doo-dad. I've seen these hem guides a few places on the interwebs lately, and being the notions collector fiend that I am, it was soon in my Amazon cart and on its way to my sewing room. Yes, a stack of Post-Its still works just as well, but this looks cooler. :-) 
The package comes with two guides, which can interlock or not, and a little clear ruler grid if you want to set the guide up at a measured distance from your needle, which is probably more useful on a sewing machine and not a coverstitch machine. The guides have a removeable, and renewable, stickiness on the back to attach harmlessly to your machine bed. Here's the Amazon link so you can check it out (which is an affiliate link so I might make a fraction of a fraction of a penny if you happen to buy one from the link).
As you can also see in my hemming pic, I've finally found a good use for the sewing clips I bought a while back. I mostly press and coverstitch hems by eye but I usually use a few pins to hold things in place. Except some of the pins inevitably fall out as I'm going around the hem. These clips are a perfect replacement. Old habits die hard so I find the clips are still not as quick to use as pins in most of the rest of my sewing and they had pretty much been collecting dust. I'm glad to put them to use at last.

Saturday, April 10, 2021

Ready Thread Go

When I first moved into this house (almost 2 years ago now!), I unpacked my sewing supplies and called it done. But I really didn't organize a lot of it to my liking. Since I haven't been sewing regularly for a while, I just grimace through it when I do dust off the machines. But my thread was irritating me just a bit too much and I realized it's been a mental roadblock keeping me from sewing more. So I decided that today was the day I would finally tackle it instead of forever searching the rows for the right color, or more likely, just ignoring sewing altogether. 

It only took a couple of hours and it's not like I haven't been inside this house most of the last year with time on my hands, so I don't know why the procrastination, but I'm guessing we've all accumulated a lot of those feelings lately so I'm not going to offer any specific excuse except to say, oh well. 

I meant to take a pic before I started pulling spools off, but whoops. I did remember after pulling off the whites and browns. 
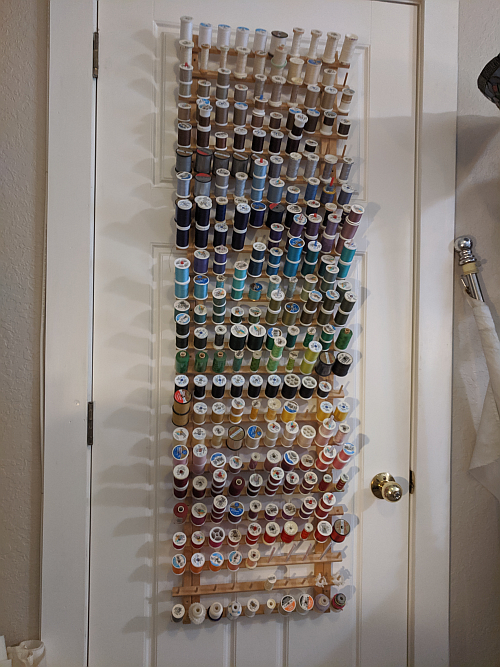
And here are the racks completely empty. Same as when I was in my rental house, I hung the racks using Command Velcro strips. I love those for this. First, no doors are harmed, and second (and almost as important), no measuring is needed to get everything lined up. I've found that using the Command strips on some painted walls hasn't turned out as well, but a wall is a lot easier to fix than a hole in a door.  
I pulled off all the spools and arranged them in groups of colors on a blanket pulled across my bed (which is about 5 steps from the door). Also, see my treadle makeup table? I really don't have room for it anywhere else but I also don't want to get rid of it. Makeup table it is. Although what IS makeup anymore?

And then I stared at the piles for a while, trying to decide how I wanted them to run into each other. 
In the end, I went with whites/beiges at the top, going into grays and then blues, greens, black, yellows, pinks, reds, oranges. I ended up with empty rows for expansion and weird stuff on the bottom row like nylon thread, fusible thread, etc. Because of my coverstitch machine, I tend to buy multiples of the same colors. For many of those, I use straws over the pegs so I can stack spools. For basics, like blacks, whites, grays, and browns, I keep them single so I have room to expand within a color range using the straws if needed but without having to move the entire collection of spools up or down. 
And since we're on thread, serger cones are kept in 2 drawers of an IKEA unit under my machine table. 
And bobbins in Bobbin Savers behind my sewing machine. 


And that's probably more than you wanted to know about my thread.

I have a pattern printed and taped together, but I don't think I have fabric in the house that is suitable. So, another small project today will be getting into some fabric bins in the garage. I actually got rid of a lot of fabric when I moved so I'm not even sure what's out there, but I really, really do NOT want to turn looking in those bins into another organization project. I think I'll take my phone out there and just take some general pics so I have some record of what's there and call it done. 

Sunday, September 8, 2013

Take 2


While the patterns (Butterick 5429 and Simp 2185) were still out, I went ahead and made another 2-piece "dress." This time I added the flounces to the skirt. I figured they would be mostly lost in the print in case I hated them but would still add swish and movement. I do like them. Per the pattern, they are single-layer and raw-edged but hang in such a way that the wrong side of the fabric barely shows. In other words, a quick/easy addition to the skirt. Can't beat that.

This skirt has definitely moved into my top 3 knit skirt patterns so I should probably leave the pattern out a little while longer. I like how it fits closely at the hips even though it has an elastic waist (I changed it from a casing to a serge/turn) and then flows into a swishy bottom. Treena had commented on the first skirt that (paraphrasing) she wouldn't want to sew all those curved seams in the panels. Don't be afraid ... in a knit, it's a breeze. You barely know you're sewing a curve. And the pattern notches are spot on if you want a little more guidance.


I was stupid when cutting out the top, though. I have the pattern marked to add an inch to the bottom when cutting but for some reason I completely spaced. I decided to add a hem band to make up the needed length and to create a blouson effect so this top wouldn't be *exactly* like the last one. It's hard to see on Zillie through the print, but it hangs differently on my body/hips. Once I get pics of me in the new outfit, you'll see.

In my last post, I mentioned the pattern keeper ziplock bags I use for my patterns. I used to buy them from Nancy's Notions, about 50 at time. But they've discontinued them. Boo. I knew Clotilde used to sell the same bags but with their logo instead of NNs. I had received one or two as a sample on a past order, so I wasn't imagining it. Well, the Clotilde company has been bought out by Annie's and the Clotilde website redirects to Annie's. I found this out when needing to order more bags. Since NN didn't have them, I decided to give the Annie's bags a try thinking they'd be the same. They are functional but they are definitely not the same and are of much lesser quality. I found other possibilities after a Google search and might try something else when I'm ready for more. In the meantime, here's the link to Annie's. http://www.anniescatalog.com/detail.html?prod_id=93028&cat_id=1520 I'm not affiliated and theirs are definitely NOT the same as the Clotilde pic you'll see at the Annie's link. Kind of misleading. 


Can you see the pocket outside the bag?


Finally, for Meredith ... here's the link to the PR discussion that inspired my last post:

http://sewing.patternreview.com/SewingDiscussions/topic/80323

ETA: I've been checking out new blog posts and it's amusing (in a good way!) to see that my questions post inspired your own posts.

Friday, August 12, 2011

Rambling Photos

Another bunch of randomness similar to the other night, but this time with photos.

I finished this bag earlier this week.


And then yesterday made up a pattern and sewed this bag today.


I really want to sew clothes but I'm paralyzed. I don't need any more casual tees right now. But if I start on dressier work clothes, will they fit in a month? I hope not, and so I don't really want to spend time and good fabric on them. Hence the purses. But I'm really going to need work clothes at some point. I wish I knew what point that is (and what my measurements will be then).

This is what my sewing table looked like this afternoon after finishing a purse. AKA purse vomit. ;-)


I really hate sewing in the midst of a mess. I always start out with a clear table and it ends up like this. I think I need a bigger table.

I ordered some stuff from Nancy's Notions last weekend and it arrived today. Two LED lights to stick onto my machine, mostly because since I can't seem to keep a working lightbulb in my D1. I liked them because they are battery-operated so no cords, and they were cheap — 2 for $15. I haven't worked up the nerve to stick one onto my machine yet. What if I hate it or it gets in the way? I also got some more Wonder Tape, Steam-a-Seam, and clear elastic. The last clear elastic I bought from NN's was Lastin brand. This is Clover. I hope it doesn't suck. Also, can you believe Joann's didn't have any clear elastic or Steam-a-Seam? OK, I know you can, but they used to so what's up with that?


I bought some more patterns. I really need to stop, which you'll see in a minute. One is the Hot Patterns Pussycat blouse that was on clearance at Fabric.com. Another is a McCall's skirt that I bought at Joann's on sale last weekend. The other is a Vogue dress I bought from BMV a couple of weeks ago (with others, but I didn't photograph those yet). Which reminds me, I still have to finish that HP dress once my replacement fabric arrives.


Also from Joann's last weekend, 3 more Vogues. Vogue 1250 I had bought during the BMV sale and have muslined it as you saw a couple of weeks ago. I need to return to it. Do you see a pattern (hah!) here? The dress in the upper left I will probably not make/wear for a long time, if ever. Unless I need to go to a wedding after I lose a lot more weight. I just know this is a good style for me and it's a pretty much a classic, so maybe it will still be passably in style when my tummy disappears.


What is up with the huge Vogue envelopes anyway? Have they always been like this? I don't usually buy many Vogues. It irritates my OCD for having everything fit in the pattern ziplocks and cabinet drawers orderly. Oh wait, it's the "designer" patterns, right?

This is why I need to stop buying patterns. All of these are my "short list." Yeah, really.


I got a call today while I was out, from another law firm I had sent a resume to (I wouldn't type such a grammatically bad sentence if they hired me). Maybe they'll interview me. I think they wanted to pre-screen me before inviting me over. That's an easy guess since the woman calling pretty much said as much without explicitly saying those words. I'll give them a call back tomorrow.

I've noticed some bloggers getting ready to sew for Autumn and Winter. They are ready for summer to be over. It must be the Florida in me, but I am NEVER ready for summer to be over. Which is a good thing, since it so very rarely is over around here. I'll be sewing for hot weather for at least 4 more months. If I had to switch seasons every 3 months, I'd never be caught up.

Tyler sent me a funny video tonight. He's working night shift in Yuma. They pranked their SSgt. One skinny guy hid in the mini fridge and when the SSgt went to open it for a drink, he got a big shock. I'd link you to it, but it's full of F Bombs, since that's pretty much the only word Marines know. Oh, and "Rah." LMAO. ;-)

I found out yesterday that a USO center has been approved (finally) for Tampa International Airport. When my life gets back together, I'd like to volunteer there when I can. It's not supposed to be finished until 2013. I hope my life is back together by then.

Who has Laura's blog URL? The Laura who, with her BF Hans, is on her way to Florida? Hers is one of the links I lost and can't find.

It's almost 2 AM. I should go to bed. Or something.

Monday, May 30, 2011

Sunday Shopping

Did I finish my jacket and start my skirt yesterday? Uh, no. I went shopping.

First stop, Joann's for their Memorial Day notions and Simplicity pattern sales.

From the notions wall (which isn't even really a wall anymore since they rearranged the store a while ago):


Stretch needles and 110/18 topstitching needles (Singer because they were out of Schmetz) and Hollywood tape. I can't say enough good things about the Hollywood tape. I use it on my left bra strap every time I wear a Hot Patterns Sunshine Top because my neck is off-center or my shoulders are uneven or *something* and any top with a wider-cut neckline eventually slips and shows my left bra strap. Just the left one. Weird, I know. Do NOT pay full-price ($10.99) because you can either stock up during a notions sale or use a coupon. I also use it on crossover necklines for insurance. So much easier than a safety pin and it won't wear a hole in your fabric. Cute little metal tin too.

I also bought 2 yds of the fabric you see under my Joann purchases at $7.98 per yard (sale price). It's a very nice rayon/Lycra knit. At Joann's! Who knew.

From the Simplicity pattern drawers, which were quite picked over by the time I got there:


These are the first Simplicity patterns I've bought in probably a year. I tend to buy most of my patterns online now because I know they're in stock in my size and I get to avoid dealing with the crazies who ravage the pattern drawers during sales. Yes woman in the blue dress, you know who you are!

Many of the patterns I really wanted were out of stock and I noticed during a visit to Simplicity's website that a lot of OOP patterns are patterns I would've bought IF Simplicity.com had good sales like BMV. Simplicity, are you listening?? (Your 30% sale this weekend is a start, but 30% off isn't enough of a draw for me.)

Next stop, Walmart for some drugstore items and a cheap necklace to wear with the new jacket.

Last stop, Fabric.com:


The three prints are rayon/Lycra, and the white solid is a poly ITY. I really need a solid white top to wear with skirts and jackets so while boring, it will probably be the first make from this group. And why am I buying MORE fabric when I have an entire fabric closet to soon pack up and move? I plead temporary insanity.

Also, I found this Fabric.com coupon from RetailMeNot.com, and it worked for me:  Coupon Code for $10 Off orders of $50 or more June 8, 2011: TRY112

I would have had time in the sewing room after shopping and dinner, but the Marine has decided he wants to shop for a new car. Yes, this is after Alex and I took his Jeep up to him not two weeks ago. So this new plan meant a lot of telephone time trying to teach him the loan process and how to deal with car salesmen (er, salesPEOPLE). I'm pretty sure I have him convinced to only look around today and to NOT sign anything no matter how irresistible the salesperson makes the "deal" seem. If he does buy a new car, he'll still keep his Jeep with him on base. He just wants something newer and spiffier and since he now has all this money to burn because he has absolutely NO EXPENSES after savings, cell, and car insurance, well — I was 22 once too. I understand. He's looking at Ford Fiestas, Mazda 2s, Kia Souls and Rios, and probably a little of everything else.

Now off to the sewing room to try to make some progress before the Marine calls with his first can't-resist-deal. ;-)

Wednesday, January 12, 2011

Clap On, Clap Off

(Or, When Peter Found My Round Tuit)

On Monday, Peter posted "The 14 Shirtmaking Tools You Won't Want To Live Without!" Ten minutes later, I had already bought and paid for one of them via Ebay. Today, it arrived. (Take note of the fast shipping, SewingPatterns.com. Hmprf.)

What did I buy? A Clapper. Well, more precisely, a Point Presser/Clapper.


I've wanted one of these for a while (anyone watch Family Guy and know the "a WHHHile" line? Cool WHHHip? Anyone?? No?? OK, then nevermind), but it's been on the back burner because I don't remember I want it until I need it. Kind of like those extra pattern weights I mentioned the other day. Getting old and losing brain power sucks, but Peter's reminder was finally the needed impetus.

I have had its cousin for a long time, but I've never been really and truly happy with it. It's OK, but it has shortcomings. Jack-of-all-trades, master-of-none.

The smaller cousin is meant for pressing curves as well as points and the curvy end of this flat point side gets in the way more than it helps. When I'm pressing a long pointed seam open, I don't want that darn valley there but the flat length is too short to easily avoid it.


It's often not quite long enough and it's sometimes fiddly to get a seam flat on the edge. See the difference in length and width between the two?


It came with printed instructions on it, blue ink. Well, I had to sand that off in a hurry because the blue transferred onto the item I was pressing one day. THAT was a surprise I didn't need, thankyouverymuch.


And, I went all out and bought this nifty padded cover with it and I HAVE NEVER USED IT. OK, that's not really a shortcoming for the board per se, but it still irks me. I had to dig it out and dust it off for this photo. ;-) I don't use it because you can't get a flat surface with it on. It doesn't fit the board tight (enough even though I've steam-shrinked the crap out of it). Which means it shifts when I'm pressing and it's just not worth the PITA factor.


Plus, I've never had a real clapper. I have a hardwood seam roll stick thingie (flat on one side) that I've been using as a substitute, but this actual clapper is just a little bit heavier and less cumbersome, and should work even better. It's funny how a block of wood can make a girl so happy, but it does. I can't wait to try it out for real.

In other shopping news, these ITY knits arrived yesterday and the order with Michael's fabric and my jacket pattern is due on Friday. It's looking good for some activity in the sewing room this weekend.

Sunday, February 24, 2008

I Love My Button Foot


I'm the first to admit I have a serious addiction to presser feet. I own 99% of the feet Viking makes for my machine and a few others Viking doesn't make. I'm sure I'll have them all one of these days. Most of the feet work wonderfully. Many I can't live without anymore and some others mostly collect dust, and yet I still can't bear to part with them. The button sewing-on foot is one of the gems.

Before Viking came out with this foot I would still sew buttons on by machine, using the hump-jumper thingie and a piece of tape. It was fiddly and I'm not really sure if it was actually easier or faster than sewing them by hand but at least it wasn't sewing on by hand! ;-)

The Viking foot comes with this little button grabbing tool. You squeeze it slightly and insert the prongs into the holes in the button. The tool expands a bit and the button is "stuck" on it until you squeeze the tool again to release it. This removes all the fiddly-ness from placing the buttons into the foot and in position over the fabric.


The foot itself has a "shelf" where you rest the button. When the presser foot is in the full down position, the button is sandwiched securely between the two layers of the foot. There is also a finger that can be moved in and out for creating thread shanks of varying height.


Here's the grabber tool still holding the button after I've put the button into the foot. I leave the tool in place until I put the foot down.


Here the foot is down and I'm ready to stitch. Pardon all the lint on my machine. It was cleaning day today and the machines all got a thorough going over, but not until after this photo was taken.


My machine has a specific button sewing stitch, which is basically a zigzag stitch set for the width between most button thread holes. I say "most" although I've not yet had a button for which this stitch wasn't perfect so maybe I should amend that to "all." It's a handy stitch and coupled with this foot, it's the answer for sewers like me who prefer not to sew on buttons by hand.

If you have a Viking, you must get this foot! If you don't have a Viking, other brands do have a similar foot and there are generics, but I don't think any of those come with the little grabber tool. (Please correct me if I'm wrong about that.)

You've now been enabled. Again. ;-)

Wednesday, October 31, 2007

I Heart Gadgets …

… especially gadgets that work! (Blogger's photo uploading over the last few days, on the other hand, not so much. Grrrr.)

This is one of Babylock's single downturn fellers. The 1/4" version, to be exact. I have all three — 1/4", 5/8", and 1". I bought these from my Babylock dealer before I ever stumbled on "the Ebay guy" and his industrial generics. (And those of you with coverstitch machines know what an enabler I've been for him ever since!)


Every so often I consider selling these fellers on Ebay or the PR Classifieds because I really don't use them. But I always stop myself and start thinking, "What if …?" Yesterday, I was very glad I've held onto them.

I was helping DS' girlfriend with some costume sewing (which explains the pink and the pacifier fabric you'll see below). We needed to make ruffles. Miles of ruffles. OK, not miles, but almost 10 yards and the thought of hemming nearly 10 yards of strips made it seem like miles. Usually I take the easy way out when making ruffles and just fold over the strip so it's doubled and no hemming is necessary. But GF had a limited amount of fabric and to get all the ruffles we needed meant we had to cut single layers of strips. And then finish the raw edge. Urgh.

Enter 1/4" downturn feller (with a chorus of Hallelujah in the background). Now I know some of you probably own and have tried various hemmer feet for your sewing machines. And most of you have cursed the day you ever bought it/them. They do work, but they are fiddly and then in the middle of a long hem, you blink, and it goes off track. I feel your pain. ;-) Not so with these fellers. They just plain work and you can blink all you want.

The feller is attached to the bed of the coverstitch machine (here, it's just laying on my sewing table, but you get the idea). The fabric is fed into the turning-under-thingie and the feed dogs move the folded edge under the needles where it gets stitched.


This is the back side, where you can see the turning under happening. (And if you look closely, you can also see the reflection of the vent on my sewing room ceiling!)


This is what the finished ruffle looks like from the top. Yes, there are two rows of stitching at the hem and it's probably not something you'd want on your finest silk blouse, but this is cheap cotton and a costume so I think it looks just fab! And really, it's not like the hem police will ever stop me to issue a citation.


And this is the underside. The raw edge is perfectly and evenly covered by the (ahem) coverstitch. 'Tis a thing o' beauty, ain't she?


After the long strip was hemmed, I ran it through my serger with its gathering foot (another gadget I love) and voila! Perfectly gathered and hemmed ruffles. Minimal effort. And one happy GF.

Thursday, October 11, 2007

Questions and Capris

OK, I have to admit that I never thought I'd get so many comments about the little thread rack and my "floating" basket. But thank you. It's nice to know I'm not the only one touched by OCD in the sewing room. ;-) There were a few questions/comments, so I'll address those here.

1. Will bobbin spools fit on those spindles?

Not directly. The spindles are on the thick side. And, as a side note, they are also spaced too close together to put C&C spools side-by-side. (Yes, I use C&C a lot because of the better color selection and my machines never balk at it.) But the spacing doesn't matter to me because I'm not intending to actually fill up the rack. If I do, it means I have too many spools sitting out. OK, back to bobbins …

To get around the spindle size, I use plastic drinking straws. I cut a straw so it's about 4" long and then I slit it along the length so it can wrap around itself to become narrower. I slide the straw over a spindle, pop on a spool of thread and then slide the matching bobbin thread down the straw on top of the thread, like this:


I use the straws on my big thread racks too, to stack multiple spools of the same thread.

2. How do you store your bobbins?

I use these Bobbin Saver thingies. I think I purchased them at Joann's with coupons, but they're available at many places that sell other notions. I like these a lot. My bobbins stay put and are handy, and the thread tails don't unwind. Well, if I actually take the time to rewind the tail around the bobbin. Ahem. But the tails don't unwind any further than however long they are when I stick the bobbin into the Saver.


As you can see, I have a few bobbins. But I do actually use them up. Either on the next sewing project if the color is right or when I'm basting something. I like to use different color threads top and bottom when basting so it's easy to tell which is which when I'm removing the stitches or pulling up gathers, so I pop in a "used" bobbin and baste away. I'm not always so thrifty, but this is too easy not to be.

3. OK, Debbie, you had such a brilliant idea that now Nancy's Notions is backordered 2 weeks out for the mini thread rack!

Nah, it wasn't me. NN's was backordered when I ordered mine too. But it was worth the wait. But I'm *still* waiting for the rest of my order and I'm getting ticked off. It's been over a month now and apparently NN's uses a new FedEx slow-boat-to-China service and on top of that sent one part of my order to my previous (as in 2 years ago!) address and has now had to reship it, again on the slow boat. Grrrr. My orders from NN's used to arrive very promptly. I am not liking their new, not-improved, shipping service. Oops. Rant over.

4. Simplicity 9076 has a can caddy pattern that I used, it has pockets. You can be quite creative with it, you need an empty coffee can.

I couldn't find that exact pattern on the Simplicity website, but I'm pretty sure I know the type of caddy. Unfortunately, I never seem to find time to sew those sorts of things for myself. Cheap plastic baskets from Walmart are more my speed. ;-)

* * * * *

My next project up is a quickie pair of denim capris. Yes, I know it's October. But it's still over 90 degrees here during the day and I need a new pair for the rest of high school football season, and probably beyond. The pair I usually wear to the games is looking too faded these days and they are on the verge of becoming embarrassing. Plus, the school colors are navy & gold and a new darker denim is closer to the navy and will look better with the gold tee shirt I wear every Friday to the games.

I'm using my TNT Simplicity 4605 (OOP, I think). I cut them out last night and will finish them this morning. I'll be adding two back and one side pocket, because the other thing that bugs me about my old denim capris is that they have NO POCKETS. Arghhh.

The rest of the day will be filled with errands. To the post office, to DMV to pay a ticket for DS (not speeding, thankfully, but driving with an expired tag which was sort of my fault too for not paying attention to it), and hopefully to the dog park. Poor poochies haven't been in so long. It's been so hot that going in the middle of the day is useless because no one else is there and with football practice pick-up, the timing has been wrong to go before or after dinner. Tonight is a big pep rally at school since this is Homecoming Week. I'm thinking if I skip the Pep Rally, I can take the dogs and then go pick up DS. DS#2 has an actual date for the dance on Saturday. I'm hoping I'll have some pics to share. Which reminds me, I need to pick up his tux too. Time to scoot …

Saturday, October 6, 2007

It's The Little Things


You probably already know that this is a thread rack. But what you may not know is that it's a tiny thread rack, costing about $3.50 from Nancy's Notions. When I saw it, I was in love and I bought it pronto!

This is where I sew.


My machines are spaced along a 6-ft counter. Generally, it's more than enough room. Except, as I sew I tend to accumulate "clutter" to the right of the sewing machine. Things like the 2-3 presser feet I'm switching between during a project, my thread snippers, different spools of thread for different parts of a project, and more. And then, if I have to move to the coverstitch machine on the far right, my garment gets laid over the top of that pile of clutter and invariably something slips to the floor or I have to hunt underneath for my snips. This drives me NUTS as I'm usually a very organized person. A place for everything and everything in its place.

The little thread rack arrived yesterday. This morning, I couldn't wait to get to the sewing room to get things in order. Now the space between the sewing machine and coverstitch machine looks like this:


The white basket to the left of the thread rack isn't a new addition, It's always been there. It holds my most-often used notions. Things like tweezers, my "stick", bodkins, seam ripper, buttonhole cutter, screwdriver, lint brush, etc. But now the mini thread rack is also in place and it's currently holding the spools of thread for a project in process, a spool of white thread that's almost used up but has too much thread left to toss, same for a cone of serger thread, topstitching thread for a pair of DS's jeans that need repair, and a couple of straws holding matching bobbins that I don't want to "file" away with the rest of the bobbins yet, lest I forget which one matches which.

Also added today was another little white basket that will "float" between the two machines. I'll toss the in-use presser feet and needle cases** in there, along with my pin cushion. Then, when I need to move to the coverstitch machine, all I'll have to do is move that little basket aside instead of gathering up each piece of clutter individually.

**I leave the whole needle case out so that I can tell at a glance what needle is in my machine. When I switch needle types, I put the previous case away and put the new case out.

Yeah, I'm probably a bit OCD about all of this, but for now, I'm feeling very pleased with the results.