Thursday, December 29, 2016

Cashmerette Turner Dress Reveal and Thoughts


I finished my first go with the Cashmerette Turner dress a few days ago, and I have some thoughts. (Suprised? Hah.) My overall opinion is that it's a great, easy-to-sew dress pattern for those of us with some fluff and boobage. Especially those of us with fluff and boobage who've been eyeing the Kitschy-Koo Lady Skater dress for a long while without pulling the trigger. I'm glad I waited.


This is the finished dress. The neckline looks better on Zillie, which is my fault for being lazy in the process, and which I'll get into more below.


This is how I'll probably wear it most days, since it's chilly in the office and I like a pop of color with black and white. You're getting from-the-top-of-the-mountain shots since instead of dragging my tripod outside for pics, I dragged Alex and, well, he's taller than the tripod.


Here's the finished dress on its own (well, on me), with no cardi camouflage for my lumpy bits. :-)


And the rear view. No back wrinkles. I believe there's a small sway back alteration built into the pattern. If so, good on ya Cashmerette!


Lots of swing in the skirt, which I like. A lot. With my arms going backward, I've got a slight Hunchback of Notre Dame thing going on. Nice.

So, let's get into the nitty-gritty of the pattern itself and my opinions on it. Because I do have a few. I hope they are taken as honest and constructive criticism because that's how I roll. Remember, my overall opinion is that it's a great dress. And although I've been a Cashmerette tester and have received free patterns in the past, I didn't test this dress at all and I wasn't given the pattern. Disclaimers out of the way, OK, here we go.

I don't have extremely narrow shoulders but they are on the narrow side. (And very square.) Cashmerette's draft is for a much wider shoulder than mine. And less sloped than most patterns (less sloped for me is good).

I'm not a big fan of the instructions for choosing size. I get (and appreciate) that you should choose by your full bust since these patterns are drafted for larger busts, but I think the instruction doesn't go far enough. There are other things going on in the bodice area beside boobs. So, if you already know you have narrow shoulders, size down for the upper bodice. If you're unsure, make a muslin. I believe Cashmerette are at least consistent, so if you need narrower in one, you're going to need narrower in all.


Above is my first go at the bodice. Using the instructions, I chose the size which was closest to my bust and waist measurements. This put me in the 18. I went up a cup size from my actual measurement since I knew the boob area is drafted with negative ease and I didn't want a sausage casing. :-) The resulting shoulders are definitely much too wide on me. If you look carefully, you can see my nude-colored bra strap on your left. The other strap isn't showing only because my arm is lifted to take the pic and the fabric moved. And while I don't mind some cleavage now and then, I don't like it at work and this was to be a office-bound dress. It's a pretty and flattering neckline, just not work appropriate for me.


Here's the first bodice on Zillie (with a past skirt still on her below). Size 18 E/F.


Here's the second bodice with the neckline raised (sigh, too much) and narrowed. Size 16 E/F blended to an 18 at waist and below. My "sweet spot" for the neckline depth on the next make will be somewhere in the middle. The width, however, is now perfect.


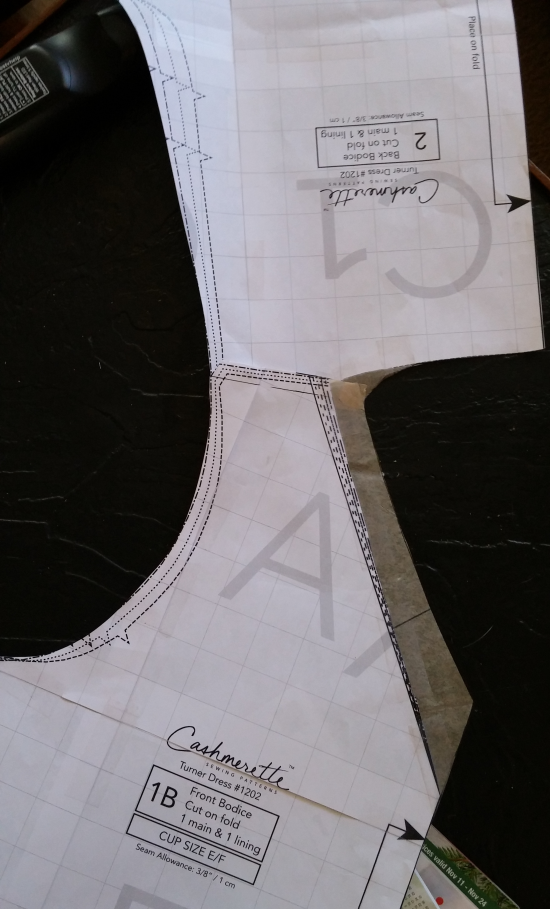
My neckline alterations. I added about an inch to the width to narrow the neckline opening. Even going all the way to the 12's stock width would still be too wide on me. I want those straps covered dammit. :-) I raised the vee about two inches. Which is about an inch too much in the final dress. I was counting on the weight of the skirt pulling the bodice down somewhat but it really didn't. I could've futzed with the neckline before finishing the waist seam, but laziness won. Who wants to pick out understitching after all? I'll live with this neckline and probably add a bright and pretty scarf to visually lower the focus.


Two things I want to point out here (besides the dog hair). One you can see in the photo above, and one you can't. First, as you can see above, the shoulder join results in a much sharper angle than the curve I created with my added tissue. If you leave it as-is without smoothing, be sure to trim your seam allowances well in this area so the fabric turns and lays nicely. Otherwise, you're going to get puckers. My 2 cents is to just make it a smoother curve before you cut your fabric. I'm not really a fan of these angular front/back neckline joins.

Second, let's talk about the waist seam. I've seen many comments out on the interwebs about how high the waist seam is on this dress. So I thought I'd outsmart myself and just add 1/2" to it when I was cutting the bodice pieces. I sewed Bodice 2 to the skirt and tried it on. You know where this is going, right? Yeah. I unpicked the skirt (and my little pass card loop which you can't see in any of the pics but which is there and I love it), cut off that 1/2" and reattached the skirt. And it's now at a much more flattering spot for me and lets the skirt skim the lumps. It's amazing how much difference 1/2" can make. So much for outsmarting myself. Unless you're very long-waisted and/or tall, you're probably going to want the seam as drafted. But at the very least, if you do add to it, BASTE the skirt on and check. The seam will hit a different spot with the weight of the skirt.

Oh, a third. I bought the downloadable PDF version. I just want to note that it's not a paper pig and the pieces went together quickly and accurately. I'm on Team PDF. I love me some instant gratification, especially when I can print at work. And even trim the pages during down time. Shhhh. I didn't say that. :-)


Here's the completed dress inside-out. As you can see, the bodice is fully lined. Which I like and which makes finishing the neckline easy-peasy. However, there are a few things in the instructions for this which I don't like. First, you are instructed to trim 1/8" from the lining neckline before you sew the shoulder seams (to allow for turn of cloth and keeping the seam to the inside). Nope. The pieces aren't going to line up as well if you trim before sewing. Sew the shoulder seams and THEN trim the 1/8" from the lining neckline edge. It just works better. Next quiggle: you're instructed to sew the lining and outer necklines together and then clip the vee. OK. But ... you really should add a small piece of fusible interfacing to the vee area before you clip. At least I would. And did. I want a bit of added stability to my clippage.


And, finally, you are instructed to understitch at 1/4". Nope, it should be 1/8", or less, as shown above. (Jenny of Cashmerette confirmed on the sew-along pages that this is, indeed, a typo.)


The hem is 1.5". Love a deep hem on knits. I didn't add or remove anything from the length of the skirt and turned a generous 1.5" hem. The finished dress hits just below my kneecap. I'm 5'5".


The instructions have you sew the waist seam and add clear elastic while you're doing so. Eh. Clear elastic is a pain on its best day. Feel free to sew swear-free and use regular elastic (The instructions tell you this, but the supply list doesn't. Just remember to add a seam allowance to your elastic since the instructions don't.). Or, do like me and omit elastic altogether. I sewed the seam with a very, very slight zigzag and then used a 4-thread overcast with my serger very close to the seam stitching. (See above.) That waist ain't going nowheres.


More insides. The sleeve hems are 1". Which is a good amount IMO.

Other pattern criticisms:
1. There are no body landmark markings. Such as bust point, waist, etc. Major boo.
2. There is no finished length given. Regular boo.
3. There are no neckline variations. Easy enough to DIY, and Jenny has created a blog page with instructions, but still, it would've been so much nicer to have variations drawn on the pattern, especially at this price point.
4. And pockets. There really should be a pocket option. Again, I can DIY, but I shouldn't have to.

As I said, overall I think the dress is a winner and I'll definitely make it again. It's flattering. Love, love the in-built FBA. Love the fast sew. Love the twirl! I'll probably use the skirt pieces to make an actual skirt, since they're perfect and now ready to go.

Yes, I know I promised a post on pattern ease. Still coming, but blog laziness is a tough mother.

Happy New Year!

Tuesday, November 22, 2016

A New Work Outfit: HotPatterns 1189 and Kwik Sew 3256


I just can't resist this work bathroom for selfies. It has a huge mirror and great lighting. Plus it's a solo room, so  no chance of being embarrassingly "caught." I finished this top on Sunday and the skirt last night and wore them both to work today.


The top is a Hot Patterns Fast & Fabulous Shirt-Tail T. It's definitely a fast sew and the first-try fit is better than the similar Maria Denmark Kirsten Kimono Tee I made earlier in the year. I like the lower scoop neck of the F&FSTT better than the boatneck KKT and the shoulder seams hit me better. The KKT tends to pull backward. The F&FSTT also has a bit more drafted-in waist shaping, which could easily be added to the KKT if one were so inclined. The F&FSTT also has a couple more styling options with the cuffed sleeves and the optional piecing and/or flounces. As for overall sizing, I agree with other reviewers that this pattern runs large. Even larger than most HPs on me. I used a straight 14. This is at least one size smaller, and maybe two depending on the style, at the hips than what I usually cut for HPs.


My fabric (an ITY) is sorta striped so I chose the pieced front. Unfortunately, the striping isn't obvious enough that the piecing is truly noticeable. Still, I do like the way the zebra stripe changes direction. I'll make this again and either use a more obvious stripe or, more likely, color/pattern block it.


The back is seamed and I chose not to perfectly match across that seam for more visual interest.This actually looks more pieced than the front. Hah.


This fabric is pretty lightweight and I felt the sleeve cuffs wouldn't stay cuffed without some help so I interfaced them with some Palmer/Pletsch Light fusible interfacing. I like the extra body it added to the cuffs.


I wish I had added some interfacing to the neckband. It's OK the way it is, but it would be a lot better if it had more heft. The neckline is also a tiny bit too wide for me. It's better out of the envelope than most HPs on me, but note that the neckline is the same size/width for all sizes so you'll definitely want to think about muslining it. I thought about it, and plunged ahead anyway. :-)


The neckband non-heft and width and having a long scrap left over inspired a necktie/scarf. I like that the tie adds visual interest (Does this print actually need more visual interest?) and takes the "T" up a notch for office wear and under cardigan.


All I did was use a 3-thread rolled hem to lettuce the edge a little bit. Easy-peasy, and now I have a scarf to wear with other things too.


Here's how I was actually dressed today. Tampa was in the 40s this morning. OMG.


I've been meaning to make a longer black ponte skirt for quite a while and finally got around to it Sunday/Monday. I pulled out this old Kwik Sew pattern. I'm sure many of you have it also, and have probably made it. The longer View A was a thing about 10 years ago. I think it's pretty much a classic and I've always had a thing for flounces. I only wish I hadn't waited so long to use this pattern since I short-changed myself some skirts over the years. I did add back waist darts by tracing them from my TNT Magic Pencil and before that I shortened the whole skirt from the top about 4 inches (since it's pretty straight down from the waist and the flounce was already attached and who wants to rip all that out?). Without shortening it, it would've been nearly a maxi on 5'5" me. Whenever I make it again, I'll also probably narrow it too since it's on the wide side and I'd like it more pegged. It's a KS Plus pattern and I'm on the edge between their Regular and Plus sizes.


I did keep the slit, although I noted many of the old reviews on PR mentioned sewing it closed. I'm not sure why since it's low on the leg, even after I chopped off the top, so it's not even remotely revealing. I like the added visual interest.


Here's a couple of totally dorkus pics in my back yard after work, with the sun doing odd shadowy things to my face.

I still have the post on Big 4 ease coming but it's more fun to post finished projects. I'm hoping to finish it during the upcoming long Thanksgiving weekend. I'm really looking forward to the time off and hope to get into the sewing room some more.


Wednesday, November 2, 2016

Butterick 6222 - Done


I seem to be on an every other month blogging schedule. Ergh. I really don't like that. I miss blogging. I miss you all.

But back to the post at hand. Here's a dress I finished a couple of weeks ago. In order to get some photos of me in it, I resorted to work bathroom selfies. I'm so classy that way. I should sneak in my tripod. The lighting is awesome in here.


The pattern is Butterick 6222 by Connie Crawford. I'm into swingy dresses at the moment and I've always had a sweet spot for ruffles so this was a no-brainer buy during one of the Club BMV sales. I can leave Connie Crawford herself (I've met her) but I have to admit to the irony of actually liking a number of her Butterick patterns. Well, the styles anyway. I get irked at the actual pattern sheets since there's no layout of the pattern pieces. I love those layouts (both for studying shapes and for knowing which pieces I need to cut from the tissue) and miss them tremendously in her patterns. Butterick, I hope you're paying attention.


The pattern calls for wovens but I went rogue and used an ITY knit from either Fabric.com or Fabricmart. They both blend together at this point. Ha.

This is one of those non-numerically sized patterns. In other words, S-M-L-XL-XXL-3X-4X, etc. Another thing I'm not fond of with the CC patterns which are sized thus. Plus, the smaller range is in one envelope and the larger in another. I always opt for the smaller range in CC since I need that sizing for my upper body. For this dress, I blended from the M in the upper areas to the L/XL below. I probably could've gone just to the L below but a little more swing in the skirt wasn't going to be a bad thing so I erred on the side of more. It worked out fine, especially since I used a knit.

There's enough ease in my dress using this blended sizing to work for a woven if I ever decide to go that route. But I doubt I will. I'm a wash and wear girl. Ain't got no time for ironing before work. :-) Using a knit, though, added some weight/drag and made the neckline lower than I'm comfortable wearing in the office (or out of it) without a cami so a cami underneath will be the way I'll wear it. (I made this cami years ago from Ressy's Powerdry knit when my coverstitch machine was new. Does anyone remember that? It's still going strong. And I think I may even have more in the stash somewhere.) There are side bust darts since it's for a woven and they hit me at the exact right place. I might have to do a slight FBA in a woven, but maybe not. I'll probably never know. ;-)


I edgestitched the diagonal seams, front and back, to define them more. It shows up better in real life.


I also omitted the neckline facings and just turned and topstitched, running the stitching down the seam which joins the two front bodice pieces. Kind of a faux wrap effect. I actually was going to go with the facings but they didn't fit properly. I'm not sure yet if it was me, the fabric, or the pattern, and I haven't gone back to check, so just make a mental note for yourself to check if you make this dress.


There's a LOT of hemming on this dress between the circular skirt and the circular overskirrt/ruffle. I just sat myself in front of the TV with glass head pins and pinned about every 2 inches, eyeballing about 1/2" for the ruffle and 5/8" for the skirt. After pinning, I took the pieces to the ironing board and pressed the hems into place and then topstitched.


A little twirl action. This dress has lots of movement and it's fun to wear.


Trust  me, you're glad I cropped out my face on that one. What WAS I doing with my eyes?


And a 3/4 view, where you can see that I forgot to add a loop for my ID card. I was so mad at myself for the lapse but there was no way I was going back to unpick overlocking and topstitching. So I hook the card onto the ruffle, and it ends up sliding down by the end of the day, where it is in this photo. Maybe I'll add a loop under the ruffle. It's not attached in the side seam so this should actually be pretty easy to do. We'll see how much it bugs me without it.

Final verdict: I love my dress. It's comfortable. It's flattering. And it was an easy sew. I'd recommend the pattern. The worst part was cutting the flouncy pieces since they're so wide and I used slippery ITY, and then hemming it all. Nothing really hard, just more on the tedious side of things. Which reminds me of one thing I did hate about the pattern. The pieces for the front skirt and ruffle are actually just one piece for the skirt with a separate cutting line for the ruffle. I wish they were separate pieces because if I ever do make this again, I'll have to tape those pieces back together to cut the front skirt again. I did make alignment marks, but still.

I'd say that I'll see you in another couple of months, but I actually have a post in the works on McVoguerick pattern ease to address some conversations I've seen and/or participated in on Pattern Review. The Big 3 aren't undeserving of some criticism but sizing and ease are not one of the things they do wrong. It's Us, not Them, and I'll speak to that soon.

Monday, August 15, 2016

Hot Patterns 1138 - Or, I finally finished something


My posts are now so far and few between that I feel like I should start every one off with "Yep, still alive." Blame Instagram. Blame my lack of home technology. I really need a new desktop computer but don't want to spend the bucks on it. I have a decent laptop but I really dislike blogging on it, so I'm just not doing it. Plus, I just haven't been sewing as much. A lot of that was some weight gain and not feeling motivated to sew for a body I wasn't keeping, but I'm back on track again after a kickstart with the Whole30 program.

Whole30 is a "whole" 'nother post but the short version is that I like it. I don't feel deprived at all and have found it pretty easy to eat this way. Mostly because its how I want to eat, how I used to eat. I just got lazy the last year and slid down a slippery slope. But I have a wedding to attend in May 2017 (my stepson Michael) and I'm determined to look great again by then.

So onto my latest finished project, the HotPatterns Metropolitan Verano dress. It seems that this very easy sew takes me FOREVER to finish. The last time I made it, I had started it and then lost *that* job and so it sat on Zillie. It sat on Zillie this time too, but not for any bad reason. I was just focused on other things. And once again, I'm wondering why I let it sit. I love my new dress. It's easy and comfortable to wear and I think it's flattering. I'm really not into shifts or boxy silhouettes. They look horrible on me. This dress with its elastic waist will also still fit for a while as I go down in sizes, which is great.


Speaking of sizes, this is the same straight 12 I made last time except this time I tilted the upper back bodice inward on the fold to remove a little neckline width since I had to take two darts in the back neck last time to compensate for gaping. My down-n-dirty fix worked; no darts needed. Now I am not a 12 in anything but Hot Patterns so please, please do muslins (even partial) for these patterns. They run big from their measurement chart, but it's pretty consistent across the pattern line.

No great photography here at Chez Stitches and Seams. Work bathroom selfies all the way. Heh heh.


Here's how the untwisted fronts sat and sat, mocking me.


The pattern calls for a neckline facing and while it's pretty much OK in my first make of this dress, I'm not in love. So I tossed that pattern piece (figuratively) and just turned the edge twice and stitched. I like this finish much, much better, even if it take 437 pins.


Here's what it looks like on the inside. This method means changing the construction order so that the center front is sewn after finishing the neckline and then just stitched as high as you want the neckline to plunge (or not).


I also took the same shortcuts for the waist as I did last time. I did not overlock the seams and created a casing from the seam allowances between the bodice and skirt. I threaded elastic through and just ran it over the sideseam and under the front twist/knot. Easy-peasy and no one but us knows the difference. The other change from the pattern that I made was to cut the back pieces on the fold to eliminate unnecessary seams.


I didn't add my super nifty card key loop on this, because I forgot. But I realized I can just clip it into the knot/twist, which is just as handy.


Extra goofy face.


And here's the flip-flop pic once I got home, so you can see the fit a little better. With a little Chili photobomber.


I've got another Cashmerette Concord tee (with a Hot Patterns inspired hack) cut out. Hopefully, I'll be back here with that sooner rather than later.

Stay well!

Wednesday, June 15, 2016

Kwik Sew 4154 - A Winner! (The reveal and the review)

Long time, no see. Kinda like my sewing mojo these days. My mental list of things I want to make always overtakes the Department of Time and Energy.

Summer is (and has been) here in Florida and it's back to hot and humid. I always call this time of year the Florida "winter," which only means that I compare this time of wanting to stay inside and avoid the weather to actual winter months for colder climates. I wouldn't want to go outside in January in Wisconsin, for example, and neither do I want to spend much time outside here in Tampa in July/August. Well, at least not very far from ice-cold cocktails and the air-conditioner for a quick cool-down. :-)


Well, I did finally trap some sewjo and set about to make a new summer dress. (I have at least 20 more summer garments I want to make. Yeah, don't hold your breath.)

From the Kwik Sew website: Dresses have semi-fitted bodice with center front seam, V-neckline finished with self-fabric facing, front and back partial gathers at waist seam, tie ends at sides to be tied in front and back zipper closure. Dress A: Narrow hemmed short sleeves, straight skirt with front and back waist darts and back vent. Dress B: Armholes finished with bias tape and narrow-hemmed flared skirt.

I made view B, but added the view A sleeves. KS patterns are sized XS-S-M-L-XL, which corresponds to measurement ranges per size given on the envelope. The letter size usually correlates to the larger of the measurement range so if you're in between sizes, keep that in mind. My experience with KS is also that they tend to have more ease than I want. I started with the M for neckline/shoulders/bodice and morphed to L/LX at waist and below. This pattern has gathers at the waist which I figured would give the girls plenty of breathing room, and I was right. No FBA was done or was needed. Before cutting the pattern, I made my usual 3/8" square shoulder adjustment with KS patterns and raised the M armhole 3/8" to match the shoulder adjustment. This worked well. The armholes hit my armpits high, like I prefer. Not too high, but just enough. For next time, though, I probably will move the side front armhole inward toward my chest as it's sitting a bit too wide for my personal preference. Nothing that screams "bad fit" or anything, just not how I want it to be in a perfect dress. The only other "alteration" I made was to add an inch to the bottom hem when I cut, for insurance. I turned a 1.25" hem in the end and I like the finished length so this was a good call, although I don't think it would be too short if I didn't add that inch.


While I really like the finished dress and the pattern overall, I absolutely HATE the facings. First of all, this pattern is supposed to be for knits and wovens and while the facings are interfaced, there's no way in a knit they would ever stand up per the pattern photograph. Which is actually a happy accident for me, because I do prefer them falling into a "lapel" and opening the neckline somewhat. It's a much more flattering look on me. I stitched and understitched the facings and still they wanted to roll outward. Grrr. I knew this would happen but didn't heed my inner voice. I even topstitched the entire neckline edge and down the "vee" and still they rolled. I settled on the sledge hammer approach and just fused the damn things completely at the front and strategically on the back neckline, using some 3/8" Steam-a-Seam. It worked. I'm good. But next time, I'm either changing the neckline and binding it or I'm making a self-fabric upper lining.


I did make a few changes to the construction, mostly because I was using a knit. A heavy knit. (This is a rayon knit from the Nicole Miller collection at Joann's. Yes, Joann's. And I actually ordered it online instead of in person. This was a first for me. The fabric is very, very nice. I highly recommend it.)

First, I eliminated all ease in the sleeve cap by cutting a smaller size and sewed it in flat. And while I did follow the instructions for creating the waist gathers front and back (which you can see in the photo above), in the end it wasn't really necessary since I made an interior "casing" by sewing the bodice and skirt seam allowances together and inserting 3/8" elastic. The rayon knit is very heavy and I knew it would need some support for the waist seam to actually stay at my waist. I'm glad I did this and I recommend it for anyone making the knit version of this dress. I also eliminated the back zip and CB bodice seam. I knew I'd be able to put this dress on over my head. And I can. Easily.

I did keep the back skirt in two pieces to conserve fabric but I think I'd consider using the front one-piece pattern for the back too next time because it's drapey-er/swishy-er than the back. But since I can't see it, I don't even think about it.

The last change I made was to add a key card loop thingie like I did for my last dress. I love this feature on that dress! And yes, I could've hooked the card onto the tie front, but I didn't want to distort the sash, so the loop is in the seam under the ties. Which also means it won't show if/when I wear this dress outside of the office.


And here's the dress on me, complete with goofy work bathroom mirror selfie face.


And back view. You can't see a CB seam in the skirt (yay!) but you can see how it's not quite as swishy. It still looks nice and I'm not unhappy with it.


Yep, I'm in the bathroom. I wish Gillian lived closer (and I bet she does too every January!) because I'd definitely bribe her to be my blog photo buddy.


What's on your summer sewing list?