Wednesday, October 23, 2013

Cake Patterns Red Velvet 0369 Take 2


Here's the remake. Yeah, I know it's hard to tell the difference, but trust me ... this one feels and hangs a lot better, especially after switching out the original doubleknit used for the skirt in favor of a thinner and drapier rayon/Lycra. And, of course, ditching the butt pleat. "Butt pleat" doesn't even *sound* attractive, does it? ;-)


I realize it's hard to see any front pleat details at all in the black so I tried to lighten up the pic a bit. Even then, it wasn't very cooperative and this is the best I could do.


I felt girly and swirly wearing this today and received unsolicitations from just about everyone in the office, so it's obviously a Win! pattern/style for me (as many of you confirmed), especially now that I've worked through the quirks and annoyances of the first go.

These photos were taken after I got home from work and now that I've worn it all day, I don't think I'd change anything else not mentioned earlier but I do want to triple emphasize (tripleemphasize-tripleemphasize-tripeemphasize!) interfacing the midriff band.Not only does the midriff hold up the entire full skirt, it also sits where your body naturally bends and scrunches. The interfacing kept the dress' midriff - and mine - neat, supported, and flat all day long. Or in my case, the illusion of flat. ;-)

In non-sewing news, the Marine officially re-enlisted this past weekend. On the blue Boise State football field!! He still has about 10 months left on his initial tour, but starting next August, he'll be in for at least another four years. Hopefully, I'll be able to share soon what his next job in the Corps is going to be but we need to wait for the Top Secret security clearance to go through first and I don't want to do anything to jeopardize that process. Needless to say, Proud Mom here! And even better, he's heading down to Florida tomorrow for the weekend. It's been over 6 months since I've seen him, so I can't wait!


Saturday, October 19, 2013

Second Slice of Red Velvet

Without a lot of tweaking, I do have a wearable (and liked) Red Velvet dress. I'll wait until I'm camera-ready to show the whole dress, since I think Zillie does it a disservice (sorry old girl!). But for now, here's a run-down on the tweaks and hacks.

I decided to interface the midriff, which is why it looks white from the wrong side. Since I now think drapey fabrics will give the best results for this dress even though doubleknit is a recommended fabric, I recommend fusible knit interfacing for one and all. The midriff needs a bit of structure so it doesn't collapse on itself or stretch out from the weight of the skirt (or get caught in any lumps/bumps ... ahem, I'm just sayin') and with the fusible, it gets that structure. Cut/fuse with the stretch going around your body.


I reduced the depth of the midriff pieces by 1-1/2" and added another 5/8" to the bottom of the bodice, which puts it at over 4" I added to the bodice length. Clearly, the narrow shouldered/full busted will have some alterations to do above and beyond "connecting the dots." Not saying this is necessarily a pattern error, just that this bodice is likely not going to be one-size-fits-all for anyone above a B cup or for whom gravity has played its tricks. Check the tuck location too, as I found them too far out to the sideseams for my particular boobage, although I actually sewed them as-is and can live with it.

In case you're curious why you're seeing white overlocking down the sideseam of a black skirt ... I decided I'd rather use white all the way down so it doesn't show through the bodice. I used black thread in the actual seam-sewing for all. Yes, I could've switched to white for the bodice, but ... um ... lazy? Also, Rebecca, I do sew most knits with a sewing machine straight stitch first and then overlock/serge to finish the seam allowances. Unless it's a really simple pattern. This pattern is simple enough except there's a tight curve in the underarm of the bodice that would be very tricky to navigate with just a serger as the seam-maker.Since I'm not in a factory and it's easy enough to move between my machines, I usually do. I'm pretty sure the seam police aren't going to come calling. ;-)

The next tweak was to lose the neckline facings. They are just a problem waiting to happen. Instead, I measured the neckline after sewing the shoulder/overarm seams and then cut a 1-1/2" strip 4 inches shorter and sewed that into a circle. I quarter-marked both the neckline and the band, aligned right sides and match/pinned at the marks, and sewed them together with a 1/2" seam allowance, stretching the "binding" as I sewed. I then flipped the binding to the inside and pressed, favoring the right side (which means a little of the right side of the neckline was rolled/pressed to the wrong side - which you can see below).


This is a finishing method that anyone with just basic equipment can do.If you're new to knits, I highly recommend Easy Sewing the KWIK SEW Way. (Full disclosure: that's an Amazon link and I'll earn pennies if you buy from it. Well, dollars if you ALL buy from it, but that's not likely to happen.) Ignore the out-of-date styles in the book and just concentrate on the top-notch methods. Sometimes you can't learn *everything* for free on the internet. ;-)

To finish, I coverstitched from the right side and trimmed the excess binding close to the coverstitching loops on the back. A twin needle will work fine here. Or even a simple single needle stitch. Truly.


The final hack was to remove the pleat from the back but to keep the swish factor. And to keep it easy by not drafting something from scratch or Frankenpatterning another skirt. I did mention my lazy streak, right?


This is the pattern piece for the skirt. Front and back use the same piece, cut on the fold (twice).


To eliminate the pleat, I folded the pattern piece the same as if I were prepping the front to sew the pleat. If you have the pattern, this will be self-explanatory. Then I aligned the CF notch (which I had to add myself and is highlighted in green here) with the fold and followed the edge of the piece the rest of the way down, truing the resulting unevenness at the bottom.


And that's it.

I hope you take away a few tidbits from this whole "series" ... but mainly that this is not an awful pattern and I never meant to imply that I hated it, or even disliked it. Yes, there were some annoyances and I think this particular pattern (which is my only experience with Cake) needs some refinement but overall the style is nice, the instructions, while not perfect, are better than most Big 3/4 instructions for knits, and I really didn't put a lot of work into the pattern itself before I ended up with something I will look forward to wearing. It was all these blog posts that took up my time. Hahaha.

So, if you've been tempted to try this one ... bookmark my blog for reference, and then go for it! Just save your best fabric for your second slice of Cake. ;-)

An Open Letter to Indies

Dear Indie Pattern Designer,

First, I want you to know that I LOVE that you are out there, providing more choices and variety. As a stitcher and habitual pattern buyer and stasher, I very selfishly want you to succeed. And, as a former business owner, I know running your own company is not as easy as it looks from the sidelines. So please know that what follows are suggestions and constructive criticisms that are meant to be helpful and not mean-spirited.

So, deep breath, here we go ...

You have a website/store, so please carve out a spot there where I can learn about your processes, your training, your vision. I want to know if you're the designer and the patternmaker, or whether you outsource patternmaking, which is really OK, but if so, tell me how you oversee that. I want to know if you're formally trained, self-taught, or somewhere in between (sewing, designing, patternmaking ... all of them). I want to know what inspired you to take this leap. I want to know where you're going.

Test, test, test. And proactively. Seek out testers from all experience levels (and even body types), and make sure you get them. Make contacts directly and don't just wait for volunteers to catch a blog post asking for sign-ups because some of your best potential testers may miss a post or two, or even your entire blog. Provide your testers with an actual process of what and how to test. Make sure you check in with them and encourage an open dialog, even, and especially, if things aren't going well for them. Don your thick skin and encourage them to find errors, in both your instructions and the pattern pieces. Don't wait for your first round of paying customers to be the guinea pigs. Sure you can tease us with pics from your testers, but don't sell us a pattern until the tests (and press checks) are complete and the corrections have been made.

And because mistakes inevitably do sneak through from time to time, plan for it in advance. Create an errata webpage for each design and provide the URL in the pattern instructions as the first step (and keep that page updated).

If you offer downloadable/PDF versions of your pattern, make sure you test that too.Pay attention to where important pattern landmarks fall between the pages and adjust your layout if necessary.

Think about those who blend between sizes with an eye toward nesting different sizes whenever you can.

Tell your customers what body (and bust) type you're designing for, and provide finished measurements for bust-waist-hip so there is a jumping off point for individual alterations and expectations. And then be consistent throughout all of your styles.

And, finally, consider your price points and the expectations created. Do your patterns fully deliver? If they do, I'm fine with the price. But if not ....

Thanks for reading. I'm looking forward to your next release!

Sincerely,

Debbie

Monday, October 14, 2013

Hacking Up Cake

OK, apologies for that post title, but I couldn't resist ...because it's literally true.

The Red Velvet "muslin" is growing on me, especially after seeing pics of me in it vs. just sticking it on Zillie to model. And I'm not about to NOT get a wearable something out of this pattern since I'm already pretty close. So, yes ... I'm making another one, which will be virtually the same but with some pattern hacking and a much thinner black knit for the skirt to eliminate the unneeded bulk.

Heather asked about the black/white color scheme chosen and if I was changing my stance on not wearing black. The real answer is simply that I was shopping my stash. But yes, I'm relaxing on the black aversion a bit and do wear it now, but always paired with a print. Plus, black in an office setting is always acceptable. Right Carolyn? :-)

I cut the new pieces tonight, eliminating the back pleat in a slapdash hack and kicking the facings to the curb. I  also removed 1-1/2" from the midriff band and will baste to see if that's enough, and I added 5/8" to the bodice length. On the plus side of all this, it's a very fast pattern to cut.

I want to thank all of you for your comments over the last few days' posts. I spent a LOT of hours on those posts and the review, and I must be honest and tell you that it's very rewarding to know you're out there reading and interacting. I do have one more post in me which will also be related to all of this, but I'm kinda burned out on writing at the moment so I'll let that one percolate in my head a little longer before I commit it to typed words. And I'll get to the off-blog emails soon too.

Oh, and before I turn off the lappie for the night ... Amanda asked what stitch I use for knits instead of the lightning stitch. Many experts and everyday sewists recommend using a slight zigzag for sewing knits, but honestly ... I just use a straight stitch, with a stretch needle, and my machine on its knit setting. Of course, your mileage may vary and so will your machine. I think the best advice is to test on knit samples or even wearable muslins and come up with what works best for YOU! By the way, the reasons I hate the lightning stitch are it can easily eat and/or warp your fabric because it's so thread dense and even worse, it can be extremely tedious to rip out ... which is why I think newbies and first-pattern sews are better served with a different stitch.

Nighty-night!

(And Ronda, thanks for thinking of me and waiting 'til late Friday for that MTC. It was waiting for me bright and early this morning.)


Sunday, October 13, 2013

Review: Cake Patterns Red Velvet 0369

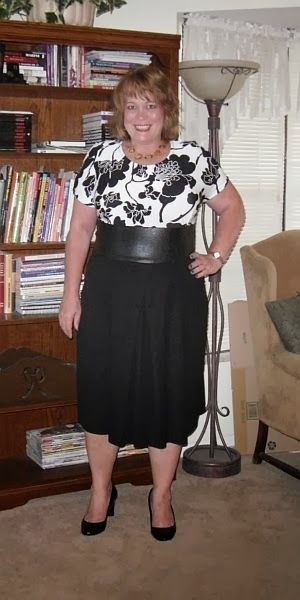
Can you NOT look at that midriff now that you've seen it?

Is that a pleat on your butt or are you just happy to see me?

That's a lot of skirt!

Edited to add this link to the blog post where the owner of Cake Patterns responds to my review.

Pattern Description: "The Red Velvet Knit Dress features a faced circular neckline with optional petal collar and pleated underbust seam. Choose the origami-style scissor pleated skirt, or reverse it for a flat boxy-pleat effect. A cleverly concealed ticket pocket holds a few coins, cards, or lipstick."

Pattern Sizing: Bodice 30"-59"; Waist 25"-55". (My bust is 44, my waist is 37.)

Did it look like the photo/drawing on the pattern envelope once you were done sewing with it? Yes and no. The actual skirt section is much fuller than the scissor-pleat view line drawings would lead you to believe.

Were the instructions easy to follow? Easy, yes, but I think there is room for improvement, especially because Cake advertises "Our sewing instructions are different -- focused on providing a clear and stress-free sewing experience with clear diagrams for visual learners. The more experienced sewist will appreciate the easy-to-skim instructions format, including a Construction Overview and technique symbols!"

I *am* an experienced sewist and I thought non-standard symbols to be more cutesy than helpful. There are no alignment notches, so make your own when you're cutting, and if you've got 40+ eyes syndrome, keep the "cheaters" or magnifying glass handy because the illustrations, while nicely drawn, are tiny. There are also no hip width measurements at all. None. If you've got hips like me or a pronounced hourglass figure, some of that scissor pleat is going to end up as fitting ease.

I also think some of the construction methods, while fast, do not give the best results. Facings on a knit neckline? No, thank you, even if the instructions tell you to use fusible webbing between facing and bodice to prevent rollout. Hemming sleeves before sewing the sideseam? It's really just as easy and a much nicer finish to press the hem first, but leave it unsewn until after the underarm seam is sewn, and then hem in the round. Using the lightning stitch for knits? Hahaha ... experienced sewists know that's an evil trick the manufacturers played on us, especially if you've ever tried to rip it out. In black. At night. A link to an invisible zipper video tute that results in a zipper with visible extra stitches you're told to just rip rip out? Hmmm.

This would lay flat if the facing was trimmed back to the coverstitching

But for now, it has a mind of its own

There are also pattern drafting errors. While minor, I do want to mention them so newbies don't wonder if it's them or the pattern. I think there's something off with the midriff pieces - first, in the size range I used (40s) they are off from each other where you'd join them at the sideseam, by 1/4". You will never get perfect sideseam alignment if you don't correct that before you cut fabric. Also, I think the "connect a dot and triangle" method of "custom" sizing the midriff can easily result in a badly shaped pattern piece that won't fit onto the skirt properly, and the piece I created by straight size 40 numbers (IOW, no real customization) didn't match up to the skirt piece by 1/2", which times 2 for the fold cut means it's off by an inch. I didn't need that inch and ended up trimming the join to a normal shape, but maybe you will need it. Who knows.

Midriff (bottom) 1/2" shorter than same size bodice seam

Fabric Used: ITY knit for the bodice, faux knit-back leather for the midriff, Sophia knit for the skirt. The skirt is much too bulky even though doubleknit is a recommended fabric.

What did you particularly like or dislike about the pattern? The scissor-pleated skirt is what attracted me. I thought the diagonal lines would be flattering, but I also thought the skirt wouldn't be so voluminous so I've now got mixed feelings about the final result and since my faux leather reached its expiration date and started leaving marks on the white of the bodice, I'm probably going to just cut off the skirt and use the fabric for something else. And, really, now that I've seen it ... who needs a scissor pleat on their backside?

Pattern alterations or any design/construction changes you made: Cake's unique sizing is good in theory. But in practice, I found it really hard to get my head around. In the end, I guessed my best from experience, and created a bodice front that was size 35 in the shoulders/neck, 40 in the width with the C cup (or 45 A, because it's the same width), and 45 for length with an additional 3/8" added. I didn't hem the skirt or sleeves because I'm not keeping this dress, but I would hem the sleeves in the round and not interface the hem. The pics above show the skirt unhemmed, but I did an a just-in-case inch when cutting, which I did need for a nice hem width.

How a dart/tuck should be trued

The incredible morphing front bodice piece
ETA: This morphing means I had to print and tape together 3 separate bodices for the 3 different sizes. So much for the economical, only print your size, printing mentioned in the instructions. I wish the sizes were nested ... or similar to what I think I see on Cake's blog for the Hummingbird top. Can't tell on that one for sure since I don't have the pattern.

Would you sew it again? Would you recommend it to others? I really don't know if I'll sew this again, but I have invested $15 in the pattern so I hate to just throw that out the window. Plus I'm doggedly determined not to let any pattern get the best of me so chances are I will try it again, in a much thinner knit for the skirt with no back pleating. When/if I do, I will post on the blog and update my review on PR. I do think the dress on me has possibilities ...

Conclusion: I applaud Cake for getting out there, but I think there is still refinement needed. I don't mind paying more for good quality independent patterns, but these aren't there yet and I think the premium price point is misleading.


Two cents

While I'm not 20-something, I have NOT been sewing for decades. I have been sewing for just over 10 years.

I grew up with a mom who sewed her whole life but she didn't teach me specifically or give me lessons. I didn't want to learn back then. A few things naturally rubbed off by sheer virtue of being around it and probably from my one 7th grade Home Ec class but by and large, I am self-taught, through books, videos, and interacting with others on the internet ... and by just jumping in and doing it. I bought a cheap Sears machine to sew the straight seams for living room curtains I didn't want to pay hundreds of dollars for. And then the spark was lit. (My mother was shocked as she had long given up.)

I'm not out to discourage anyone from sewing, from buying a specific pattern line, or from creating a pattern line. I've been giving my opinions about one pattern. You know what they say about opinions, and you are free to take mine ... or leave them. But when reviewing a product, I don't believe in saying only nice or popular things. I prefer to be thorough and truthful. In the end, though, it's still only my opinion.

I've sewn a number of indie patterns, such as Hot Patterns, Pamela's Patterns, and Colette's freebie Sorbetto, and my own created with Pattern Master Boutique. I've been honest about those experiences too, and two of my favorite patterns are HP's Sunshine and Pamela's Magic Pencil. I've also sewn Ottobres, Jalies, and probably a few others I'm forgetting at the moment. I'd love to try them all. Alas, I'm not rich. But when I do get my next one, whatever it may be, you can count on another honest opinion.

I don't mind PDF patterns and taping together 65 sheets one little bit. I can tape those sheets together in roughly the same time as it takes me to unfold and press tissue and then find the pieces I need.

I'm not really sure where I stand on feeling a responsibility, obligation, or opportunity (or whatever word you want to use) to contact an owner of a company whose product I'm talking about but part of me thinks that if you put something out there for sale at a high price point, it should pass muster. I'm fairly sure I don't want to pay the pattern price to be part of a "community" to give feedback that IMO should have been part of a testing process before release.

On the flip side, they could always contact me to test prior to release. ;-)

Saturday, October 12, 2013

First Slice of Cake


So here's the "muslin." And some more observations.

I used the neck facings, just to see and report back. Hate 'em. They do not stay flat. (Not that I really expected them to.) In fact, the "fix" for this in the instructions is to use fusible webbing between the facing and bodice. Hahaha. My fix would be to ditch them completely and either just turn the edge under and stitch/coverstitch or bind it one way or another (depending on desired final look). In other words, there are far better ways to finish a knit neckline. And I still remain firm in my stance on not staystitching a knit neckline. I don't care what a Tilton sister says. (Said with a smile!) It's much more likely that you will overwork the knit with the extra stitching than you would stretch it out by omitting it. But if you're really worried, fuse some lightweight stay tape to it instead. 

For this trial, I coverstitched about 1/2" in from the edge and if I were going to keep this dress, I'd trim away the rest of the facing from behind because it's still flopping.

But ... this is not a keeper. It looks horrible on me. This is not the fault of the pattern. It's just not my kind of dress. It's mumsy on me, and those pleats add 20 lbs. What is the fault of the pattern, though, is the deceptive line drawing, which makes the skirt look more pegged than it really is. But seeing the muses' makes out in blogland and now the pattern pieces, I knew better. Hopefully, now you do too.

The front and back use the same piece so there are pleats in the back. Yeah, I need pleats on my backside.

The midriff band is entirely too wide/deep for me. Again, not the fault of the pattern. This is a personal preference thing. If I were keeping this dress, I'd rip off the skirt and cut off about half the depth of the midriff band. (In case you're wondering, I used a faux leather, knit backed fabric. It's past its expiration date, though, because it left black marks all over the white of the bodice. I think they will wash out, but not sure I should bother trying)

Although I used the same size number for midriff and skirt, the midriff was wider where it attached to the skirt, because you're sewing a rectangle to a hip curve. Easy enough to trim, but should I have to? And should I have to create my own alignment notches? Lucky for me, I know when they're missing and can just make snips as I cut fabric to make it easier on myself when I'm matching up pieces later to actually sew them.

Whatever your answer to those questions, I think most of all I just wish there had been better testing by more experienced seamsters because many of the issues I've found would have been eliminated in the first round of tests.

The good news is that technically, this dress does actually fit. Even though I never really could agree with the weird sizing. It's a fine idea, in theory. But it's just not there yet in application and simple styles hide the flaws even when you do just throw your hands up and guess your best. After reading many Tiramisu reviews on PR, I'm sure I'm not alone in Flummoxville. I'm just a lot more blunt. :-) There are a lot of nice Tira finishes, but the paths to fit were bumpy for most.


* * * * *

I'm still deciding whether I want to save the dress or just cut off the skirt fabric and move on. It depends on my motivation and whether those black marks from the midriff piece do wash out. Before I do anything, I will take some pics of me in the dress and add an actual review to PR.

Another Piece of Cake

I want to start off by saying that I wish it wasn't me finding errors with the pattern. I really want indies to be successful. It's to everyone's benefit if they are. And I admit I wanted to feel the bliss I've seen around the interwebs. But on the other hand, I'm not inclined toward that bliss when plunking down $15 and then needing to fix the pattern. And it bugs me a little that beginning stitchers won't know what they don't know and will probably remain blissfully ignorant. I'm not sure if that's good or bad.

Here goes ...

I was originally going to blend between upper chest/neck and waist. Bad enough that the sizes aren't nested to make it easier on me, but the sleeve angles vary between the sizes. If I line up the sleeve angles as below, look what happens to the center fronts ... they are wonky donkey.


Likewise, if I align the CFs, the sleeve angles go in different directions. Which means you may need a shoulder angle adjustment in one size range, but not in another. BTW, per the instructions on using high bust measurement for the base bodice size, I should be using the smaller size on top. But if I did that, I'd need to add 4" to go over the girls, which is why I decided to blend in the first place. The bust depth alteration on Cake's blog isn't (IMO) a good alteration ... it leaves you with a terrible pattern piece. So, instead, I'm meeting it all in the middle and using the smallest lines on the bigger pattern piece, with the neckline/shoulder lengths of the smaller piece.


This is the front midriff piece, sized using the pattern instructions. Uh ... my body (and I'm guessing yours too) doesn't get *smaller* as we near the hips. Something just ain't right here.


Nor here ... I was right when I said earlier that the midriff pieces don't match at the sideseams. They are off nearly a 1/4". Yes, there is a possibility that the printer was off, but I didn't print this in separate runs so I'm kind of doubting that. And everything else on these sheets lined up fine.


And then we have this ... the wonky midriff piece is over an inch longer than the bodice piece it's supposed to match up to. Even if I undo the tuck, which is supposed to be untucked anyway on the smaller size of each range (WHY?), it still doesn't match up. Note to self: Find the next size out so I can use the tuck for shaping, and then correct that midriff.


And my last entry for the night ... the tuck is drafted without a proper extension. Folded in this direction, it won't fully catch in the seam. Folded the other way, the extension hangs down below the seam line (better for getting caught, but still bad drafting).


And I haven't even looked at the skirt yet.

(If you missed my first post on this pattern, go back one.)


Friday, October 11, 2013

A Take on Cake

So, I'm actually and FINALLY mostly caught up at work and I made my hours this week, which means I could leave at 2:30. I was home today by 3. Can I get a woohooo?!

But before I left, I bought and downloaded the PDF version of Cake Patterns new Red Velvet dress. I won't say where I printed it. Ahem.

Yes, I drank the Kool-Aid. Or ate the cake. Or whatever. ;-)

What follows are my first impressions before even cutting the pattern or fabric. I still have hopes for a nice dress in the end, and I don't want to bring down the wrath of the Cake "muses" and other devotees for what I'm about to say ... but so far ... I. Am. Not. Impressed.

In no particular order:

1. Why do I have to turn page after page of instructions to find my frickin' starting size?
2. Why are the adjustments (Proportions in Cakespeak) after the sewing instructions?
3. Lightning stitch? Really? Yeah, uh, no.
4. Staystitching a KNIT neckline?
5. Instructed to finish the "raw" and interfaced edges of a knit neckline facing?
6. Wide, floppy, neckline facings in a knit to begin with? Probably not even cutting THOSE pieces. :-)
7. This pattern is NOT for the full-busted no matter what someone says. Not without alteration for extra front length ... which starts out pretty darn short IMO. Edited to add: Yes, I know about the depth alteration, and I've also been playing some more with the different sizes for the bodice. But the sizing is weird to me without some deeper studying. Not sure yet if this is good or bad. Old dog, new tricks, etc.
8. Fast, but not professional, methods ... such as hemming the sleeves before the sideseams are sewn. Eww.
9. Why no hip measurements for me to take into account when picking cutting lines? It's got a skirt section ... I want to know its finished measurement. I'm not a sheep who will just cut and believe. ;-)
10. Pattern lines and markings in bad spots for printing tiled pages, and I have a LOT of experience with printing and then lining up tiled pages.
11. Weird markings in general. Why not use standard marks? The marks don't have to be unique just because you can. Inexperienced sewists won't know the difference, but those who've been sewing more than a minute will just get frustrated.
12. I don't think the midriff band meet-up seams are the same size. Will know better when I'm cutting.

I apologize to anyone that loves this pattern. In fact, in was probably because of YOUR blog post/trial that I bought it myself. :-) I've seen some great looking dresses! I hope the above is taken as constructive criticism and I will definitely come back and eat my words on anything I've got wrong in my initial gripe list, so stay tuned.


Sunday, October 6, 2013

Butterick 5849 - Almost There

The dress is pretty much done. I just need to stitch the sleeve hems and decide on the overall length, probably chopping at least 6 inches off the bottom. But I'm going slow with this because I'm not highly motivated at the moment. It's still 90+ degrees outside and this dress is (1) moleskin and (2) high- and closed-necked, which is kind of suffocating in these temps. It will make a nice autumn/winter dress ... when we finally have those seasons in about 2 months. :-)


The fit is almost perfect. The only thing I'd tweak if there was a next time (not sure yet if there will be) would be an erect back tuck since the back neck does hit me a little high. But my hair covers it so I'm not going to sweat it. As long as I wait for the temps to drop. ;-) I thought about that alteration as I was cutting the tissue because it's fairly standard for me with wovens but then I forgot so I really only have myself to blame. I didn't do aany other alterations to this except to morph between cutting lines and make my usual square shoulder fix before cutting the tissue. I started with a straight 16 at the shoulders/neck, blended to a 20 at the waist and then 22 for hips/butt. I figured with all the panel seams (they are not really true princess seams in the front), I'd have room to adjust. I basted it together and, of course, I needed NOT ONE seam adjusted. Of course we all know that iIf I had skipped the basting, I'd be cursing that. Murphy's Law. No FBA was done or needed in case you're wondering.

The back also has panel/princess seams which are invisible in this print, and calls for a center-insert zipper. Part of my basting was also to see if the zipper was really needed, since the moleskin does have some stretch and the wrap front allows some wiggle room. After trying it on basted but without sleeves, I decided the sleeves would mean a zipper would be needed if I didn't want to work myself into a lather wiggling into the dress in the morning.

It's not a fancy zipper application and I debated a lapped zip instead, but laziness won out and it came out perfectly, which is what I was after.


The pattern calls for a 22" zip. I didn't have one and didn't feel like hitting Joann's on the weekend. The one I had was just fine. I think it is about 16".

I toptstiched the panel seams front and back. It doesn't stand out too much in the print but it does keep the seams nice and flat.


A somewhat better shot of the tucks at the side.


Inside shot where you can see the underlayer of the wrap is not double-layer all the way down. This is per the pattern and works just fine.


For the collar pieces, instead of turning under a narrow hem and then slipstitching per the pattern (a/k/a icky handsewing), I stitched in the ditch from the right side to catch the facing edge underneath.The ditch sewing would show a whole lot less on the underside if I bothered to change my bobbin thread to match the collar. This should really be in the instructions instead of the slipstitching method.


And now a little confession and a rant ...

The thing I like the absolute LEAST about sewing woven garments? Setting in sleeves with cap ease. I can do it. I can even do it well. It just bugs the crap out of me that I have to ease in a sleeve when it's something the pattern drafters can, and should, eliminate. These sleeves went in fairly well. But there were 3 puckers total that I had to pick and restitch because there was 1" of cap ease. Stupid. I know I've sewn a pattern or two with a woven sleeve and armhole that  fit together perfectly. I need to rack my brain and remember which and use those for every future woven sleeve/armhole.

The sewing community seems to have spoken loudly enough for the pattern companies to offer more and more vari-cup sized bodices. I'd like for us to be heard about the unnecessary cap ease drafting.