Sunday, February 25, 2024

Just in time for warm weather - Cashmerette Stanton

The Sewjo has been Slowjo since my last post. And that means I probably won't have much chance to wear this before next winter, except for taking Cyrus out back in the mornings while it's still below 50F in the mornings. But, hey, at least it's finally done. And proof that I'm still sewing and updating the blog. 
This is a mash-up between the Cashmerette Stanton Hoodie and the expansion pack, which includes the collar and half-zip view. There is no specific view or instructions for the full-zip front with the collar, which is a shame IMO. Personally, I don't really like hoodies on me. They give me knots and static in my hair at the back of my head, and it's never cold enough here to really need a hood. 
 
So, I had to wing it to add the collar to the zip front and still include the zipper and collar facings. I'm rusty and I goofed, which I'll talk about below. But whatever. It's done. I like it. It fits great. And no one is really going to care about my goofs, including me. I did not goof on matching up seams, etc. and those are the parts that really show so I'm calling it a win.
I created a primitive color blocking guide (below) so I could keep track of what was what when I was cutting out the pattern pieces and took a pic of the computer screen so I'd have it on my phone and with me while cutting. 
 I ordered 2 zippers from Wawak. After I decided on the final color blocking, I went with the purple zip. The main fabrics are both French terry from L'Oiseau Fabrics in Canada, with a matching rib knit purchased at the same time for the wrist and hem bands. The navy French terry was re-purposed from my failed HP Beatnik
Here's where you can begin to see my goofs. I should not have serged the facing edge and, instead, turned it under and either handstitched (no way!) or stitched in the ditch. Or, even better, created a new facing piece that incorporated the collar. At the very least, I should not have used navy serger thread. I can live with it. It's a very casual jacket after all and there's no sewing police to give me a visible seam ticket.
Sigh.
What I can't figure out is why the zipper facings came up short. Below you can see the seam where I added length to the bottom of each facing. I laid my pattern piece over the fabric to confirm nothing had shrunk after fusing the interfacing on. I double-checked I cut the correct size. Swapping the hood for the collar shouldn't have mattered. I haven't seen this mentioned in any review I've seen so it's probably me. Life is full of mysteries. :-)  
Otherwise, everything fit together well and the size I chose was spot on. I started with an 18 E/F cup and graded outward at waist and hip. I believe 2-3 sizes, but I've put up my pattern pieces and I forgot to refresh my memory before I sat down at the computer. I also used the full bicep pattern piece. No other fitting adjustments were made or needed.
Here's a Sunday no make-up, dirty mirror selfie with a photo bomber.
And because that was so great, here's another with the proverbial hand-in-pocket shot. Speaking of the pockets, many have mentioned that these pockets are good for keeping hands warm but not so much for actually keeping things IN the pockets. I agree. A phone or dog treats will slide right out. Before I put away my purple thread, I will add an "X Box" (no, not THAT one, but a sewn square with an X inside) at the bottom of the pocket flap. Credit to Nina Niskanen for that idea.
My next project is going to be some old lady overnight underwear IYKWIM. Sigh. Getting old has some suckie parts.

Parting shot: Where Cyrus spends much of the day when I'm working from home, and where I'm sitting right now as I type this. This is technically my dining room, with the fold down leaves of my table folded down and the chairs stored in the garage. It's not pretty, but it's functional and the commute sure is nice. Who has dinner parties anymore?


Saturday, January 13, 2024

Seamwork Andi

Here's my finished jacket, on me. Insert usual disclaimer about dirty mirror, no make-up, etc. It's a long weekend - maybe I'll get to one or the other. Or not.
And here it is on Zillie. I wish I had done a better job of aligning the pockets but that's water under the bridge. Eventually I won't see it. Especially since I know this jacket will get worn a lot both in the house as an extra layer for those cold days we actually have in Florida and outside the house to run errands, etc. This fabric is so nice and cozy to wear without being too hot in the house.
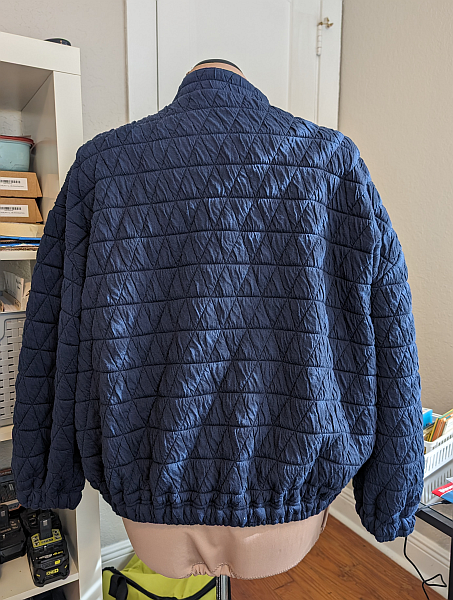
Back view. I decided to go ahead and insert elastic at the hem. I almost blew the opportunity though, because I put on the snaps first, but thankfully realized before I did the second snap at the hem that I needed to hold off until I inserted the elastic or else I wouldn't be able to since the snaps block the channel.
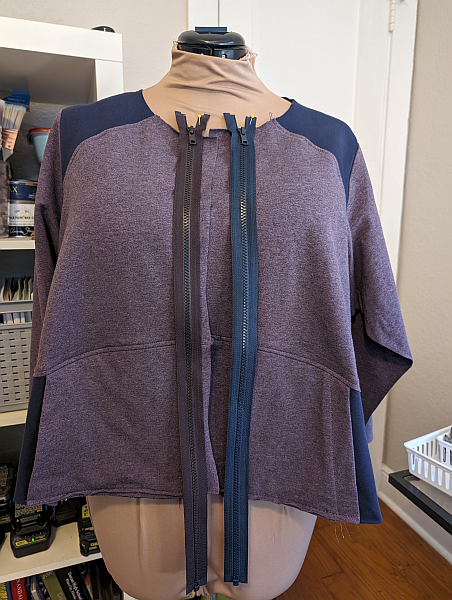
The annoying pocket. But it's a pocket and I'm glad to have both on this jacket. Perfect for the phone, dog treats, chapstick, whatever.
Inside view. 
This is the snap tool I ordered from KamSnaps. It, the necessary dies, and the snap pieces arrived on Thursday. Very fast shipping from California.
Here's everything and the envelope it was all shipped in — laying on top of my on-deck pattern to be cut out today hopefully, around watching football playoffs.
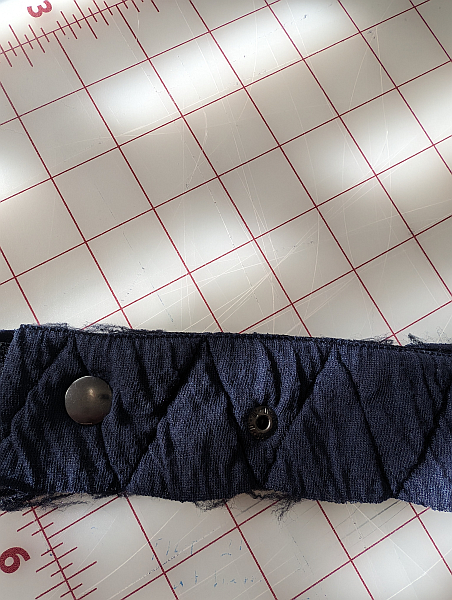
I'm not going to lie - it was kind of a struggle to get everything aligned on this thick fabric with the handheld tool. Moreso for the bottom parts of the snap because the dies and snap pieces are smaller and a little more fiddley and my fingers are big. But I took my time and plowed on, and I'm happy to report that I didn't have any mishaps. I'm sure the honkin' big tabletop setting snap press would be easier to use but aside from the higher price, I didn't want to think about where to store that thing later. If I found myself all of a sudden needing to set tons of snaps, I'd probably upgrade. But the handheld tool does the job just fine too. It's certainly easier than the old purple or teal multi-layer plastic setting tool from Snapsetter that you whack with a hammer and hope the prongs all got caught. Just me?
Before doing the real thing on my jacket, I watched a few YouTube videos (highly recommend this video from Sew Many Creations), laid out all my parts and pieces and got very familiar with them, and then I did a practice run, below. I'll probably have to do all of that again the next time I install snaps because I won't have any muscle memory after a month goes by.
Here's my new jacket in its home. It will be nice to give my ratty black RTW cardigan a break.
Parting shot: Cyrus living his best life. We love him so much!

Saturday, January 6, 2024

So Long 2023

The holidays are over and all the sewing I thought I would get to while I was off work didn't quite happen. But I did manage to get two projects done, or mostly done. And I had lots of time for Cyrus snuggles and some reading.

First up is a Love Notions Rhapsody, but this time in knit. It seems so many things I've made lately have been wovens that need to be ironed. Ugh. While I do press constantly while sewing, I'm not a big fan of clothes that need to be ironed before wearing. I mean I'll do it, but I won't like it. So, I'm back to sewing knits for a while to cut down on my ironing.

The fabric I used is a very nice black/white ITY recently from Gorgeous Fabrics. (There was still some available last time I looked.) I bought 3 yards and I have enough left for a skirt for one of my 2-piece "dresses" should I feel the urge. 
I made no changes to the pattern from my first woven version, except to use the elbow-length balloon sleeves with elasticated hems. We've been having a bit of a cool down weather-wise and my supply of warmer tops is low. I'll still be able to wear this in the office during the hot days since it's usually an AC iceberg zone
Here's the inside with the "burrito'd" yoke. I again gathered the lower back instead of using the box pleat per the pattern. 
The binding and ties were done on my coverstitch machine. The black looper thread shows on the backside of the ties, but I'm OK with it. I'll take applying knit coverstitch binding over woven bias binding any day of the week. But I also seem to remember owning a bias binder sewing machine foot for wovens (like this). I may need to dig that out and reacquaint myself with it.

To give the binding strip a bit more body and less curl as it feeds through the binder, I bought some SewKeyse 1 Inch Fusible Knit Stay Tape (that's an Amazon link, which may pay me a penny or two if you use it for a purchase). I usually cut up fusible interfacing scraps and use that on knit binding strips that need some help but this already cut and ready-to-go 1-inch tape seemed like it would be a great addition to the notions collection. And it is. I love that it's ready to go.
Here it is on my ironing board being applied to my binding strip. (I finally bought a new board cover and this is the cleanest you'll probably see it.)
My other project, which is not quite done yet, is a Seamwork Andi jacket. I really need a casual slightly warm jacket for around the house/yard and running errands, etc. Seeing this pattern made up by others on Instagram is one of the reasons I decided to go with a Seamwork subscription. 
I shamelessly copied my inspirations by using the same prequilted knit. I bought this navy colorway from Stylemaker Fabrics and I might have another color coming from Minerva. And OMG is this fabric so comfy/cozy! (And kind of a pain to sew with since it sheds its innards and is a bit thick and slippery.)

What I did not have ready to go were snaps for the closure. I have a TON of Snapsetter (RIP) snaps that I was thinking would work but I hadn't even looked at them in years and it turns out they are all too small for this jacket and I don't feel confident that the short-ish prongs would be a good match with the fabric thickness even if I had a bigger size. So my jacket got a bit more expensive since I ended up buying a snap press and dies (plus bigger snaps) from KAMSnaps. My order should be here next week and then I'll finish the jacket.
Here's the back, which is hanging very crooked on Zillie. I also have not yet added elastic to the hem. I'm still deciding on that and will make up my mind once I can actually snap the jacket closed.
Even though this is a very simple and oversized design, I had to go my own way a bit with the pockets because they are shaped with a straight side to be inserted into a straight side seam and I blended between sizes, which created a very curved side seam. It's not a big deal, but I kind of think the instructions should have mentioned/shown that you'll need to apply the pockets more like a patch pocket if you do blend between sizes. Seamwork patterns are mostly geared toward beginners and I can imagine a beginner doing some head scratching on this situation. On the plus side, Seamwork's private member forum is very active and filled with extremely helpful people, so one could ask there if stuck.

I cut the pattern pieces to match the "pattern" of quilting across the front and side seams, but somehow one of my pockets does not match up at all. I decided to just leave it. Besides the laziness factor, I didn't want to "waste" any of the remaining fabric since I should have enough left to colorblock for another pattern that's percolating in my brain. I figure there's so many lines going every which way and the pockets hang more to the side than how it looks on Zillie that no one but me (and now the entire internet) will ever notice. 
So that's the end of my 2023 sewing. I'll be back when I have my snaps on the jacket. I'm also planning to start a sweatshirt tomorrow so hopefully I'll have that to share soon too. 

Happy New Year!