
Showing posts with label lingerie. Show all posts

Sunday, January 1, 2012

Oh Thank Heaven


Yes!! I am FINALLY done with the Panty Project (KS2908, modified, before you ask). They still need a trip through the laundry so the elastic shrinks back up. I love wearing my self-made panties and I will definitely avoid buying any RTW for as long as I'm able to sew, but truth be told, I hate sewing them. Well, what I really hate is sewing them assembly-line style. Maybe I ought to just knock out one or two pairs at a time every six months instead of attempting EIGHT. Urg. The mojo ought to deal with two with more enthusiasm. OK, not enthusiasm exactly, but tolerance.

But, really, I probably don't need to sew panties again for another five years. For kicks, I revisited my first real post on this blog, which was panty sewing. And I saw that every single pair from that 2006 post was still in circulation. Not from desperation, though, but because they were still in pretty good condition (with one exception) and still fit fine (through up and down weights too, go figure — although they DO fit better now).

This is the photo from back then:
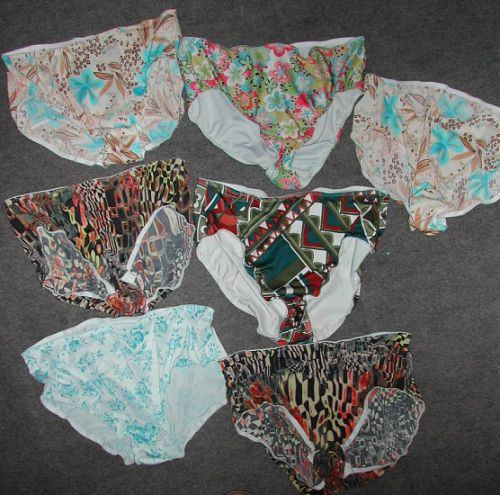


This is the photo from 15 minutes ago:


One pair from the top photo is currently in the wash. Another (lower left corner) I tossed tonight because I noticed tiny fabric fatigue holes forming in a weird place and, well, I have a gazillion pairs now, because not only do I have these old ones and the new ones, I also have others I made in between.

But some are favorites and some are worn with certain outfits. Do you do that? Have panties you prefer with jeans and others you prefer with officewear, and then those that have seen better days for "those" days of the month? I hope so, or else I'm just weird.

This is the white tee I sacrificed for crotch linings. (Lord help me on the spam I'm going to get on this post with both panties and crotches. lol) After cutting what I needed, I stuffed it into my lingerie (oops, another spamtastic word) elastic bin so that maybe I can find it next time I am delusional and decide to make panties from scraps.


So, enough about my underwear. Under where? Under there! Sorry, that just popped into my head.

These are the patterns I'm contemplating for my next project. Unfortunately, the Vogue on the left has had mostly bad reviews, but at least I'll be forewarned. Maybe I'll consider it a personal challenge. ;-) The HP on the right I can see as a 2-piece dress (otherwise known as a skirt and top). The only problem I see with it is that I can't wear another layer over top (especially the top on the left which is my first choice), so will it be warm enough in my office? I'll ruminate over these and suitable stash fabrics while watching the rest of the football game tonight. (Looks like Tony Romo still ain't making it to the playoffs.)


Tomorrow will include some work I need to do (yay overtime, and from home), and a trip to Joann's for thread and purse interfacings. If I've decided on a pattern, I may even get to start on a muslin.

And with that, I'm off to toast the completion of the Panty Project. I'm very sure I deserve it. ;-) It's not Bailey's (my preference), but it's close, and a LOT cheaper.

Sunday, May 22, 2011

Change of Course

Thank you for all the nice comments on the dress yesterday. Like Carolyn, I'm a comment 'ho and, well, keep 'em coming. ;-) (And Carolyn — you haven't updated your blog in ELEVEN days … I'm just sayin' …)

I didn't spend a lot of time in the sewing room yesterday, but I did pull out some knit scraps and cut some new panties. I'm overdue, but no one sees 'em so it hasn't been a big priority.


I cut out 6 pairs (2 of the blue). I'm using poly knit scraps this time for the silky and "firming" factors. Think Spanx-lite.


It's apparently still not a big priority because that's as far as I got. After perusing my "on deck" pattern basket last night, I set them aside for a while, in favor of …


…this! The print will be a remake of Butterick 4818. Which is this jacket below, one of my favorite things ever that I've made. The alterations are already done from the first make so I should be able to just cut and sew. Fingers crossed.


The solid is a knit, which will be a gored skirt. At least that's the current plan. Always subject to change, of course.

I was reminded in the comments yesterday that it would've been pointless to vacuum, what with the Rapture and impending end of the world. I didn't need my arm twisted, so my sewing room floor still looks like this. But I'm going to enjoy the prerogative to leave a dedicated sewing room floor messy because I probably won't have a separate sewing room once I move to an apartment. You win some, you lose some, right?


Parting Shots: The Marine hard at work on the flight deck, and hard at play on a Single Marine Program trip to Busch Gardens Williamsburg yesterday.


Monday, August 31, 2009

From Unwearable to Wearable In One Easy Snip

This is an excerpt from The Bra Makers Manual by Beverly Johnson, which I bought on CD about 10 days ago. This little gem alone may be worth the cost of the book to me.

(Hopefully you can click this and make it larger to read more easily, but Blogger has been cranky with photos for a while now so who knows!)


Especially note: "the bridge may sit in at the chest wall, but it may tip away from the body at the top."

This is one of the RTW bras I bought in desperation. It fit pretty much everywhere except that the wires at the top center front "tipped away from the body" and poked outward, making an annoying and unattractive lump in the valley. I ordered 3 of these bras and as you can see on this one, the tags are still attached because I was going to return them. Zillie isn't quite filling out this one the way the real girls do.


I read that blurb in The Bra Makers Manual and immediately decided to sacrifice one of the three that I bought, since I had been wearing it and wouldn't be returning it anyway. So, I sliced the bridge upward from the bottom, to apex level. With the slice, the bridge relaxed and spread, making the top of the wires lay flat against my chest wall as they should. Hallelujah!


I only trimmed a little out of the slice to make a more pleasing vee shape. The rest of the spread is happening naturally.

I made a tube from some organza I had on hand and from the right side zigzagged this to the backside of the slit to finish the edges and provide stability. Looking at the photo below, you can also see where I sewed across the channeling at the top to keep the wires from riding up to the top. This bra is a "minimizer" and the style used to spread and flatten the tissue is way too high cut and the wires were riding too high on me without that stitching. It's still too high cut, of course, but at least now across the top it's only stretchy fabric that gives and not wires that don't.


With these small changes, the bra went from pretty much unwearable and uncomfortable to very acceptable. I'm probably going to keep the other bras now too and make these same changes. Until I have time to crank out some more bras from the sewing room, these will fill in nicely. I can also see this easy modification happening on some other RTW bras in the drawer, especially since I've got nothing to lose.

Sunday, August 30, 2009

Details and Photos

Last night I showed a preview of my latest bra, but let's go back to the beginning for this pattern (Danglez DB4).

This copper-colored bra is where I had last left the pattern. Looks good, no? Except after wearing it for an extended period of time, it drooped and the girls with it. Not so much from the cups, since they did contain everything within. It was the band that was failing. It just didn't want to stay in position, no matter how tight I made it.


So, back to the drawing board, as they say.

During the interim, I ordered this bra.


It arrived, I tried it on, I hated it. It's the next "model" of the bras I used to wear that fit perfectly. Once I found out that my beloved bra had been discontinued, I bought up every one I could find in my size, which is why I'd been off the bramaking bandwagon for some time. Sadly, even those finally wore out and I was desperate. And at that point, they were so worn out that cloning a pattern from one wasn't going to be a solution either.

So I kept trying on the hated new model wishing for it to fit, because it was so close. But the bridge and center front of the underwires felt like they were about to touch my chin and the straps felt way too short. As I said, I was desperate so I pushed the underwires downward into the channeling as far as they would go and sewed across the top. That solved the feeling that they were about to scrape my chin, but they still stuck out at the center front instead of laying flat. Horrible. I certainly don't need a third bump there. And the straps - they're nice and pretty and all, but the padded area ends right as it gets to my shoulder. Clearly, whoever graded this bra up into the larger sizes did not try it on real humans. If anything, I'm *short* between shoulder and bust point and straps are never too short for me.

The one fantastic thing about this bra, though, was the fit of the band. It was firm and comfortable and didn't ride up even with those short straps. So the brain kicked into gear and I decided to morph the RTW band onto the Danglez pattern and have another go.

This is the original Danglez band.


This is my morph of the RTW band with the Danglez pattern.


And these are the two pattern pieces:


The straight-across pattern is the original Danglez pattern piece. You can see how the RTW shape drastically curves downward in comparison. The reason this downward curve works so well is because that downward curve acts as a counter-balance to the weight of the heavy breast tissue in front. The other difference is that on the Danglez pattern, the greatest stretch is running around the body. This is a no-no for a bra band. You want a firm band, not one that has no resistance at all.

I already knew all this but had a brain spasm or something when I was tracing the original pattern to sew because I didn't even notice the potential problems. (But it was nice to have this confirmed by Beverly Johnson in her Bra Makers Manual, which I ordered a week and a half ago and which arrived yesterday. If you have this book, it shows how to alter a straight pattern into the downward curve. More on this book in a later post.)

While I was tweaking, I also decided to have one more go at the cups since I felt like the upper cup was still too wide and the straps were still not sitting exactly right. So I tried the copper bra on again and pinched and pulled. I took it off and pinned out the amount of the pinches at the center seam …


… and I pinned a "slash/overlap" into the top cup to bring the straps further inward.


These are the old and new pattern pieces. The original is on the top left. Not a huge amount of difference, but 1/4" goes a long way in a bra pattern.


I also decided I wanted a smidge more coverage near my underarm so I extended the sides of the upper and bottom-outer pieces. This is the bottom-outer piece below. The bottom-inner piece remained unchanged from the original.


Then I sewed up a bra with my new pattern changes. And had a meltdown when seeing the results. Arghhh!!


It technically fits fine, but there was just too much bulk at the center cup seam and the cups would not lay smooth no matter what. This is what I saw looking down. Not very pretty, is it? LOL!


And then work and home intervened and I had to stay out of the sewing room for a couple of weeks. But I finally finished this latest bra yesterday and it's a winner. This time, instead of double-layer lower cups, I made them single layer and this solved the bulk problem. But there's not quite as much support so …


… the last tweak I'm going to do is to add a "powerbar" (as Beverly Johnson calls it), which is a side panel on the outside of the cup which forces the girls more inward and center. The powerbar acts like if you took your hands to the sides of your breasts and pushed them together for mega cleavage, but less dramatic. Just a little more needed lifted, not mega cleavage. ;-)

I also traced off a pattern from the RTW bra for the padded straps and lengthened them so the padding actually hits the tops of my shoulders. I improvised with what I had here and used a layer of poly batting for the padding. I'll see how these straps come out of the wash before I decide if this was a good idea. But they look and feel pretty for now.

Mirror bra shots don't always tell the whole story since arms and shoulders are lifted just to take the pic, but this bra is 97% TNT now, and I'll definitely be wearing it until I get the next one made.

Miss Me?


I've been so busy the last couple of weeks and haven't been in the sewing room much until today. But I did get version 3 of the Danglez DB4 bra pattern finished today and here's a preview. It's about 97% perfect - still one tweak left to do - but definitely quite wearable. Don't mind Zillie's lumps. She's got a stuffed bra on under this one and the stuffing has never been smooth.

More details and photos sometime on Sunday, when I'm not too sleepy to write coherently.

Monday, April 27, 2009

Bra-vo!


Review here.

A couple of comments on the dye job. I am NOT a dye whiz. The dyes I used I purchased a long time ago from Elan when they still had a website. They are powder "jacquard" dyes which seem similar to the Acid dyes Dharma sells. You only have to add vinegar to the hot water/dye bath. I did this in a stainless steel pot. Most bra fabrics are nylon, which dye very well (and very fast). Polyester won't dye at all at home. If you don't know what color you want when you're done, sew with nylon thread (YLI makes some) so the thread will dye too. That's about the extent of my dye knowledge.

Sunday, April 26, 2009

Progress Report - Update

Since first typing this blog entry a couple of hours ago, I finished sewing the bra. It fits great. The fit on Zillie is not as great, but good enough for a pic. No cup alterations were necessary.

Hopefully I'll have time tomorrow to dig out the dye and be able to call this one done. I'm very impressed with this pattern and will be writing up a proper review on PatternReview.com soon.


I still have a little more left to do to finish this bra. I've been in and out of the sewing room all day, splitting my time between sewing, cleaning, shopping, web surfing, etc. I do plan to finish it tonight.

I have a concern about the areas highlighted in green. It seems "poofier" than any of my other bras but I won't be able to know for sure until I try this on. I'll be able to sew out the excess if needed. The inside won't be as nicely finished, but it's not like I'm lifting my shirts and letting people look at the inside or outside of my bras. ;-)

Saturday, April 25, 2009

Looking for a 30-hour day


There just aren't enough hours in the day. I had to stop on the bra for today and do some household things, like setting up the new bed that was delivered today for DS#2. He's been away since Tuesday at a State Drama "thing" in Tampa with his high school and many more high school drama departments from all over Florida. Dramatic Teenagers all over downtown Tampa, as if they weren't already dramatic enough. LOL! Anyway, he'll be surprised when he gets home tomorrow. He's going from a twin to a queen.

So, back to the bra … this pic is just a little before where I left off. This is the next one cut, with construction started. Right now, it's white with copper stretch lace. But I'm sewing with nylon thread and plan to dip the whole thing in dye when I'm done (and if it fits, of course).

I took this pic to emphasize that when you are sewing a bra, you should be very careful with your pieces. Keep them laid out on the table as they will be sewn. You'd be surprised at how easy it is to mix up a left and right piece. I learned this the hard way a few years ago.

That's my helpful hint for this evening. LOL!

I plan to get up tomorrow morning and work on this some more. I'll post again when I have progress to show.

We Knew There'd Be Alterations

But that's why I'm sewing my own bra, right? To get one that fits *me* (and the girls). Really, though, this one is pretty darn good for a first go. I'm thrilled.

Here's the ugly muslin. Yes, those are fish. No, I have no idea what I was thinking. I hope I was thinking to use this for a muslin but it's been so long since I bought it, I can't swear to that.


I sewed this tester just as you see here – simple straight stitching, no seam or edge finishing. I did not use channeling, wires, edge elastic, or even powernet. This muslin was just to test the fit of the cups and to get a starting point. I did use some strap elastic and real hooks, though. Safety pinned bras are just too hard to get in and out of. Trust me, I know.

Because there's absolutely no support in this muslin, I tried it on over an existing bra to see if:

1. Do the cups contain all they need to contain? Yes. The bottom of the cup is perfect. The top edge goes high enough.

2. Are the seams hitting in the correct spots? Yes. The diagonal intersects the apex.

3. Does the band go all around me? Yes. It's a bit big right now, but powernet instead of Lycra fish will fix that.

4. Does the center panel lay against the breastbone? Yes. It's hard to tell over the RTW bra because the RTW is not as good in this area anymore since its wires are misshapen from age and wear.

5. Are the straps in a good place. No.

As you can see, there's only one area that needs adjustment. At least at this stage. I may change my mind after sewing the next bra, which will be a "real" bra with all the support-y things I left off of this muslin.

Here's what it looks like on me. That white stripe down the center is just the odd fabric.


And with the seams drawn in:


Using the bra I was wearing underneath as a guide, I used a narrow strip of yellow duct tape to "draw" a line where these pieces should end on me. I actually just happened to have this duct tape in my sewing room. Serendipity!


I haven't given it much thought yet, but I believe I'm just going to lay my pattern tracings over this edge, mark the adjustments, and trace two new pieces. I suppose this would be a "narrow shoulder adjustment" in a bra. ;-)


As I mentioned, I did sew on strapping elastic and hooks. But I used a zigzag and contrast thread so it would be easy to rip and use over. That's a little tip in case you didn't recognize it. ;-) I'll leave this test assembled for now, at least until the next one is sewn.


Next, I'm going to hop in the shower, take the dogs for a walk and then get back at this while the Mojo is still strong.

Friday, April 24, 2009

Weekend Sewing

OK, the panties are done so now it's time to get busy on the upper half. I've sewn my own bras before but for the last couple of years, I've been doing OK with finding RTW that fits. Until it was discontinued. And my supply of every last one in my size that I could find finally gave out.

An old PatternReview.com thread on plus-size bramaking was recently revived and Heather posted some photos of a Danglez bra she's working on. Together with seeing that and Sigrid's beautiful Sewy bras over the last year or so, I was duly enabled. Off to ElingeriA.com to buy some European bra patterns, all of which are different enough from the few American patterns available that I just had to try them.

The ElingeriA website is both German/English (look for the little flags in the upper right corner) and Michaela, the owner, is very helpful if you need assistance choosing sizes, etc. Note that Paypal doesn't always work when checking out so if you run into that problem, choose bank draft and leave a note for Michaela to send a Paypal invoice and she will take care of you within 24 hours.

I ordered my patterns last Saturday the 18th and they were in my mailbox today — from Germany! Here's what I bought:


After dinner, I traced the Danglez DB4 (first one above) and added the seam allowances. The instructions for these patterns are in German only and have no illustrations so if you don't know how to sew a bra (or read German), you'll need a reference. Correction: The Sewy is well-illustrated. The Danglez are not. But Michaela does have an English instruction PDF for the Sewy bra on her website and those instructions transfer pretty well to the Danglez patterns too. However, specific basic techniques applicable to all bra sewing are not fully covered so bramaking beginners may still need a reference. The cheapest instructions would probably be a Kwik Sew pattern. More expensive references include Making Beautiful Bras and The Bramakers Manual. I have the former and the latter is on my wishlist. But because I don't really *need* it, it's still on the wishlist and not on my bookshelf. Although I did just get my first tax refund in about 15 years direct-deposited into my checking account today ... hmmmm .... ;-)

After the pattern work, I went ahead and cut out a "muslin" using some very bright fabric I bought years ago for bras. I'll sew it "down and dirty" and will not expect a wearable bra out of this. I just want to know how it fits and for that, I need to sew the whole thing.

I'll start sewing in the morning. It's been a long week and I may pass out over the sewing machine if I try to do any more on it tonight.

A note for Marie-Claude: While you're correct that this is a Dutch pattern company, this is the German version of that pattern (I bought it from a German site). I believe the Danglez patterns do also have English instructions and, of course, Dutch, if you buy directly from their website.

Saturday, April 11, 2009

Done for another year

Whew! That was a marathon, but I'm done. And apparently I can't count. I ended up with 11, not 10, new pairs of panties.


My panty drawer runneth over. ;-) Between new and existing, I now have enough to go at least 2 weeks without running out of clean pairs. I even tossed about 8 pairs that had seen better days. (Why is a single panty called a pair anyway??)


The elastic is still warped out from all the stitching and stretching during construction but one run through the laundry and it will shrink back down. Here's a new pair on the left compared to an existing pair on the right. The only difference in pattern sizing is that I added an inch at the top of the waist for the latest batch so they'd sit higher on me and right under my pants/skirts waistbands. The elastic shrinks up quite a bit, doesn't it?


The last step of Project Panty was to roll the big bunches of lingerie elastic onto some cardboard cards so it stays untangled and fits neatly in the drawer.


I took pics of how I attach the elastic and I'll put those up as a little tutorial in a day or so since there were a couple of requests. But right now, I'm kind of tired of looking at lingerie elastic. ;-)

ETA: I just did the math. The only part of this project that I'm counting as an expense is the elastic. All of the fabric is scraps from existing projects that would've hit the trash bin if not for panties, so it was free. 21.39 yds of elastic at 45¢/yd = $9.63, or 88¢ per pair. This is truly the one thing I do save money sewing myself, and the fit is priceless.

Friday, April 10, 2009

Under Where? Under There!

(Angie and Carolyn, the pattern is Kwik Sew 2908. I really like this pattern in general but if you decide to buy this one and make it, please read my review on PR as I have made a few key changes which involve some pattern alterations and construction changes.)


I've had no sewing time this week until this afternoon and tonight so the panties are still in progress. I hope to finish them all tomorrow. Above are 10 pairs with crotch pieces and lining sewn, trimmed and turned. I got a wild hair this afternoon and cut 2 more pairs. My panty drawer will be overflowing! And I still have a lot of big scraps for future pairs.

After I do the burrito thing (see my review link above for a link to the KS Beautiful Lingerie book instructions) to enclose all seams, I quickly zigzag the sides of the crotch to hold the two layers in place. I find this fast extra step really helps when applying the elastic in this area as there are no layers shifting. The extra thread is not even noticeable and most of it usually gets trimmed away anyway. For the natural (breathable) fabrics, I'm using self-fabric for the crotch lining. For the synthetic fabrics, I'm using white cotton interlock.


Tomorrow morning I'll start applying the elastic. That's 10 waists and 20 leg openings, or 30 applications. I'm NOT looking forward to that part, but it goes a lot faster once I get started and am in the groove. The elastic below came from Sew Sassy, which has a great selection, great prices, and fast delivery.


* * * * *

The new car has over 500 more miles on it since I brought it home a week ago and I've only been 4 places. I've had a little help from my sons, who have decided they like what they're calling "our car." DH has yet to even try it out. Angie, your comment is so funny. Maybe it is "your" car.

Kristy, you left a comment asking what about the dog hair from Chili in my fabric closet. I have three dogs. Dog hair is a fact of life around here. That's what vacuums and lint rollers are for, right? Besides, I'm a big softie when it comes to my poochies so they pretty much have run of the house, including bins of fleece in the fabric closet. LOL!