Monday, March 31, 2008

Monday Ramblings

OMG. It's hot outside. It started out a perfect 80-ish degrees for the afternoon dog walk. But then the pooches decided today would be Leash Tugging Day and Lizard Hunting Day and Goat Chasing Day and Go Up and Lick Strangers Day and Barking At Horses and Donkeys Day. No different than any other day, really, except that the humidity level is rising and the longer you're I'm outside in it, the soggier you areI am when you I get back home so that what started at 80-ish ends up feeling like 95. Did I hear some of you have had another round of snow? Wanna trade? ;-)

I'm glad I decided to take pics of the new blouse *before* I went outside, even though my hair is still wet from the shower. At least the blouse was still dry then. But it was actually very cool and light feeling in the humidity … just what I had imagined and wanted, so I'm pleased with that.


I've been meaning to comment on one of the pattern pieces for this blouse. This one, for the ELASTIC in the sleeves. It's bad enough that there has to be an actual pattern piece instead of a length notation on the construction sheets (not that I'd follow that either), but …


… to say you need to cut two?


I know what they meant, and no, I don't usually cut out these pieces, but this one just cracked me up.

Sunday, March 30, 2008

New Blouse To Wear Tomorrow


Now that the alterations have been done, this is definitely a blouse I can cut and sew in an afternoon, which is great because I want to make it again in a less … er … vibrant color. I'll take a pic of me wearing it tomorrow, but for now here it is on Zillie.


I thought I'd be stalled again at the buttons but can you believe this match?? There they were, just waiting in the button bin, and plentiful in number too. Yeah, they're shank buttons that I had to sew on by (gasp!) hand, but I managed to trudge through it. ;-)


Here's the final back pattern piece which was changed to sew with a CB seam. The red line is the old CB cut-on-fold line. I kept the width at the top since I wanted to keep the same density of gathering. Instead of adding two waist darts as I was first contemplating, I scooped out the center back at waist level, which is where the extra fabric really needed to be removed. This worked out well. I also removed most of the extra width added at the sideseam area and some more width was removed at CB because my new seam line is 1/2" in from the original CB. With these changes, the "essence" of the blouse is intact but the tent effect is greatly reduced (it's still a loose-fitting blouse, so there is some "tent" but in a good way, if you know what I mean!). The last tweak was to lower the front and back armholes about 1/4" because one last try-on of the muslin told me I should do that (and the muslin was right).


Speaking of the armholes and sleeves, the Simplicity instructions said to sew the sleeves in the round and insert them very early on in the construction, before any of the gathering. This is just plain stupid (it's a raglan sleeve on a very casual blouse!) and a royal pain when gathering all the un-flat pieces to the yoke. Instead, I did everything flat and then sewed the sideseams and underarm seams last.

There were a couple of comments with questions related to this blouse so I'll answer them now while I'm thinking about it.

OP Gal: "I'm always confused, though, as to what the term "overfitting" means."

For this blouse, it meant that I didn't want to end up with a fitted blouse when I was making a loose, very casual top. I had to accept that there would be some fullness/tenting. For other garments, I think overfitting means taking alterations to the extreme so that it's no longer comfortable to wear and/or flattering. It's better to have fabric skim lumps/bumps instead of accentuate them, and that can happen when fitting becomes overfitting. At least that's my take.

Laceflower: "I too need to do the FBA but patterns never mark the bust point any more. How do you begin with out this needed landmark?"

I either hold the tissue up to me and mark my actual bust point or I'll just guess my best. For me, it's usually obvious where the general vicinity of the apex is on patterns that aren't marked. If I guess wrong, the muslin will let me know. I really am just a fly/sew by the seat of my pants kinda girl. ;-)

Cathy: "I have a question re the alteration on the front side seam. You split the pattern there and spread inserting the needed room. Am I accomplishing the same thing by just adding that measurement to the outer edge of the pattern or am I missing some part of the idea?"

By sliding the seam allowance out like I did, the sideseams of both pieces will still match up perfectly when I'm sewing them. It's like altering a pattern with NO seam allowances and then adding them later. Alterations really need to be done within the body of the pattern, not the seam allowances.


Weekend Progress


I really should be done by now. Like even yesterday. But I've been working like a snail. A snail who's been taking a lot of breaks. ;-) But the weather has been perfect all weekend so yesterday we spent a few hours at the dog park and today I've been in and out all day watching DH try to fix the riding mower and then bringing drinks as he resorted to the push mower while he waits for a part. Along with laundry, grocery shopping, and cleaning bathrooms.

This fabric is a bear to photograph. I think I've adjusted it to a pretty close match to the real thing, although it's still looking a tad brighter in the photo than in real life. (You should've seen the neon orange of the original pic!) But what you can't really see are the mini clear sequins sewn into the embroidery at regular intervals. These presented no problem at all when cutting or sewing as they're soft and thin enough that a needle pierces them without a moment's hesistation.

At this point, I still have to sew the inside yoke facing down, sew the sideseams/underarms and bottom hem, run elastic in the sleeves, and do the buttons/holes. As soon as I'm finished typing here, I'm going back to the sewing room to finish it.

Yesterday, I made a couple more alterations before cutting the real fabric. First, I decided to go with a shaped CB seam and forego the waist darts. I'll take a pic of the altered pattern piece when I'm photographing the finished blouse.

I also went ahead and "altered" the yoke to make it more narrow in the shoulders. This was not rocket surgery! ;-) All I did was to substitute the size 16 pattern for the front piece, keeping the 18 length and my square shoulder adjustment. The size 16 is on top in the pic below.


The back yoke piece had all the sizes so all I had to do with it was trim it to the size 16 width along the bottom edge.


I had a big DUH! moment on that one. LOL!

Friday, March 28, 2008

Simplicity 4122 Muslin


Overall, I think I'll like it for a very casual and comfortable summer blouse. It's not something I'd go to meet the Queen in. But really, how often is she going to come knocking anyway?

I over-estimated on what I added for extra tushie/tummy room, so it's hanging *very* A-line at the moment. I experimented with pinning a waist dart in the front (seen on the right side in the above pic), and what I think I'll actually end up doing is adding a couple of waist darts in the back instead. I pinned those and it made the front hang better (with no darts), since most of the extra width is coming from the back.

I think some shaping is definitely needed if you have any hips at all. The model on the envelope is pretty straight-up and down. I'm not. But I don't want to ruin the comfort factor by overfitting either. Hopefully, I'll be able to strike the correct balance.

I'm also going to redistribute the gathering in the front. Using the pattern marks after doing the FBA, it's too full close to my armpit.

Below is the front pattern piece laid on my incredibly thread-laden floor. ;-) I started with the size 18. The red lines are a standard spread/slash FBA, with the underarm dart rotated to the neckline gathers. The yellow lines are the extra 2.5" of length added to the pattern before starting the FBA. The green lines are the extra hip room added at the sideseam by cutting at the seam line and moving the seam allowance outward.


This is the back pattern piece. Like above, yellow is the additional length added. The green lines are more width added. I only really needed about 75% of what I added. Oh, and I just remembered I made a swayback tuck, but I forgot to mark that in this pic.


These are the yoke pieces. I added 3/8" for my square shoulders at the outside pattern shoulder by slashing at the seamline and spreading the seam allowance.


I think the shoulders are still technically a bit too wide but I'm going to live with it. I really don't want to even think about messing with the yoke.

Now it's off for a walk before Chili pokes a hole in my knee.

Thursday, March 27, 2008

Thinking About a Mini Wardrobe

First, thank you everyone for the birthday wishes yesterday via comments, email, and PMs on Pattern Review! I turned 46, which means I'm now downhill to 50. Of course, the alternative is much worse, right? ;-) I don't really mind the numbers at all. I just don't like the speed at which everything is flying by. I still remember when a year felt like forever. But it's been forever since it felt like that.

We were very low-key at my request. I've got way too much stuff already so I requested no real gifts. My sons made dinner (and since it was Wednesday, it was quesadillas on their menu), then they cleaned up afterward. They also started my day with a big bouquet of spring flowers and funny cards and DH brought home a sinful chocolate birthday cake, which I now have to stare at the rest of today. I wonder how long I can last. After dinner, we planted ourselves in front of the tube and watched a Bon Jovi Unplugged concert. (I wish I had JBJ's aging secret—He looks better now than he ever did!) The guys even stuck around while I watched Top Chef, which they'd only do if it was my birthday or something. ;-)

Next up on the sewing front is possibly a Mini Wardrobe inspired by the PatternReview contest starting April 1.** I'm not sure if I'll actually get it done in a month so I can enter, but I'll let it be my motivation to churn out some easy-sew, easy-care summer clothes. Today I'm working on Simplicity 4122. I've made the alterations and am about to cut a muslin.


If the muslin works, I may even sew one over the weekend which I won't enter in the contest. It's a very fast top so I can always make a second during the contest timeframe, right? The gathers over the bust are a concern and the real reason for a muslin, so I can see if I look like the Pillsbury Doughboy's older sister. I hope I do like it, though, because it looks so cool and airy and just what I'd want to wear for Florida summers.

I think I'm going to stick with the peach/coral & brown theme for a while, with some plain white thrown in as a basic, and that palette will be what I concentrate on for the Mini Wardrobe. I bought this stretch poplin to maybe be a skirt to go with the peach blouse and it arrived the other day.


In real life the coral is probably too bright for the blouse, but it will certainly work with other stash items for the Mini Wardrobe. I've got lots of fabrics and patterns swirling in my head as possibilities right now so I thought I'd just jump in with the pattern above and see where it leads, instead of succumbing to analysis paralysis.

**Well, scratch all that. I just re-read the dates over on PR and the Mini Wardrobe contest starts May 1. Oops. But I can't wait until May since our Summer will be here before then, so I'm going to do my own and not worry about a contest yet.

Tuesday, March 25, 2008

Photos and Answers


The Burda blouse is done, laundered, pressed (arghhh!) and reviewed, here. As I mentioned in the review, the wind was really howling when I was taking these photos (which was a comedy in itself, try to snap pics between gusts) and the back view shows how it plastered the blouse against my butt. There is actually plenty of ease back there but you'd never know it by this pic.


The Jalie skirt was originally reviewed, here. My expression here looks rather odd, but at least it's a modeled pic, right? And no, Carolyn, I don't have a brown cardigan. But I'm thinking I should since it would blend into my wardrobe rather nicely.

Click on any of the photos to see larger versions.

* * * * *

Now to answer some questions from recent comments.

Nancy K, (re the Jalie skirt above): "This is view D?"

Yes, view D. The skirt with the 8 gores and non-godet flounce.

Laceflower (re the Burda blouse): "Debbie, you feeling OK? This is the tamest fabric I've seen you purchase."

LOL! Well, sometimes I do need some boring solid colors in the wardrobe. They can't all be wild prints.

Anna Szabo (re the Burda blouse): "Great blouse and I love the fabric I have a question. We appear to have similar shapes. I know you wrote me before that you draft up to the desired size using a similar increment that is used between the sizes of the existing pattern. I got the impression that you also used software to draft your pattern. I do not have the software but would like to do this shirt in my size. 16-18 in the big 4 patterns. Do you think this is possible without the software?"

Thank you! Yes, it's very possible to make this without software and without the pattern. You'll need a fitted blouse that has a side dart and you'll need to be willing to chop up a pattern and make a couple of muslins. The previous posts, here and here, show how to morph a regular fitted blouse into the shapes of the Burda pattern.

Nancy K: "I just looked at your jeans fly front zipper tutorial which is really excellent. How about a tutorial on that great waistband?"

When I make my next pair of jeans/capris, I'll try to remember to take photos. I'm not sure that it's tutorial-worthy though. ;-) Is there something specific you have a question about?

Alison: "… I believe you only want to baste one of them (the one that gets topstitched). This is because the placket is slipped in between the folded-in placket and the blouse and is caught in the topstitching. Now this can't be done if it's already been basted shut (Luckily I'm lazy and only basted one side)."

I did finally figure out what Burda meant, but thank you. I wanted to point out to you, though, that when Burda instructions state to "baste," they usually mean with pins. So, if you keep that in mind, you won't have a problem with something being unmoveable because it's been stitch-basted.

Joanne: "I copied a rtw blouse, got the "V" neckline perfect, but my sleeve doesn't fit my armhole, so I'll need to make another sleeve, that's my problem. Can you tell me how to draft a sleeve that will fit into an existing armhole?"

I've never drafted a sleeve from scratch in my life. But what I would do is to use a sleeve and armhole that I know work for me and then copy them onto the new pattern. Just substitute the good armhole by tracing over it onto the new pattern and then use the sleeve that goes with it. I'm all about doing things the easy way. ;-) HTH

Nancy K: "Thought you might be interested to know how your old posts are a great resource. I am making a welt pocket in pants and I referred back to this post to see where you put yours and what you used for stabilizer."

Thank you Nancy. I'm glad to know that what I write is helpful down the road.

Ann's Fashion Studio: "What pattern do you use for the boys boxers? They look great."
Thank you! I used a now-OOP Simplicity pattern, Simp 8150. I'm sure there must be a replacement pattern available or you can probably find this one on ebay.

Becky W (re the Button foot): "Looks way more functional than my Janome button sewing on foot. Mine does not have the elevation of the button on the garment. I end up getting the button in place and using a sharp pointed wooden skewer (spelling?) from the kitchen to give something to stitch over to give some thread shank to the button. Any ideas for a comperable generic?"

I wish I could be helpful on this but I tend to buy most feet directly from my Viking dealer. I do have some generics, but this isn't one of them. Maybe this one will work?

Monday, March 24, 2008

Oh Sure!


Yep. As soon as I chop off the sleeves, the weather forecast is for cold tonight and tomorrow. And by cold, I mean sub-70. ;-) It's supposed to drop to the 40s tonight, so that's cold even outside of Florida. Back to 80s by the end of the week, though. I now love this shirt again with its new short sleeves so I can wait on the weather.

I finished the skirt this morning. I ran out of steam last night and decided to read one of my Adele Margolis books instead. How to Make Clothes That Fit and Flatter: Step-by-Step Instructions for Women Who Like to Sew. Lots of fun and interesting information about styling so far. Oh, and girdles. LOL! It was written in 1969 after all. I'll write more about the book another day.

The Burda blouse is out of the wash and ready to be ironed. I'll do that later and try to snap some modeled pics this afternoon. Right now I've got to go clean up the remains of an empty serger cone that Dani snatched out of the trash basket and chewed into shreds. She is such a thief in my sewing room, and so I have to be really careful about what's in her reach. I kinda knew she'd go for the cone and I'd clean it up later. Since there's no real harm, I let her have some fun. Better that than another pillow. ;-)

Sunday, March 23, 2008

Before I Forget


I had meant to show this comparison earlier but then I started working on muslins and the pattern pieces were scattered all over. The white paper on the bottom is my PMB-ified pattern, the sheer pieces are the tracing (w/o seam allowances) of the size 42 from BWOF after I did that "mock" FBA on it, last month. They really aren't too far off in general shape. My pattern is wider, of course, because I am. I see now that I should've copied the angle from the bib section instead of guessing, but my second guess turned out very close so it's all good.

Thank you everyone for the nice comments about the blouse! It was fun having you along on the project, encouraging and motivating me. It will be nice to have this addition to my summer wardrobe.

Speaking of which … I've already moved on and have cut out a new summer skirt. I'll sew it up after dinner and will then have something to wear with the blouse when I take pics. It's my TNT Jalie 2681.


I'm using the same fabric I used for this Onion top.


But … I hacked off the long sleeves of that Onion top today. I wore it exactly twice over the winter because of those darn sleeves. The wrist/cuff area fits fine at my wrists, but it's too snug to push up my arms, which is what I usually do with long sleeves since our "winters" are not exactly frigid most days. I love the fabric and I hated to see it mocking me hanging in the closet, so it will now be a spring/summer top. And it will match the skirt, if I want a 2-piece dress look. I'll hold judgment on that until I see how they look together.

I eeked the skirt out of every last inch of that fabric. All 8 gores and 1 flounce piece were cut without a problem, but I had to chop the second flounce in the middle and add a seam. I'll make that the back flounce and no one, especially me, will ever notice it.

Saturday, March 22, 2008

In the End, the Weather Won


The blouse is done. I need to wash it, though, to remove the marks and basting glue before I can give it a good pressing. Once that is done, I'll take a pic of me wearing it and write up my entry for the contest. (I think this will be the first PR contest for which I actually enter something!)

Overall, I like it and it fits very well. Yay muslins! But as Cidell mentioned in her blog today (BTW, awesome blouse Cidell!), it takes some getting re-used to wearing a blouse made from non-stretch fabric, as this one is. I feel very prim and proper. LOL!

I ended up using peach (yes, the fabric is really peach, not pink) buttons from stash, which are actually and amazingly the same shade of peach, just darker. When I auditioned them last night, I wasn't thrilled. But they started looking much better the more it poured rain outside and now they've actually grown on me so I may just end up keeping them. That, and who the heck wants to remove six buttons only to sew on six more?

So, what should I be asking Carolyn to shop for in NYC for me? ;-)

Sneak Peek


The blouse is coming along. If the sewing continues to go well, I'll have it done this afternoon. Well, except for buttons which I have yet to buy. I'll bring a swatch of the fabric to the store with me, but I'm already thinking that I'll end up with very basic white-ish buttons because, again, the fabric is telling me to keep it simple. I'm also thinking of covering one button to see how that looks.

The next thing to do is to decide how long I want the blouse to be so I can incorporate the button placket/facing into the hem at the center front corners. Then it's on to the collar and stand.

Ah, the button placket … See anything weird going on there?


This is something I'd never point out in real life, but since you're all sewing with me, I'll come clean. ;-)

In hindsight I obviously wasn't thinking too clearly when I originally decided to cut the plackets on the bias, thinking how nice the stripes would look on the diagonal. Well, that was a good thought, except when the button placket is to be attached to bib sections that are already on the bias. With the placket and the bib on the bias, the whole front would look lopsided since the diagonals would chevron off-center. Oops. And double oops because by first cutting two plackets on the bias, I really limited what I had left for usable scraps.

Luckily, I had enough to cut one placket on the lengthwise grain and since only the outermost placket will be the visual focus (and the store was closed), I decided I could get away without buying more fabric. So I have one straight and one on the bias. We'll call it a Design Feature, and move on.

Friday, March 21, 2008

Letting the Fabric Speak


I started sewing the blouse yesterday, and this is my fabric (ETA: bought at Joann's last weekend). I stalled last night as I was contemplating the topstitching. I thought I wanted a thread that really stood out. But no matter what I tried, it just didn't look right. The darker tones were looking like they were trying too hard to be topstitching and contrasting in a bad way with the woven stripes of the fabric.

I decided to go with the lighter thread (the one at the top) to match the fabric. It won't stand out, but it doesn't need to. The stripes are enough. And, hey, it means no thread changes as I sew which is definitely A Good Thing. ;-)

Hopefully construction will continue smoothly and I'll finish the blouse over the weekend, with enough time to enter it into the Fitted Blouse Contest on PatternReview.com.

Wednesday, March 19, 2008

Nope, Not Yet

All I've done today for the blouse is to press the fabric and give myself a headache trying to figure out what Burda means for the half-hidden button placket instructions. I think BWOF would be the perfect pattern magazine if a native English-speaker wrote the instructions for the English language version. I assume the other language translations are just as bad?? I don't mind the short instructions but it's really hard to put my head around a term that just isn't what we usually say in English, which tells me it's more of a literal translation than vernacular. Oh well. All I really needed to do was re-read Christina's review where one photo is as good as 10,000 Burda words. And after all that, I've decided I'm not going to use that half-hidden placket anyway. It's too bulky. What a waste of a headache. LOL!

So I tossed my experiment fabric pieces and took the dogs for a walk. It's over 80 degrees today, sunny and breezy. There aren't too many days left before the weather turns unbearably hot and humid so I had to get out and enjoy it while it's here. I noticed a lot of new baby goats in the big pasture but I didn't bring carrots today so we kept walking. Spring has definitely sprung.

I did mend DS#2's jeans, caught up on the ironing pile, and cleaned up from the muslins so the sewing room is now tidy and guilt-free and I'm ready to start on the blouse. I think I really just needed one day away from it to re-energize.

Tuesday, March 18, 2008

Final Muslin


Muslin #3, and the last one for this top. I'm ready to cut bait and fish. Er, I mean cut fabric and sew. ;-)

I traced the BWOF collar and stand for the size 42 and they fit the neckline (and my neck) perfectly without any alteration so that was easy enough. I also went ahead and cut the back with a center seam, which I've decided I like and I'm keeping for the final. I eased the back shoulder darts to the front piece and I'll stick with that method for the final since the dart is only 1/2" wide total. The last thing to tweak is those stupid back waist darts. I'll see if DH is willing to pin them for me as the last step for final blouse. Well, I know he'd be willing. It will be a matter of whether he's good at it or not. LOL!

Making muslins delays having the final garment to wear but once I start, I find that I actually enjoy sewing them in an oddball sort of relaxing way. Cutting out goes quickly, there's no interfacing to mess with and the sewing is fast and ugly. And then the end result is progress you can actually track. I guess that explains why it was really no big deal to cut and sew three separate muslins for this blouse. Plus the knowledge that I can now just cut and sew the real blouse without interruption.

(Carolyn, I'll send along this final muslin with the pattern. I'm pretty sure my shoulders are squarer than yours but at least it will give you a jumping off point.)

The real fabric is in the dryer. Fingers crossed that it doesn't come out in one big unwieldy pile of wrinkles.

Monday, March 17, 2008

Not Reinventing the Wheel


The sleeve on your left is the "new" sleeve. But it's not really new, since I traced the actual Burda sleeve from the 01/2008 issue. Because this is a gathered sleeve, I figured I'd have some leeway in my adjustment "techniques." I measured my sleeveband and then noted the measurement for the largest size Burda sleeveband (size 42) and calculated the difference (4.25"). I slashed my tracing straight down the middle, parallel to the grainline, and spread it that amount. Voila! Done. Oh wait, I also added another 1/2" to the bottom when I cut the muslin because to my eye it looked a wee bit too short for me.


But the proof is in the pudding, right? So I cut out one sleeve and sewed it to the other armhole of yesterday's muslin.


I think this will do just fine. Still puffed, but so much less so. And it fits great. If only all sleeve alterations were so easy.

The problem stems from PMB's default puffed sleeve, which I just clicked buttons to produce and cut out as is, planning to try it and see and if that didn't work, move on to morphing the actual Burda sleeve. You can see the whopping difference in the two sleeve patterns below and why the PMB sleeve was completely overwhelming. But I had to try it just to know.


Yesterday I also sewed a sway back tuck into the muslin which made a huge improvement. Still need to move those darts though.


This morning I've made what I hope are the final tweaks to the pattern:

1. If you look at the photo above with me wearing the new sleeve, you can see vertical folds. (Ignore the diagonal fold as it's an anomoly from the too-long collar.) I really shouldn't have extended the shoulders, at least not on a puffed sleeve blouse where (I learned today) it's actually better to reduce the shoulder width a little and let the room of the puff compensate. Live (make muslins) and learn. So I trimmed the front shoulder, tapering to nothing going into the bottom of the armhole and darted the back (since I actually like back shoulder darts).

2. I incorporated the swayback tuck into the back pattern piece and I'm now debating whether to cut it with a CB seam, mostly because the original Burda pattern has a CB seam and I'm trying to copy it as closely as possible.

3. I traced the Burda collar and stand pieces and morphed my PMB pieces to match, as well as shortening the PMB pieces overall since yesterday's muslin told me they were too long.

I'm going to cut one more muslin because I'd rather be safe than sorry, and it really doesn't take very long to sew ugly. ;-) I especially need to test the altered collar and stand since it would be a major drag to get almost done with the real blouse and then be fiddling with those. (Note to self: get that fabric in the washer!)

Parting shot: All of the odd bobbins I've used up sewing muslins, with 2 more still in the machine.

Sunday, March 16, 2008

Another Crumb for Carolyn


The stars aligned yesterday and I was finally able to make it to Joann's, with a coupon, and return with a full bolt of muslin. (I also left with a cut of fabric, which may be what I use for this blouse but I want to see how it washes first.)

So, Carolyn, here's the next crumb: Muslin #2. Yes, I'm wearing my PJs. ;-)


There are still some issues. The main problem is the sleeve. The sleeve band at the bottom is too tight (it's ripped open in the photo of me wearing it) and I'm not liking the super-puffiness of the sleeve. It's too tight because the sleeve itself drafted wonky and I had to sew out about an inch to make the seams match, so I'll just correct the problem and it will be fine. But I know I'll be removing some of that puff which will mean at least one more sleeve trial, but I haven't decided if I want to keep it a semi-puffy sleeve or just go for a regular sleeve. Right now I'm leaning toward keeping it semi-puffy because I like the look (regardless of whether it's *my* best look).

Other issues: The new collar band and collar drafted too long for this neckline so I'm going to have to cut them down. Not a big deal. It also looks like I need a bit more bust room but part of the problem is the too-tight sleeve so I'll revisit that after a new sleeve is in place. The back is so-so. I need to move the waist darts and sew them deeper at my waist.

On the bright side, I like the new angle of the bib seam. ;-)

None of this is really major — just some tweaking left to do, so I'm still encouraged. I'm going to set it aside for today, though, while we do some family things to celebrate DS#1's 19th birthday.

* * * * *

Donna, you asked if I cut my PMB pattern pieces out exactly and then lay them on the fabric so that when I cut the fabric, I'm not cutting onto paper. Yes, that's what I do. The paper is too thick to stay flat and stable if I cut it and fabric at the same time.

Friday, March 14, 2008

Continuing On With Fitting the Blouse


(Click on the graphic above to see it in more detail. My latest changes are in pink.)

I still have not made it to Joann's for more muslin. I was actually out the door and in the car yesterday when I realized that I didn't have a current coupon. I used them last weekend on thread, the same trip when I forgot to buy the muslin. I'm not buying a full bolt of muslin at full price, so I'll have to wait until the next flyer shows up in the mailbox. For all I know, it may already be there since I didn't check the mail yesterday afternoon.

In the meantime, I tried on the sewn muslin again and started evaluating. I decided the reason the shoulder seams were hitting me weird is because the whole back wasn't laying properly. And that's because my butt got even bigger since the last time I drafted a blouse with the software. Depressing but true, and so something that had to be dealt with. If not immediately on the body, at least on the pattern. ;-)

I slashed the muslin straight up the back waist darts. Now that the fabric had enough ease to go over the curves, everything was much better. So I added 1-1/4" to the back sideseam of my pattern. I think (hope?) this is a bit too much, but I can sew it out, if necessary, at the darts and sideseams after muslin #2 is made.

Another change I made was to the front bib seam. I added 5/8" to the center piece at the "princess" seam and removed the same from the outside piece, in order to create a wider angle in the seam.

The last changes were to lower the front and back necklines small amounts but which necessitated new collar pieces, and to extend the shoulders 1/4" (because Belinda convinced me that a slightly extended shoulder seam feels better to wear during my usual mom/wife daily activities).

Only the pink pieces needed to be printed again and that's what I did. Another 12 pages now waiting to be taped together, which will only take a few minutes once I get into the sewing room.

Hopefully I'll only need one more muslin. And hopefully, I'll get it done over the weekend so I can work on the real blouse.

Thursday, March 13, 2008

Cooking, and Other Stuff


Wednesdays are usually quesadilla night here, so sayeth DS#2. Last night I took pics during the process.

First, the ingredients:

Southwest Chicken Quesadillas

(I tend not to really measure when I make these, so the amounts are best estimates. If you like less spicy, use less chili powder, chipotle, etc. You really can't go wrong with just winging it.)

3-4 boneless chicken breasts, cut into small pieces
1 green bell pepper, deseeded and chopped
1 large onion, sliced medium thin
2 tbl chili powder
2 tbl powdered chipotle pepper
1-2 tsp salt
1/2 - 1 tsp black pepper
1-2 tbl dried cilantro (or sub fresh if you have it, I didn't last night)
one 16 oz can tomatoes (I usually buy "chili" tomatoes)
one-half* 16 oz can yellow corn (drained)
one-half* 16 oz can black beans (drained and rinsed)
1 small can green chiles

2-4 cups shredded cheese (I use a "fiesta" pre-mix)
10-15 10" flour tortillas
cooking spray

Optional: sour cream, jalapenos, and Kraft Spicy Ranch dressing for garnishments

*I store the other half of the can contents in plastic containers in the fridge and use them the next week.

Spray large skillet with cooking spray and cook chicken on medium heat until pink is gone. Drain. Add all of the remaining ingredients, except cheese, tortillas, and spray, and continue cooking until bell peppers and onions are soft.


Place tortillas in a stack and spray one side of each with cooking spray. Using a second skillet, lay one tortilla spray side down. Add a small handful of cheese to one half and then a scoop of the chicken mixture. Fold over and cook at medium heat until brown on the bottom, about 2-3 minutes. Flip and brown the other side.


I usually do two at once. I add the second to the pan after the first has been flipped once, which makes it easier for timing and for flipping a weird shape. ;-)


The rest is DS's job. He uses a pizza cutter and slices each quesadilla into 3 sections. And then arranges them all on a serving platter, as in the first photo above. As you can see, we make lots. But DS likes them for his lunch so some go for that the next day and the rest get eaten over the weekend. Cheaper than prepackaged microwave meals, and much tastier!


=============================

Sqeamish Alert!

Instead of quesadillas, Chili had other plans: Fresh lizard (apologies to Geico!).


=============================

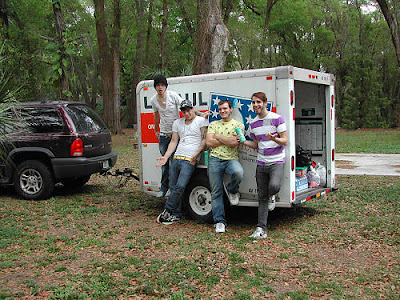
And, finally, one reason it's been fairly quiet around here. DS#1 (2d from right) and his band left "on tour" last Friday. They've been through North Florida, Alabama, and are now in Nashville, Tennessee. They'll be gone another 3-4 days. DS promised that he'd call every day and so far he has. They're having a ball! Oh to be 18 (19 this weekend) again, without a care in the world!


=============================

Now I'm off to Joann's to pick up muslin.