Monday, April 25, 2016

Cashmerette Concord Tee - The Reveal and Review

I'm done. Tee shirts used to take me a 2-3 hours. Now, it seems, they take weeks. Hmmm. :-)

It's not the pattern that's the problem here. The Cashmerette Concord pattern is really great. I just started to dislike the fabric and had to force myself to keep at it. Now that it's done, I like it again. I just hated sewing with it. It's a thin rayon/lycra knit and it wanted to wiggle all over the place. At some point early on, once I declared this a "wearable muslin," I pretty much just gave up on stripe matching. If it happened, yay. If not, I wasn't going to care. I see a few spots in the pics that could be better but I still just don't care. This is a casual tee. No one in real life will even notice. It's fine. I just point out these things for other sewists, to keep it real. In actual life, nope.


So, as you can see, I used 3 different fabrics for the tee. Had I known how much I hated sewing with this fabric, it would be a b/w-only striped tee. :-) But I soldiered on, and here's a crappy cellphone-pointed-at-the-mirror pic.


And another cell pic from during the process when I was gauging the neckline width. (Did you notice the cool-geeky dinosaur necklace?) If you remember, I had some concerns last post about the open-ness of the neckline since I'm a bit narrow-shouldered. To compensate, I cut a 14 for the neck/shoulders. This is 2 sizes smaller than my size per the instructions (using my full bust measurement). It worked well. In the photo below, the neckband isn't attached and my bra straps are only just visible. Meaning, with the neckband, I'd have full coverage. Jenny (from Cashmerette) confirmed the neckline is "pretty open." My conclusion, it's a nice width but definitely go narrower if you have narrow shoulders. Or, cut a wider neckband. :-)


Close-up of neckband, sewn on with the sewing machine, and then coverstitched. I used the pattern piece for the neckband and I was a little concerned that it was going to take a ton of stretching to get it to fit the neck opening. It did but it also worked absolutely fine for this fabric. Still, I think I'm going to add a wee bit of length for poly knits such as ITYs. I have a really good feel for neckbands at this point in my sewing so it's one of those "I'll know it when I see feel it" kind of things. :-)


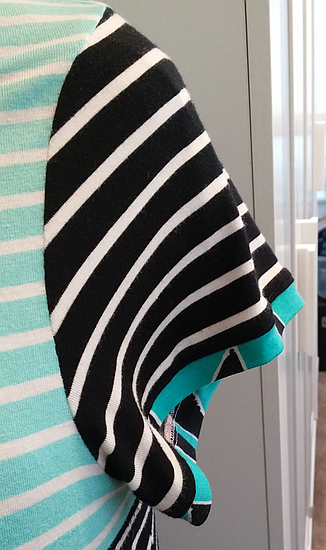
I also added the contrast band to the sleeve hems. (I like things in odd numbers, especially threes.) Although I cut the shortest sleeves in the pattern with a hem allowance (I didn't know I was going to use bands), I trimmed it off before attaching the bands. I like the finished length of the sleeves. The width is also good for me. I don't have skinny biceps but they aren't particularly meaty in proportion to the rest of me.


I color blocked the back as well as the front. I whacked at the pattern visually (meaning without measurements) so the back yoke length has no relation to the front. I was more interested in pleasing proportions viewing head on vs. how the two met around my armpit. The back yoke joining seam is one of those places where things could be more even. But it's my back. I just don't care.


I started with the shortest length and then proceeded to add 2 inches to it. And, yes, you guessed it …it's about 2 inches too long. I know it technically looks OK but 2 inches up is better on me. Since this is rayon, I'm going to see if a trip or two through the laundry takes care of things. This thin rayon does tend to like to keep shrinking a bit.


So, what I haven't specifically mentioned yet but I think is obvious from the photos is how well this tee fits me and the girls. The pattern is divided into C/D, E/F, and G/H cup sizes. I used the E/F as instructed because it was closer to my waist measurement. Yes, I said waist. It's an hourglass v. apple kind of thing, I'm guessing. I think the neckline options are nice. My only criticism on the necklines is the finish for the vee. It's more of a "scrubs" neckband, which I think is eh. I'm sure it's aimed at beginners, but I don't necessarily agree with "dumbing down" a tee pattern. But if I had been an actual tester as I initially agreed, maybe I could've changed some minds. We'll never know. :-) As for differing sleeve and hem lengths, these aren't really aimed at me since I can easily make those adjustments. For those who like to have it all in the package, it's good to have so no complaint there.

You may be thinking it's difficult to get excited about a tee pattern which costs $14/$18, but if you're a curvy lady who hasn't found tee nirvana in any other pattern, I say go for it. It will pay off in the long run. If you've been reading my blog for a while, you know that I love my Ottobre TNT. Well, that Ottobre magazine was probably in the $12-$15 range and I've made SO MANY variations on that tee that the cost of the magazine isn't even a factor anymore. (Yes, I know there are multiple patterns in the magazine but I didn't sew them.)

Don't tell my Ottobre bestie, but I think this Concord even fits me a little better. I like it enough that I'm subbing it into the bodice for the Kwik Sew dress pattern I showed last post.

Wednesday, April 20, 2016

In the works and on deck

(Can you believe it? TWO posts from me in the same week!)

So it's Spring here in Tampa. For about another minute until it's All Summer-All Humid-All The Time … for months. And I'm ready for some new clothes.

First up, is the new Cashmerette Concord tee. This should have been a very quick sew over this past weekend. To be fair, it IS a quick sew. It just wasn't a quick decision on sizing so actually starting took some time. And let's not mention Netflix sucking me in.

In-Progress Concord

I was originally to be a tester but my sewing is so scarce and scattered these days that I pretty much just wussed out. Jenny very kindly sent me a paper pattern anyway. I'm a bad tester. But I am an honest reviewer, so maybe it will all work out?

Concord back pattern with curves!

With the paper pattern in hand, it meant I had to trace. It also meant I had to "sacrifice" some old never-used costume pattern so I had tracing paper to use, or something resembling it. (I know I have actual pattern tracing paper but I have no idea where it ended up after the move last July.) Tracing isn't a big deal. I have to be honest, though, and say I actually prefer PDFs just because I don't have to trace and I can just print another if I mess up.

So back to the sizing conundrum. I tend to run a little bit narrow in the shoulders and from the Concords I'd been seeing on blogs and Instagram, it looked to me like the neckline runs wide. After cutting and partially sewing, I agree with myself that it does have a wide-set neck opening. In the pic above, the neckband isn't yet sewn on (and in real life it's not even cut out), so the neck opening looks even wider than it will when finished.

Although my B-W-H measurements would put me in the 18-20 range, I started with the E/F cup and traced at 14 for the neckline and shoulders, gradually increasing to 16 at underarm/bust level, and then out to 20+ for hips/bum.

So far, everything is going great. Except my fiddly fabric. I thought I would do some colorblocking, and as you can see, I did. But I'm probably going to be sorry. This rayon knit is very flimsy and there is definite rippling where the two colors come together. I'm pretty sure that the neckband stitching will be meh too. So, I'm dubbing this a wearable muslin and we'll see how it goes.

The pattern itself is very nice. It's nothing earth-shattering for me because I now have years of fitting/altering experience (and a few TNT tees), but I can see that it's going to be a good fit (pun intended) for busty/curvy ladies who don't want to roll their own (paying homage to 4/20 today hahaha!). It should be very easy to get a great tee with a more modern fit than most other commercial tee patterns right out of the envelope. Just heed the possibility of a wide neckline. Oh, and maybe slim sleeves. They looked on the smaller side to me as I was tracing/cutting but I'm withholding final judgment since I haven't actually sewed up the sideseams/sleeves and tried it on yet.

The instructions look comprehensive and I love the 3/8" seam allowances. At the larger end of the plus pattern spectrum, that 3/8" seam allowance can make a real difference in pattern layout on fabric. Plus, it's just so much easier to sew and serge with a 3/8" SA. Jenny also says that there's a slight forward shoulder adjustment built-in. (This doesn't help me, of the erect posture brigade, but it might be of interest to you?)

I'm hoping to finish this up tonight and tomorrow night after work so I can then start on …


… Kwik Sew 3873. And yes, they still don't have the best illustrations/photos. But at least you can see the seamlines and I think it's going to be a fun summer dress with mix/match prints.The sleeves definitely need some de-frumping and KS has always run big in the armhole for me. If the Concord trial above is a win, I may just morph the two together (or if not, use my TNT).

Stay tuned. I promise I'll be back soon with an update on both.

Tuesday, April 12, 2016

Maria Denmark Kirsten Kimono Tee

A couple of weeks ago, Gillian of Crafting a Rainbow went on a tee bender, cutting and sewing four (4!!!) tees in less than a weekend. Me, I can barely sew four seams in a row lately. Anyway, Gillian's post inspired me to download and try the free Kirsten Kimono tee from Maria Denmark. It's only two pattern pieces (plus a neckband) and I would've had it finished last weekend had I not made a really boneheaded mistake at the finish line. More on that later. Anyway, here's the finished tee. I added an interfaced self-fabric sash to add some waist definition (and give me a place to hang my pass card at work).


I don't remember the exact sheet count for the PDF and the file isn't on this computer for me to check but it wasn't too many, and it went together quickly and with no alignment issues. (Edited to add: I've checked the pattern and it's 20 pages, 8 of which are instructions. So, only 12 pages to put together.) Seam allowances are not included but it was easy enough to add them with my rotary blade attachment as I cut out the pattern.


I went back and forth over sizing and in the end picked too big for the neck/shoulders. I ended up adding two pleats to the center front to take up the excess. No big deal on the finished top, as they look intentional. However, the pic below is NOT the finished top. I thought it was nearly done last weekend, until I realized that I had mixed up the back and front and those pleats below are really the back. (See the shoulder seams riding "forward"?) Of course, I didn't realize my mistake until after I had attached and coverstitched the neckband. I ripped it all out and was able to finally finish it this past weekend. It wasn't too traumatic, just frustrating to have to put off finishing for another week.


As I mentioned, the tee is only two pieces - a front and a back so not too complicated. But one part that was a nice surprise was how well the underarm hem turned under. Often on dolman/kimono sleeves, the underarm hem has to be fudged when it doesn't turn under evenly. Not so here. (The coverstitching looks a little messy because you're seeing my ending threads run under the loops.)


The finished tee, this time with the pleats in front. The next time I make this, I'll narrow the upper width so I can eliminate the pleats, although I do like them on this top for little interest. All in all, a great fast project and pattern, or it would've been if I didn't mix up front and back the first go-round. And, hey, FREE!


And for a parting shot, if you follow me on Instagram (link upper left), you'll have already seen this photo of the grasshoppers that have invaded my neighbor's yard. They're cool and ewww at the same time.