Wednesday, November 15, 2023

Finished Fringes on me

Not my best photography (is there such a thing for me?), but also not on Zillie so there's that. 

Here are my finished Chalk & Notch Fringe dresses on me in mirror shots. That harsh overhead lighting and shadows for the Fringe #2 pics are doing me no favors, but whatever. I've now grown too old to care. Much. Hah. 
I wish this fabric would hold up, but it's just not going to. I suspect I'll be retiring it after a few more trips through the laundry cycle. I'll reclaim those buttons when it goes.
This fabric is so much nicer, but it definitely feels a little heavier to wear. Both dresses are extremely comfortable since they are loose fit and flowy. Perfect for the very warm days we're still having. (What happened to that cold spell that was predicted?) This should be the last you'll see of the Fringe dress for a while. But it's a keeper and an easy sew, so it might pop up again after the navy dotty version dies.
Cyrus, as usual, is pretty much Velcro'd to me and you can almost see him behind me. He's such a cuddle.
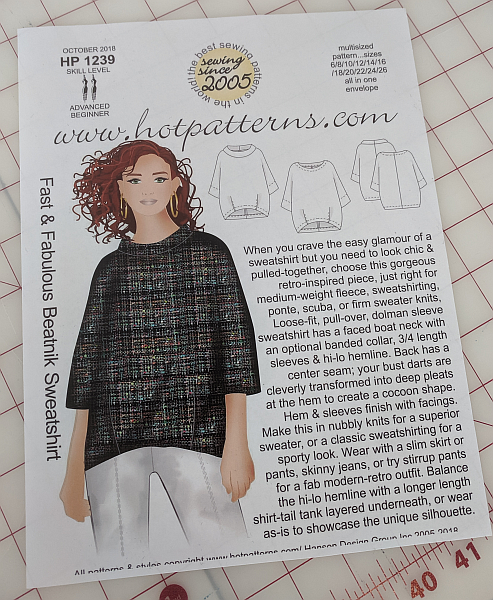
I'm just about finished with the HP Beatnik top but I'm not loving it on me. It's very boxy. I'll finish it and it will be a house sweatshirt, which is needed because my made-for-Florida house gets pretty cold on cold days when we have them. And we do always have them.

Monday, November 6, 2023

Second verse, better than the first - Another C&N Fringe Dress

While my sewjo didn't disappear again, it was having a severe case of analysis paralysis. I just could NOT decide what I wanted/needed to make next. I have so many things I want to make that I can't make up my mind (sound familiar?).

After making my first Chalk & Notch Fringe Dress, I had pulled out a much nicer quality cut of rayon to make a second Fringe Dress, but I kept telling myself I didn't need a second one quite so soon. But then I couldn't decide what to make instead and this fabric and my pattern languished on my cutting table, whispering to me. Since I wasn't coming up with an alternative, I finally decided to just give in  to the whispers and make the darn thing. Here it is. 
I'm not sure where the fabric came from at this point. Fabricmart? Fabric.com (RIP)? It's been in the stash for years. But it's much, much nicer than the navy dotty challis from the first Fringe. This one is a black rayon crepe with ivory herbs? (no idea) printed on it. In person, they do read as a horizontal and vertical pattern so I cut the front bodice pieces single layer to match the print. I think I did pretty well.  
Since I was topstitching the facing, I wanted it to actually show, so I used a matching ivory/beige thread for the facing, and the sleeve cuffs. I went back to black thread for the skirt-to-bodice seam and bottom hem since I didn't think those needed to be quite so visual. Plus, I was playing thread chicken with the ivory and the bottom hem is fairly long. The buttons are silver metal from the button stash. I only had 4 so 4 it was. They are non-functioning since this dress goes on over my head. Which means I still haven't sewn buttonholes on my new machine. 
And apparently the sewjo knew best since the Fringe #1 is already showing wear/tear. I knew this fabric wasn't going to last. I have an identical cut but with an olive green background. It's not going to get anywhere near a final version of anything and will be regulated to muslin status. I'm disappointed because I really like the navy version, so I'll be on the look out for a similar but high quality fabric for a future Fringe #3. 
Next up is what I hope to be a very quick HP Beatnik sweatshirt since the temps are dropping here in Florida next week to a frigid 50ish (ha!) and I don't have sweatshirts I want to wear out of the house. I'm going to lengthen the sleeves and probably narrow the neckline and attach ribbing. 

Monday, October 9, 2023

Boring Basic

I know many sewists don't like sewing basics, but, truthfully, making basics is one reason I'm back in the sewing room. No, basics are not exciting blog content. But they sure are workhorses in my closet. I have a RTW plain(ish) black top that I've never loved even though I wear it a lot to the office because most of my office wardrobe is pretty much a take on basic and/or black these days due to a relaxed dress code and opting for comfort over "fashion." It's been way past time that I make a plain black top I actually like.

So, I present my 6 zillionth TNT Ottobre tee (view 4 with the gathered front). This pattern is now 16+ years old and still going strong, both on my cutting table and in my closet. I have more than a few I still wear from when I started making them 16 years ago. (Gotta love indestructible polyester haha!) And if I haven't sewn a knit top directly from one of the multiple views of this pattern, I've used it to fit most any other tee I've sewn.  
(In the pic above, the arrow is pointing to fabric I'm planning to use next for a skirt. It will be another boring project, but I imagine I'll get a lot of wear out of that too.)

This is what this particular 02/2007 Ottobre Woman issue looks like. It's actually still available, only in Dutch, on the Ottobre website here. I'm pretty sure I'd still wear most everything in this issue. I really should revisit it now that I've re-stocked my tracing paper.
I went "old school" with this top and used a neckline band instead of a binding.
And as usual, I coverstitched the bottom and sleeve hems. Which leads to …
… this little doo-dad. I've seen these hem guides a few places on the interwebs lately, and being the notions collector fiend that I am, it was soon in my Amazon cart and on its way to my sewing room. Yes, a stack of Post-Its still works just as well, but this looks cooler. :-) 
The package comes with two guides, which can interlock or not, and a little clear ruler grid if you want to set the guide up at a measured distance from your needle, which is probably more useful on a sewing machine and not a coverstitch machine. The guides have a removeable, and renewable, stickiness on the back to attach harmlessly to your machine bed. Here's the Amazon link so you can check it out (which is an affiliate link so I might make a fraction of a fraction of a penny if you happen to buy one from the link).
As you can also see in my hemming pic, I've finally found a good use for the sewing clips I bought a while back. I mostly press and coverstitch hems by eye but I usually use a few pins to hold things in place. Except some of the pins inevitably fall out as I'm going around the hem. These clips are a perfect replacement. Old habits die hard so I find the clips are still not as quick to use as pins in most of the rest of my sewing and they had pretty much been collecting dust. I'm glad to put them to use at last.

Sunday, October 1, 2023

Chalk and Notch Fringe Dress - Finished

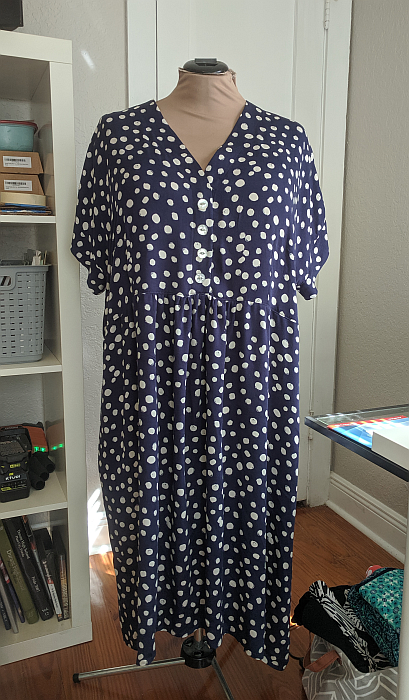
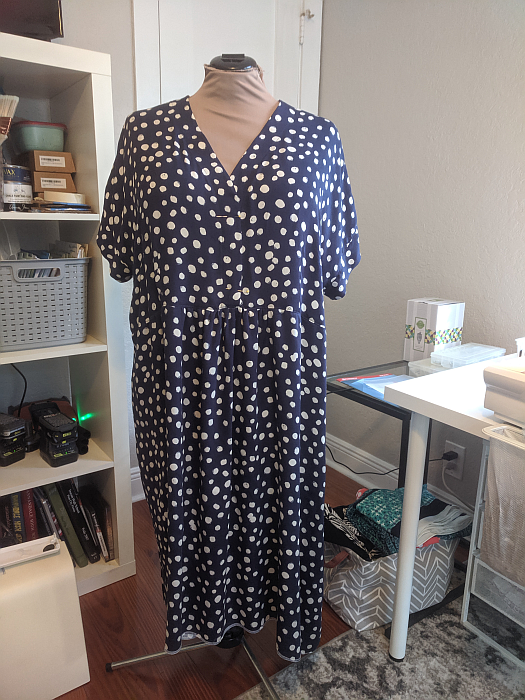
My Fringe Dress is done, and overall I like it. I'm still not loving the fabric though. The print/color is good. But the fabric quality is just OK. It's very drapey and comfortable, though I expect it to wear out quickly.
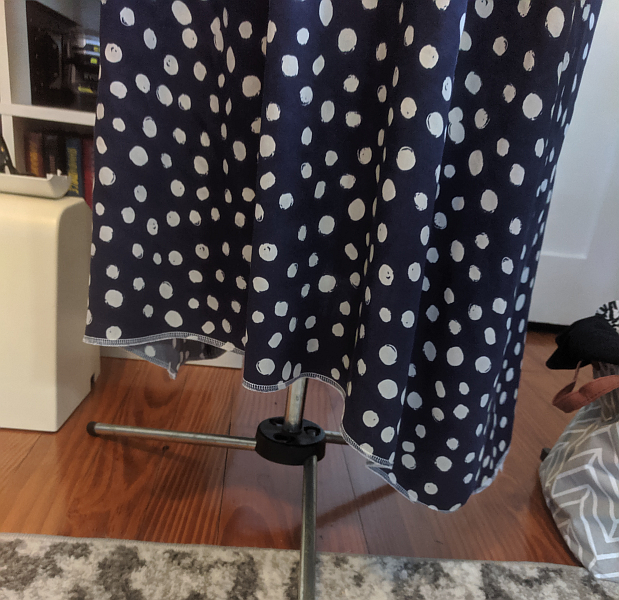
The dress sat in Time Out for a week because the bottom edge just seemed so uneven and I didn't want to deal with trying to even it out. (I had eliminated the curved up sides of the pattern and just squared off the hem but that wasn't a factor.)
Here's another view. It looks like the sides of the dress are hanging much lower than the front/back.
Well, today I had the brilliant idea to finally try on the darn dress. And, guess what? The bottom edge hangs MUCH straighter on my actual body and not Zillie's. The dolman sleeves without arms in them made the sides of the dress hang lower. It's obvious NOW, but when I was looking it on Zillie, all I could see was the floppy unevenness, hence the Time Out. 
I decided that any residual unevenness is not obvious when I'm wearing it, so I just hemmed it, added buttons, and called it Done. (Do you see my Cyrus—aka Velcro—behind me?)

Here's the back view. (I really need to fix Zillie's tilt.)
The inseam pockets.
And the sleeve "cuffs" that are the View B sleeves bands, which aren't really cuffed and there are no tabs. I didn't want to fiddle with those.
I also didn't want to fiddle with buttonholes. The dress fits over my head fine so I just sewed the buttons on, by machine, through all the layers. 
Before I get into my very few quibbles, I'll say the pattern goes together very well, I like it, and I'm sure I'll make it again. Now here we go on the quibbles …

The PDF prints in landscape orientation and I found that kind of awkward. It's not a deal breaker and I know I'm being nit-picky, but I do wish at least the instructions were portrait oriented. It's just what feels "normal" to me. I kept reading the left side of the page top to the bottom and then the right side, like columns and not rows, and the instructions are oriented in rows not columns, so I was reading out of numerical order and had to keep self-correcting.

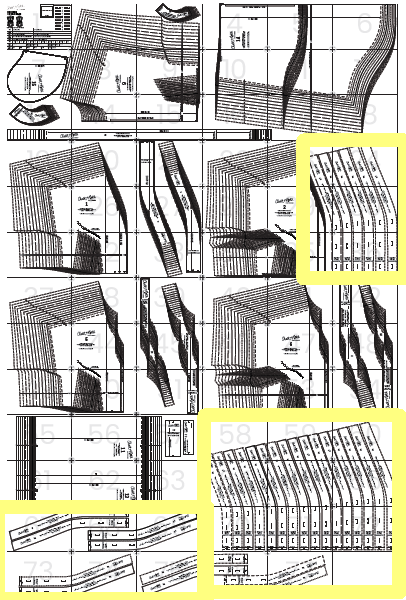
I found it completely ridiculous that there are about 20 pages devoted to patterns for interfacing. (Outlined in yellow below.)
And even if you deselect those sizes in the layers tab of Acrobat, the interfacing pages still print with the page outlines and number watermarks. Yes, I could have checked and done a custom page selection before clicking Print but since I print at the office, I tend to just print everything because I blend between sizes and I want to be sure I don't miss something. Even with the "key" telling you what to print for certain sizes, it's difficult to know which pages are actual pattern pieces and which are interfacing pieces. If you're using your own printing supplies, you may want to check what pages you can eliminate from printing. Twenty extra is a lot.

After all that, I didn't even use the interfacing patterns, preferring instead to block fuse my interfacing to my fabric and cut out the facing pieces that way. The instructions have you fuse the interfacing to the garment wrong side instead of to the facings, although fusing to the facings is an "option" mentioned. Fusing to the garment side of things is way too fiddley for me, especially with this floppy rayon challis. (See here if I didn't explain well.) I'll also mention that the interfacing pattern pieces do not include seam allowances, which can be good in theory but extra fiddley to place accurately. Also, you shouldn't be using interfacing on this dress that is thick/firm enough to be a problem in the seam allowances so I think eliminating the seam allowances from the interfacing pieces is not really necessary here. Plus, I *like* the interfacing to go to the edge of my facings, especially on fabric that ravels when you just look at it sideways. And I don't turn under the edges of my facings - I just overlock/serge those suckers, at least for non-fancy stuff like this. So I guess what I'm saying is the instructions are fancier than I sew. Haha.

But the instructions overall are good. Not too verbose and well-illustrated with diagrams/drawings. If you prefer photo instructions or want more fitting help, there's also very good extra information on C&N's sew along pages, here.

Like I said above, I do want to make this again and I like the pattern. Any negatives I've detailed above are not show stoppers and are easily remedied or overlooked. I also hope to get a decent pic of me in this one, but who knows when that will happen. 

Question(s) of the Day: Do any of you watch sewing channels on You Tube? Who are your favorites? I have a few but I'm always looking for new ones. I miss the sewing shows from PBS. Sandra and Nancy and Shirley were gems, weren't they?

Monday, September 25, 2023

Quickie Update

I was able to get the Chalk & Notch Fringe dress pattern put together and cut out on Friday and over the weekend. I even started sewing it yesterday.
So far, so good. But I think I hate the fabric and if I continue to hate it, this will be a muslin/toile. The fabric is more lightweight than I was expecting, which I could work with, but it also seems kind of low quality. By that I mean that it just seems like it will fade and show wear fairly quickly. Just a hunch. Hopefully, I'm wrong.

The pattern, on the other hand, seems good. Everything is going together nicely so far. I do have a few opinions (surprised?) which I'll detail whenever I make a final post about this dress. Nothing really bad at all — just my own preferences on some things. 

So now that the sewjo is back, I'm seeing all sorts of things I want to make and there's not enough time in my days. One thing on the short list is this Double Vision glasses case for toting two pairs of glasses in one case. I'm always juggling between my prescription sunglasses and regular glasses and it would be nice to have a pretty single case instead of two ugly boxy ones. The boxy ones are good for protection but I'm not actually going anywhere where I'm slamming down my purse, so an interfaced fabric case should be fine to protect my eyewear from lens scratches while inside my purse. I'm not sure exactly how I ran across this pattern, probably from looking at the designer's sewing room tour on YouTube. But the pattern is only $2.95 and the video tutorial looks like it will be a fast and easy project. Also, good Christmas gift for my sister. I'm not affiliated or anything — just sharing. Wawak has all the interfacings/notions needed, which I ordered (and which brought the cost of the $2.95 pattern up substantially. Haha.). I'm sure I have plenty of quilting cottons in the stash that will work fine for this so at least I'm "saving money" on that part. 
Parting shot: My table in the midst of a project. I need to figure out a second surface for this room so I'm not constantly moving things on/off the cutting table. Maybe a bookcase to the left with a couple of empty shelves for in-progress stuff. I've already filled up the shelves below the table.