The new sewing room has officially been used to make something ... other than a mess. Woo hoo! I love all the room to spread out in there. This was an easy project but that's just what I needed right now after the busy week of moving things in and around, plus the usual football Team Mom duties.
This tee is for DS#2 and is made with my TNT (tried and true) tee pattern for my sons, Kwik Sew 3299. He doesn't know I've been making it so he'll have a surprise when he wakes up tomorrow. Since tomorrow is a Game Day (for his brother's Varsity team), I'm not sure if he'll wear this or a football theme tee shirt. We'll see. I won't be insulted if he chooses the latter. (5 AM Update: He chose the Metallica tee!)
Once again, I used my favorite "embellishing" trick for my teen sons' mom-made tees — iron-on transfer paper for dark colors. I love this stuff because it has an opaque white background. Anything white in the image stays white after it's ironed on to the fabric. Most transfer papers have "show through" where white would be and are best used on plain white fabric. This paper gives results much more like screen printing and you can use it on any color, even black. It also washes well and the print colors don't fade. I made the first tee shirts using this transfer paper a couple of years ago and they are still in great shape. My review for this pattern is here.
I used to buy Epson brand transfer paper at Office Depot until they stopped carrying it or Epson stopped making it — I'm not sure which. I bought my last supply at http://www.printonit.com/ (NAYY). I bought 50 sheets for about $1/sheet. I can usually get two designs per sheet if I lay them out carefully. Still, the fabric was "free" since it's been in my stash forever and the pattern has been used many times making it nearly free too ... so $1 for a design paper is pretty cheap I think (especially if you add in the "looks RTW and not homemade" factor). If you don't want to spend $50, you can also buy in smaller quantities for just a tiny bit more per sheet. (Hmmmm. Maybe I should think about coop-ing this stuff.)
Here's a close-up of the design. I grabbed my sharp, pointy embroidery scissors, plopped myself down in a chair, and custom cut the design to incorporate the dripping outline. I think it turned out pretty darn cool.

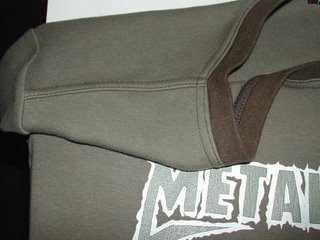
The colors are a bit off in the photos. In reality, it's an olive drab tee with a darker olive rib at the neck and the inside of the transfer design matches the tee fabric perfectly. From a short distance it looks like an outline instead of a filled shape.
Here's another close-up showing the contrast coverstitching around the neckline and shoulder seams. Gosh, I love that little coverstitch machine!
 As for the sewing room ... boy is it ever nice to walk to my pattern notebooks, pick out a pattern, pull it from the drawer, cut my fabric, sew, press, serge and coverstitch ALL IN THE SAME ROOM!


Awesome! I love how you cut the transfer paper. Neat idea. Where was my invitation though to the christening? ;-)
ReplyDeleteHi Debbie,
ReplyDeleteFabulous blog and GORGEOUS T-shirt, darling!
Carry on...
Debbie - I want more pictures of your room! I really thought that was a purchased t. What was I thinking? Looks great and I bet your son loves it and all his friends want one (which is always the way to tell if a Made-By-Mom item is a hit!).
ReplyDeleteCongrats on getting moved in.
Great looking Tee! Thanks for the link to the transfer paper.
ReplyDeleteI am so happy for you! Your room is done, organized, and in use! I think it is a marvelous playroom!
That shirt came out great! It's not fair - I finally got a serger this year, and I'm already lusting after a coverhemmer now! :) (And I still need to learn how to do more than just finish seam allowances with my serger.)
ReplyDeleteThe t-shirt is incredible. I love the transfer and your coverstitching is beautiful.
ReplyDeleteCongratulations on a very successful inaugural project! All the detailed tips are much appreciated, as always.
ReplyDeleteUnbelieveable - this is such a fantastic shirt. I can't believe you did this and I love the transfer. Your post also makes me realize that I really need a machine that does coverstitching.....
ReplyDeleteHi Debbie, the shirt looks great. You do a good job with t-shirts. You asked me a question about my dgd in sew4fun4kids. I made the jeans purse for dgd. The one in my pictures that is wearing the green shirt is not the one for whom the bag was made. I forgot to take my camera when she opened her purse at her birthday, but I will get a picture of her. She is older than the one in the green.
ReplyDeleteP. s. I love your blog. Mine is www.diannes-happenings.blogspot.com
I hope you will visit mine. I have a picture of all the grandchildren in it. I am still learning what to put where. Yours is great.
Dianne, from GA
Oh, mygosh, I'm overcome! Great Tees, awesome sewing room & wonderful blog! You are one busy lady! More later, I'm sure!
ReplyDelete